Freight Flow
Last updated: April 22, 2026
How to Process an E2E Freight Order in RetailReady
This article walks through the end-to-end Freight order flow in RetailReady, from preparing pallets, packing cartons, entering dimensions, completing the pallet rules checklist, creating a load in the RetailReady dashboard, and loading pallets onto the truck for shipment. Follow these steps each time you process a Freight order.
Pack SKUs
Navigate to the RetailReady App
Locate the RetailReady icon on your iPad home screen and tap it to open the app or click 'tablet mode' located on the left-side navigation panel on the RetailReady dashboard.
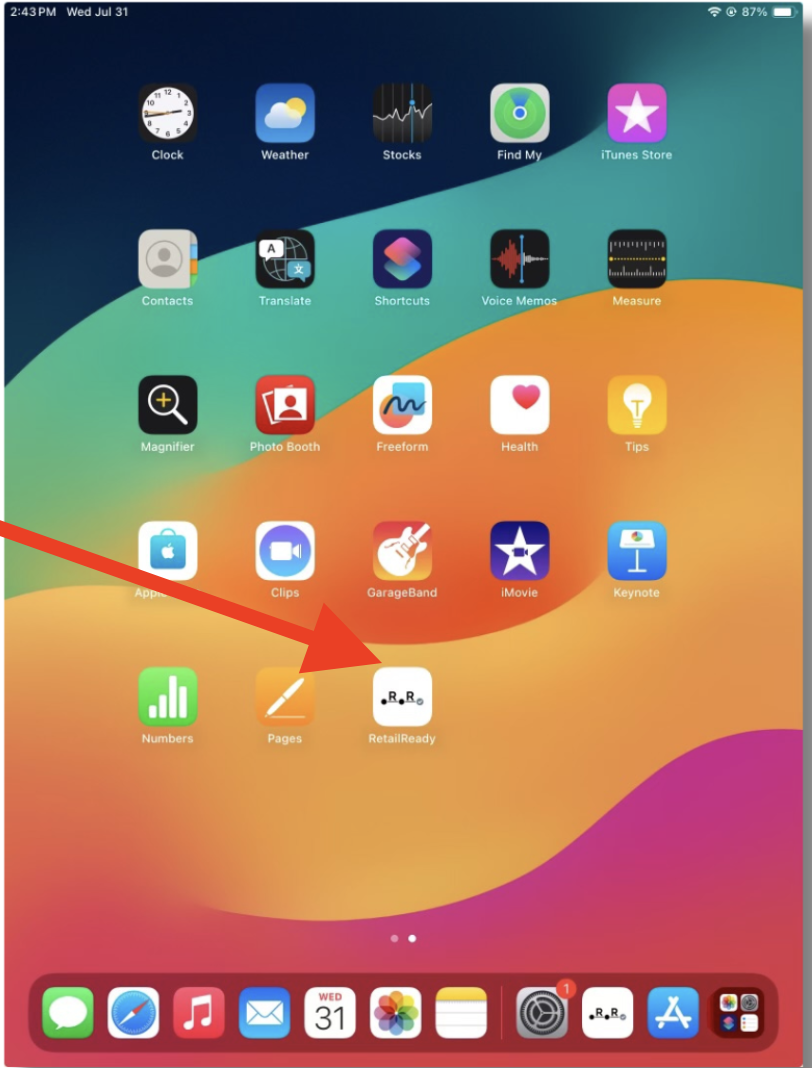
Log in with your credentials.
Enter your Email and Password, then tap 'Log In'.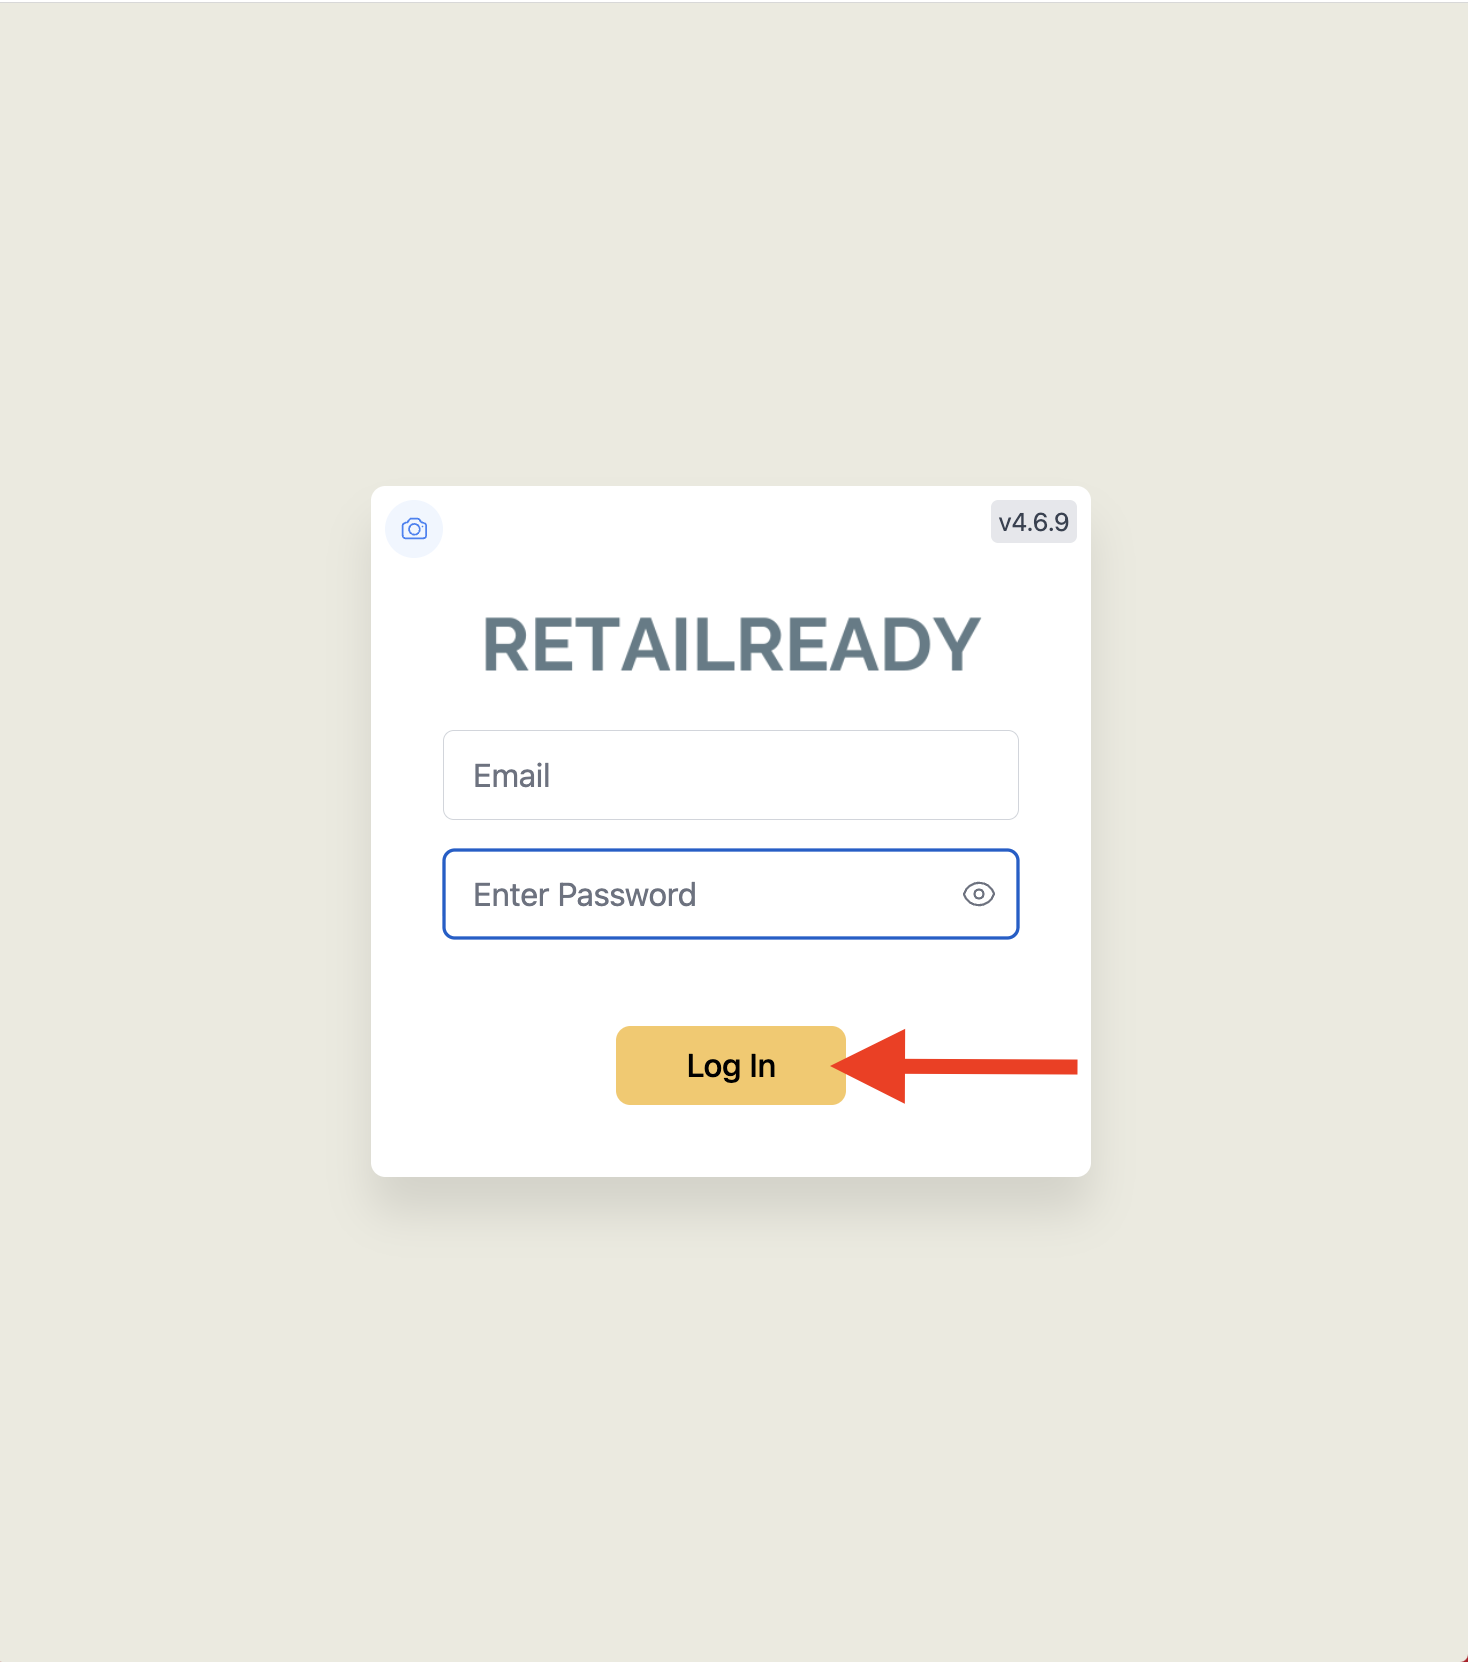
Select the printer you will be using.
After logging in, RetailReady will prompt you to select a printer. Tap the printer you'll be using for printing, then tap 'Continue'.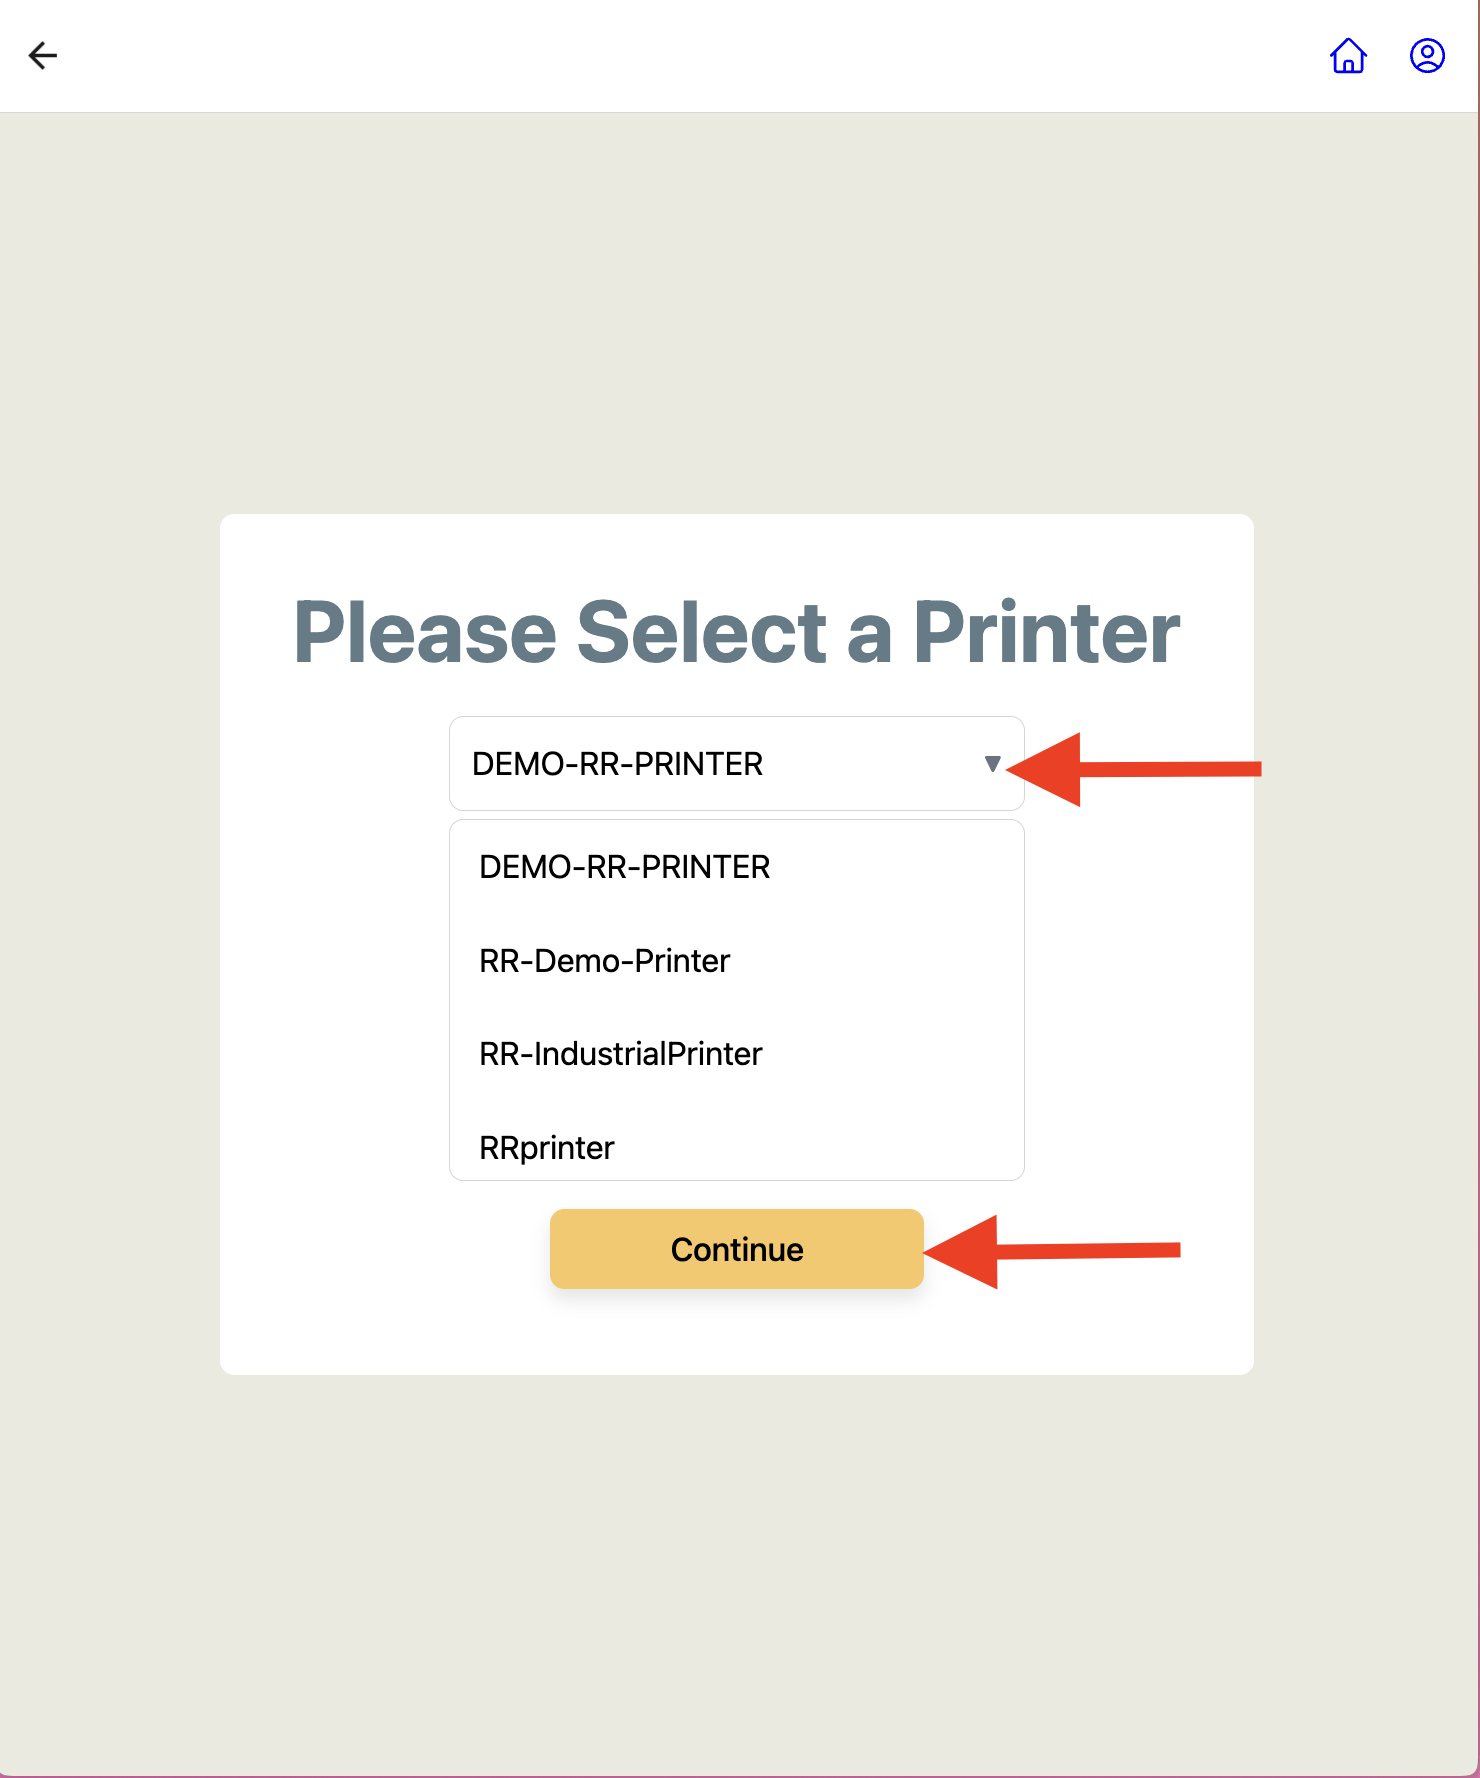
Scan or search for your order on the Get Started screen.
On the RetailReady home screen, tap the 'Scan Order, Carton, or Pallet' field and type the order number manually or click the camera icon to take a photo of the barcode of the order number.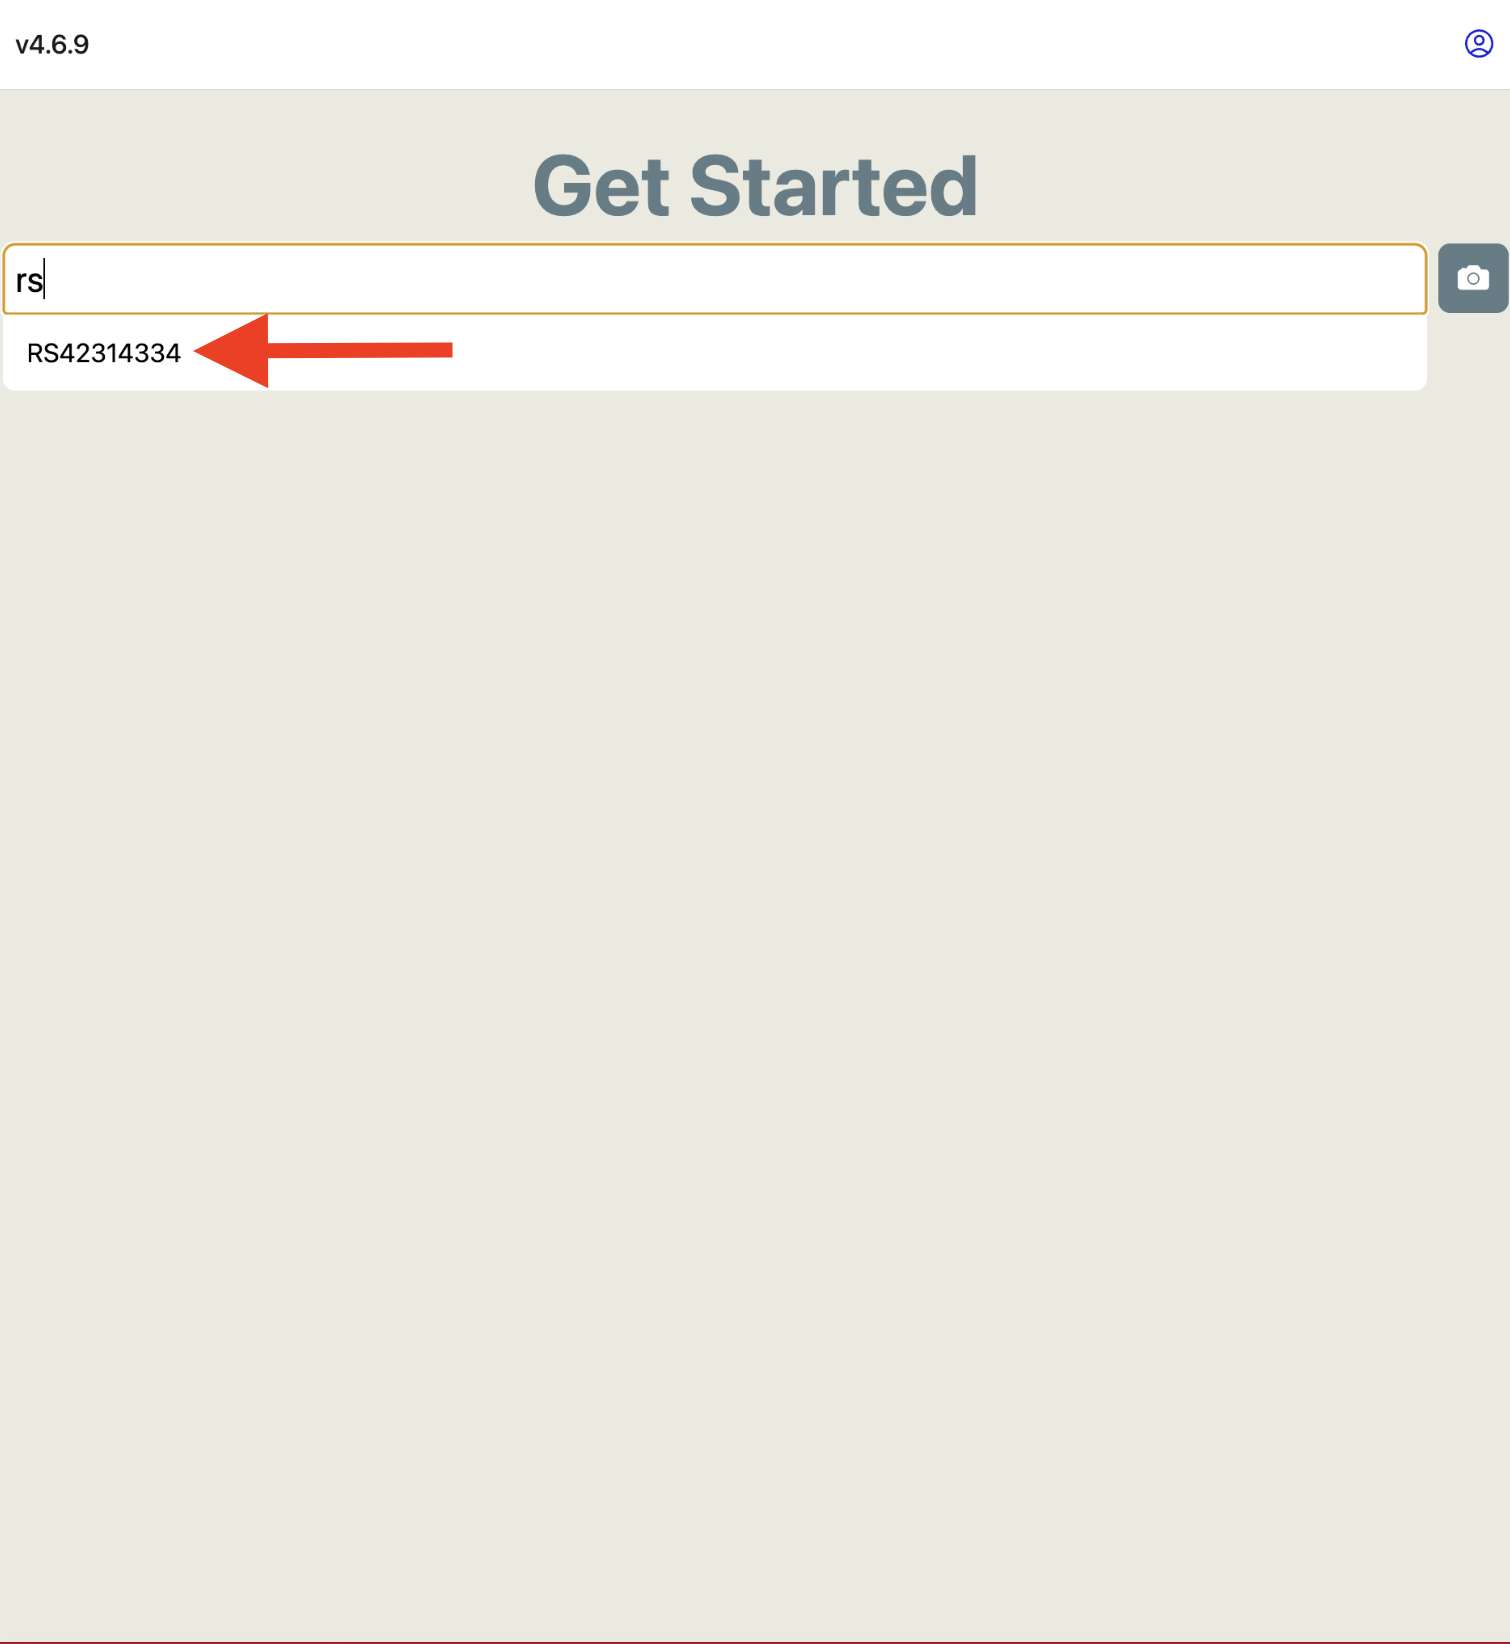
Review the order details and tap 'Begin Carton Packout'.
Confirm the Order ID, Merchant, and Retailer. The Freight order timeline shows six stages: Pack SKUs, Shipping Method: Freight, Stage Pallets, Create a load in RetailReady dashboard, Ship Order, and Order Completed. Tap 'Begin Carton Packout' to start.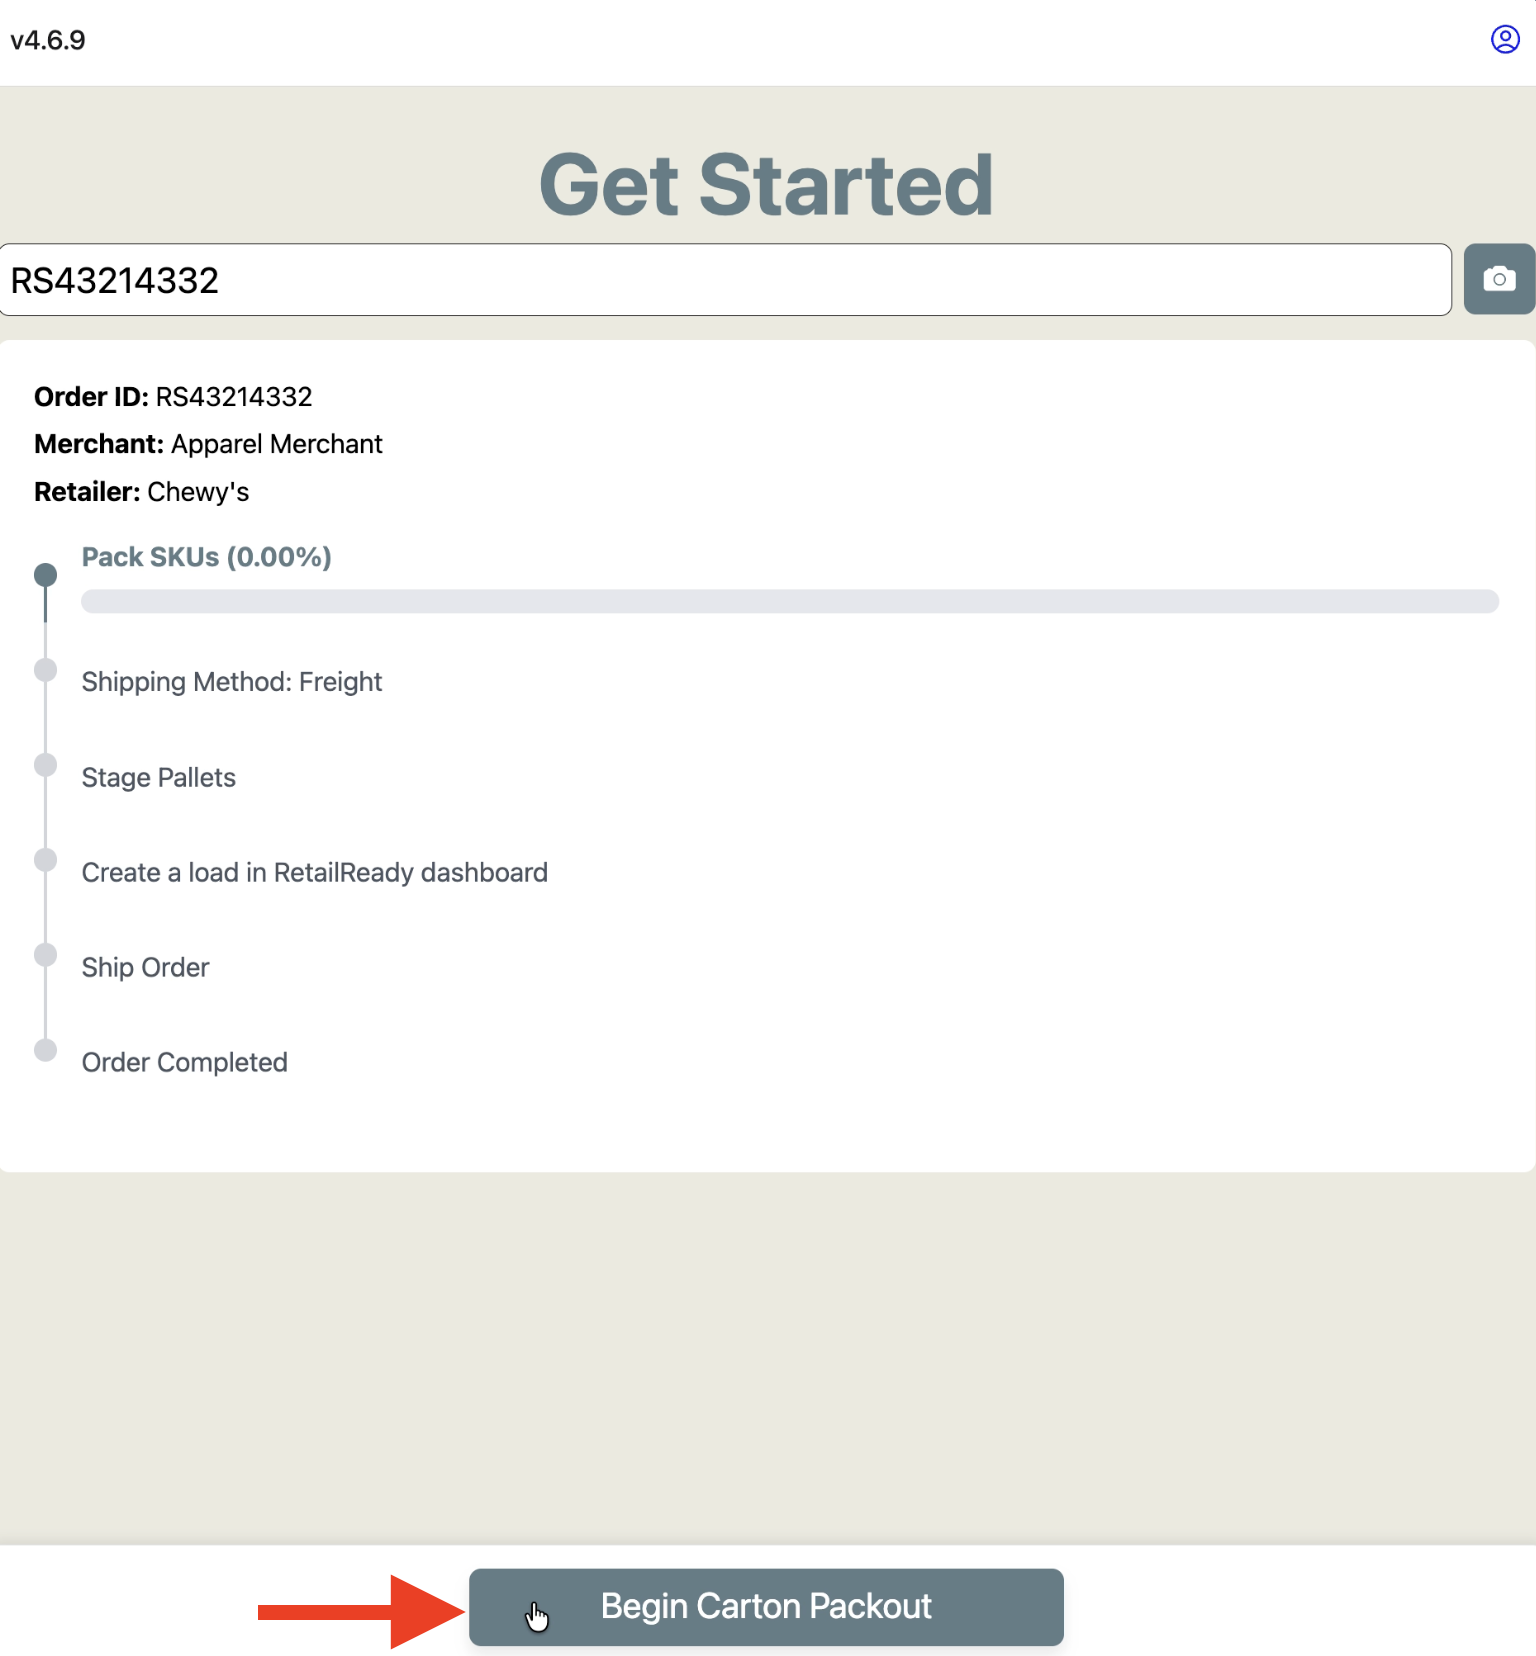
Select Your Transportation Method
This step only appears when no transportation information has been entered for this order in the RetailReady dashboard. You must select an option to move forward.
Need to enter transportation information? Transportation information can be entered at any time, either before starting packout or while an order is being processed. Use this link to learn how:📄 How to Enter Transportation Information (Freight)
Select "Parcel," "Freight," or "Choose Later" to proceed.
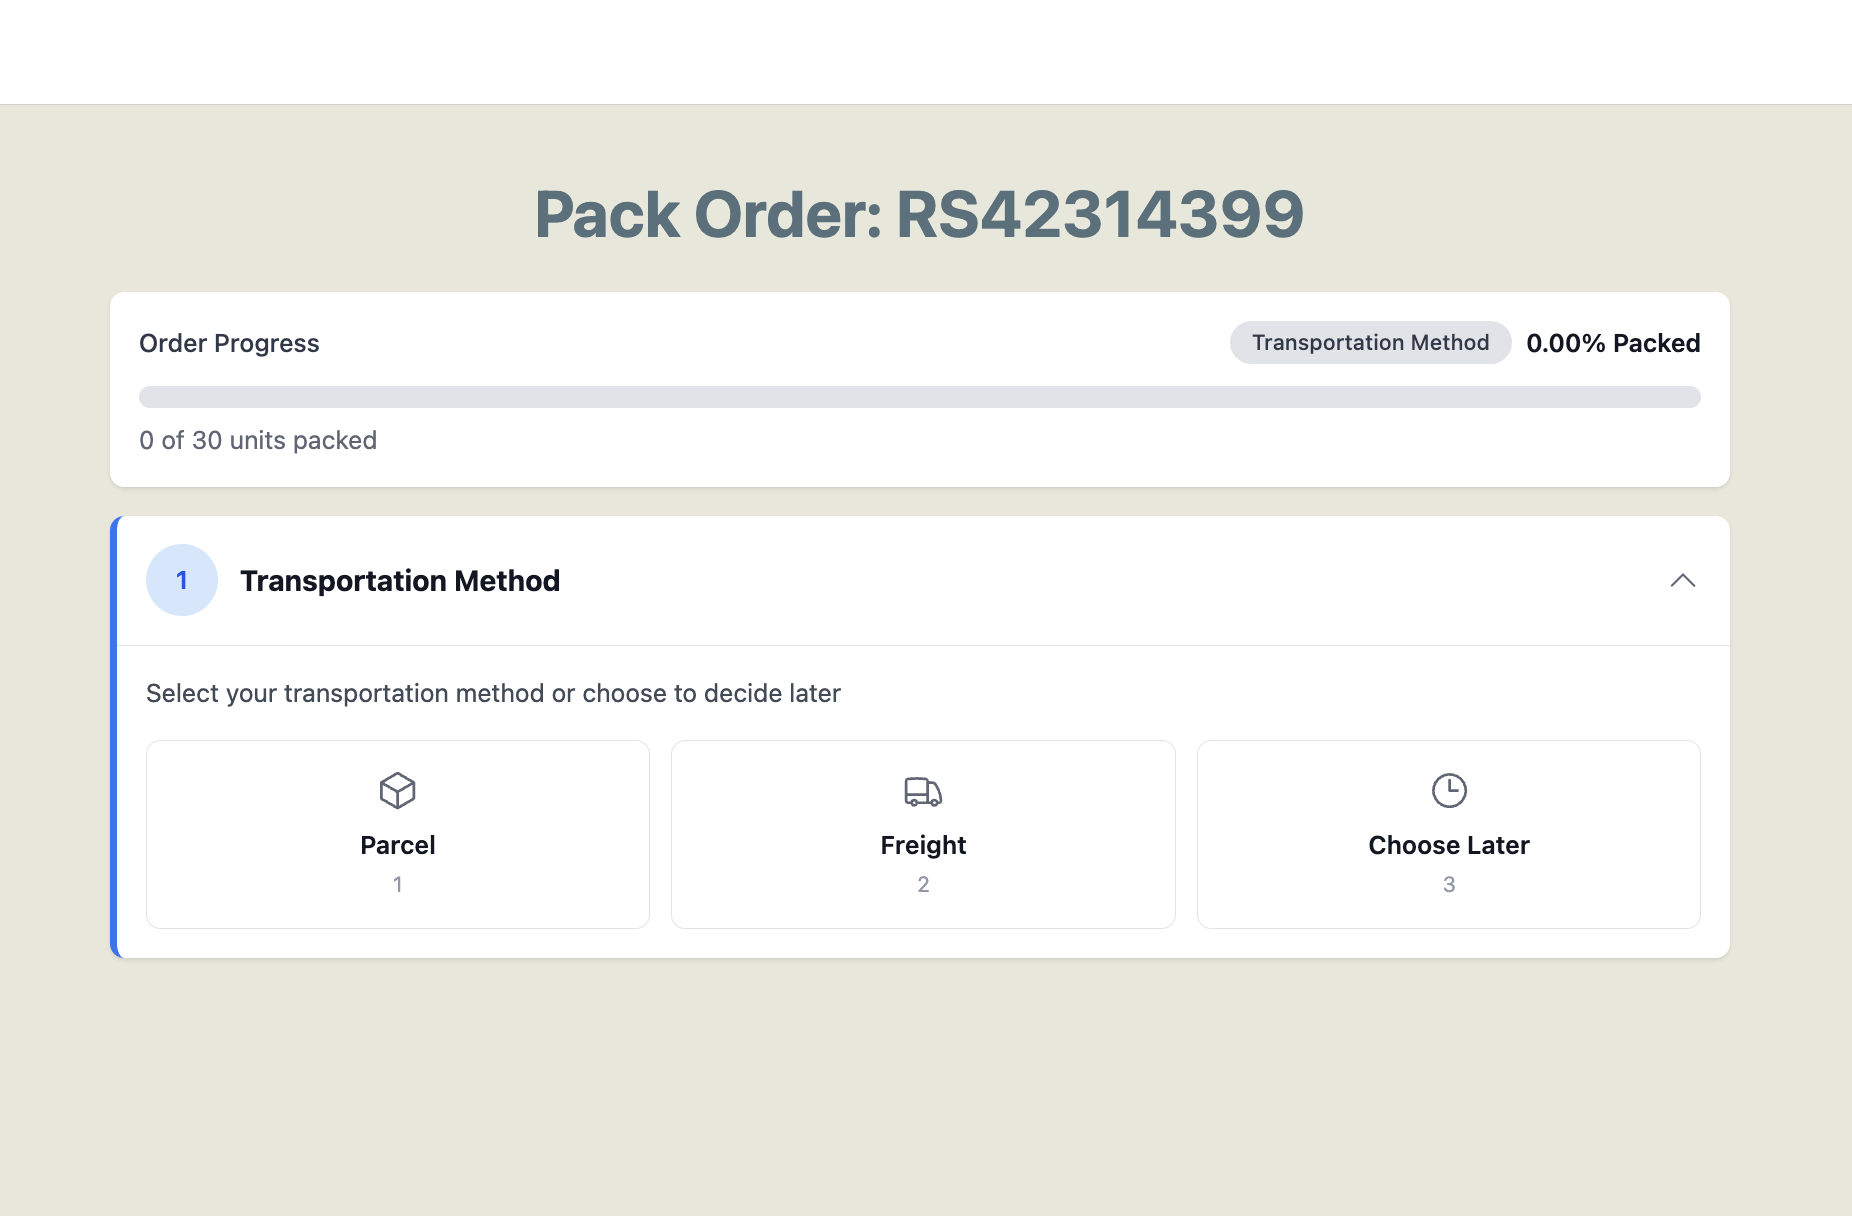
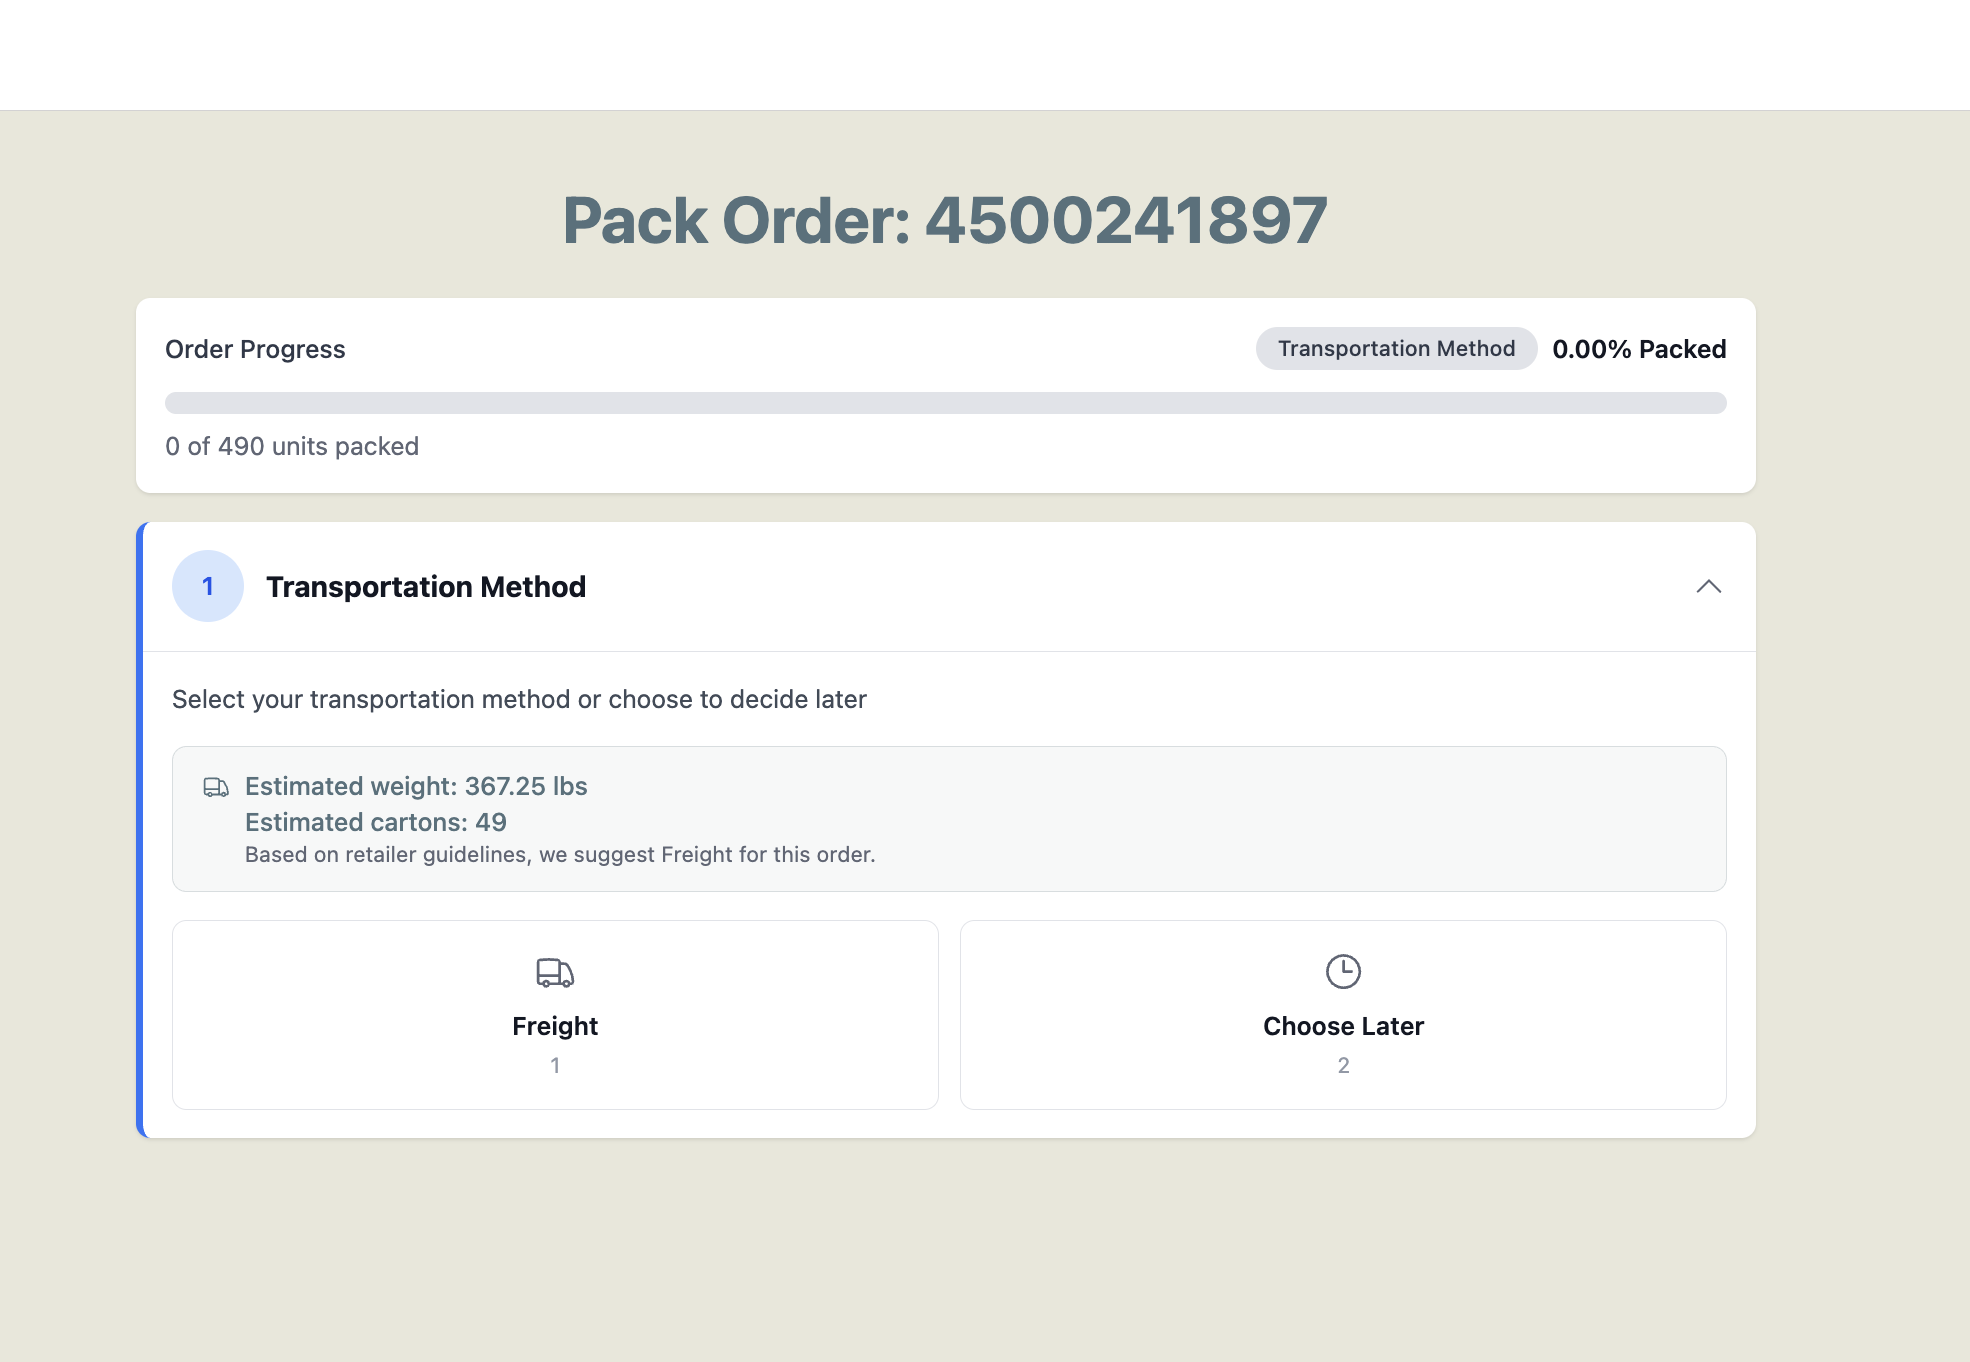
RetailReady can suggest a transportation method for you! If Parcel vs. Freight thresholds are entered in "Settings" > "Order Rules" > "Parcel vs Freight Rules" and case dimensions and weight are entered in the Item Master, RetailReady will display an estimated weight, estimated carton count, and a recommended transportation method for the order.
Prepare the pallet, grab a Grade A GMA pallet and tap 'Print Pallet QR Code'.
Prepare Pallet instructs you on the type of type to use and if any slip sheets are required. Tap 'Print Pallet QR Code' to print the pallet's QR label. If you are resuming an existing pallet, tap 'Or scan existing pallet to resume' instead.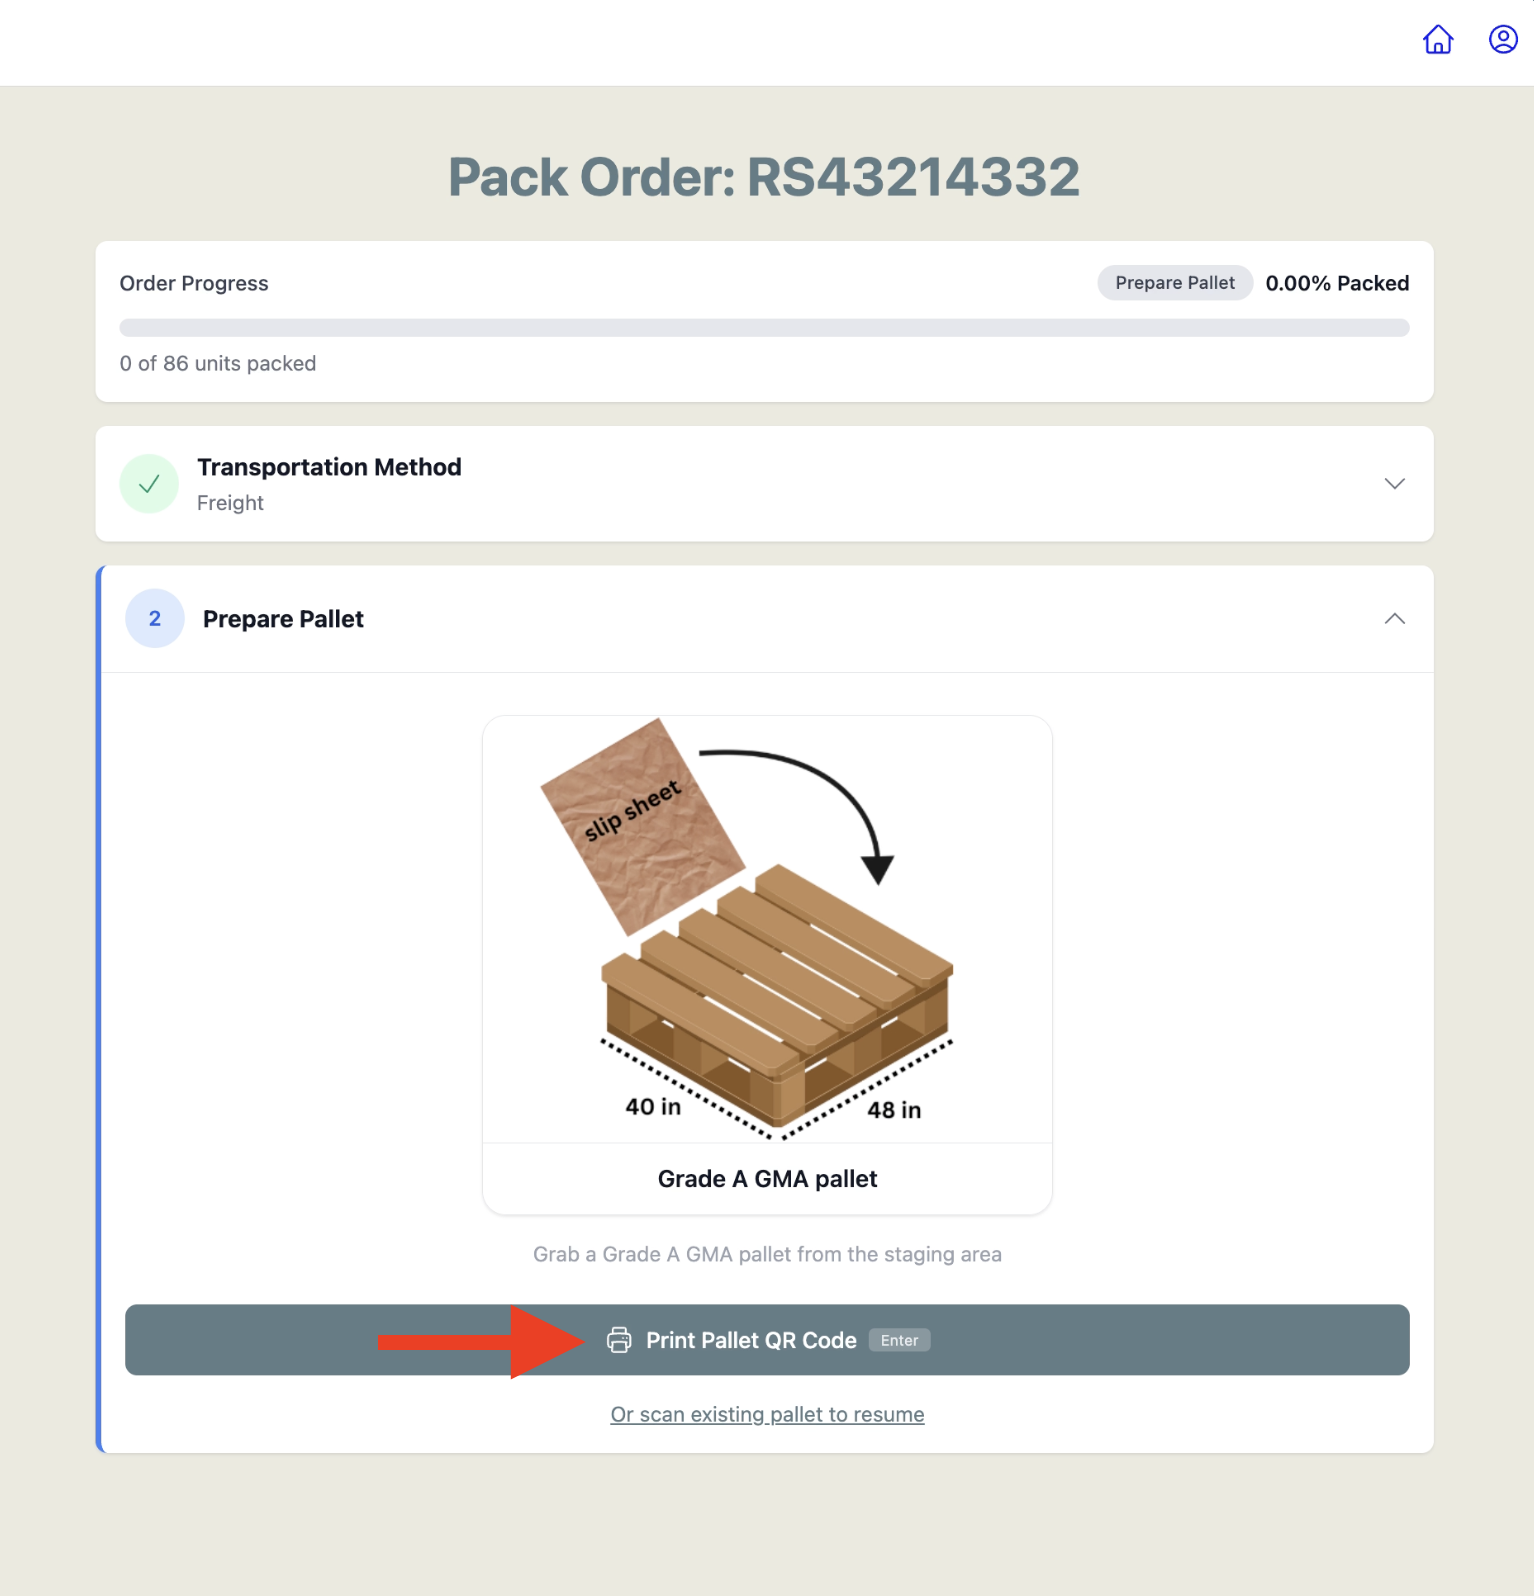
Apply the QR label to the pallet and tap 'Continue'.
After printing, RetailReady confirms the Pallet QR Code has printed and shows a diagram for placement of the QR code label. Apply the label as shown, then tap 'Continue'.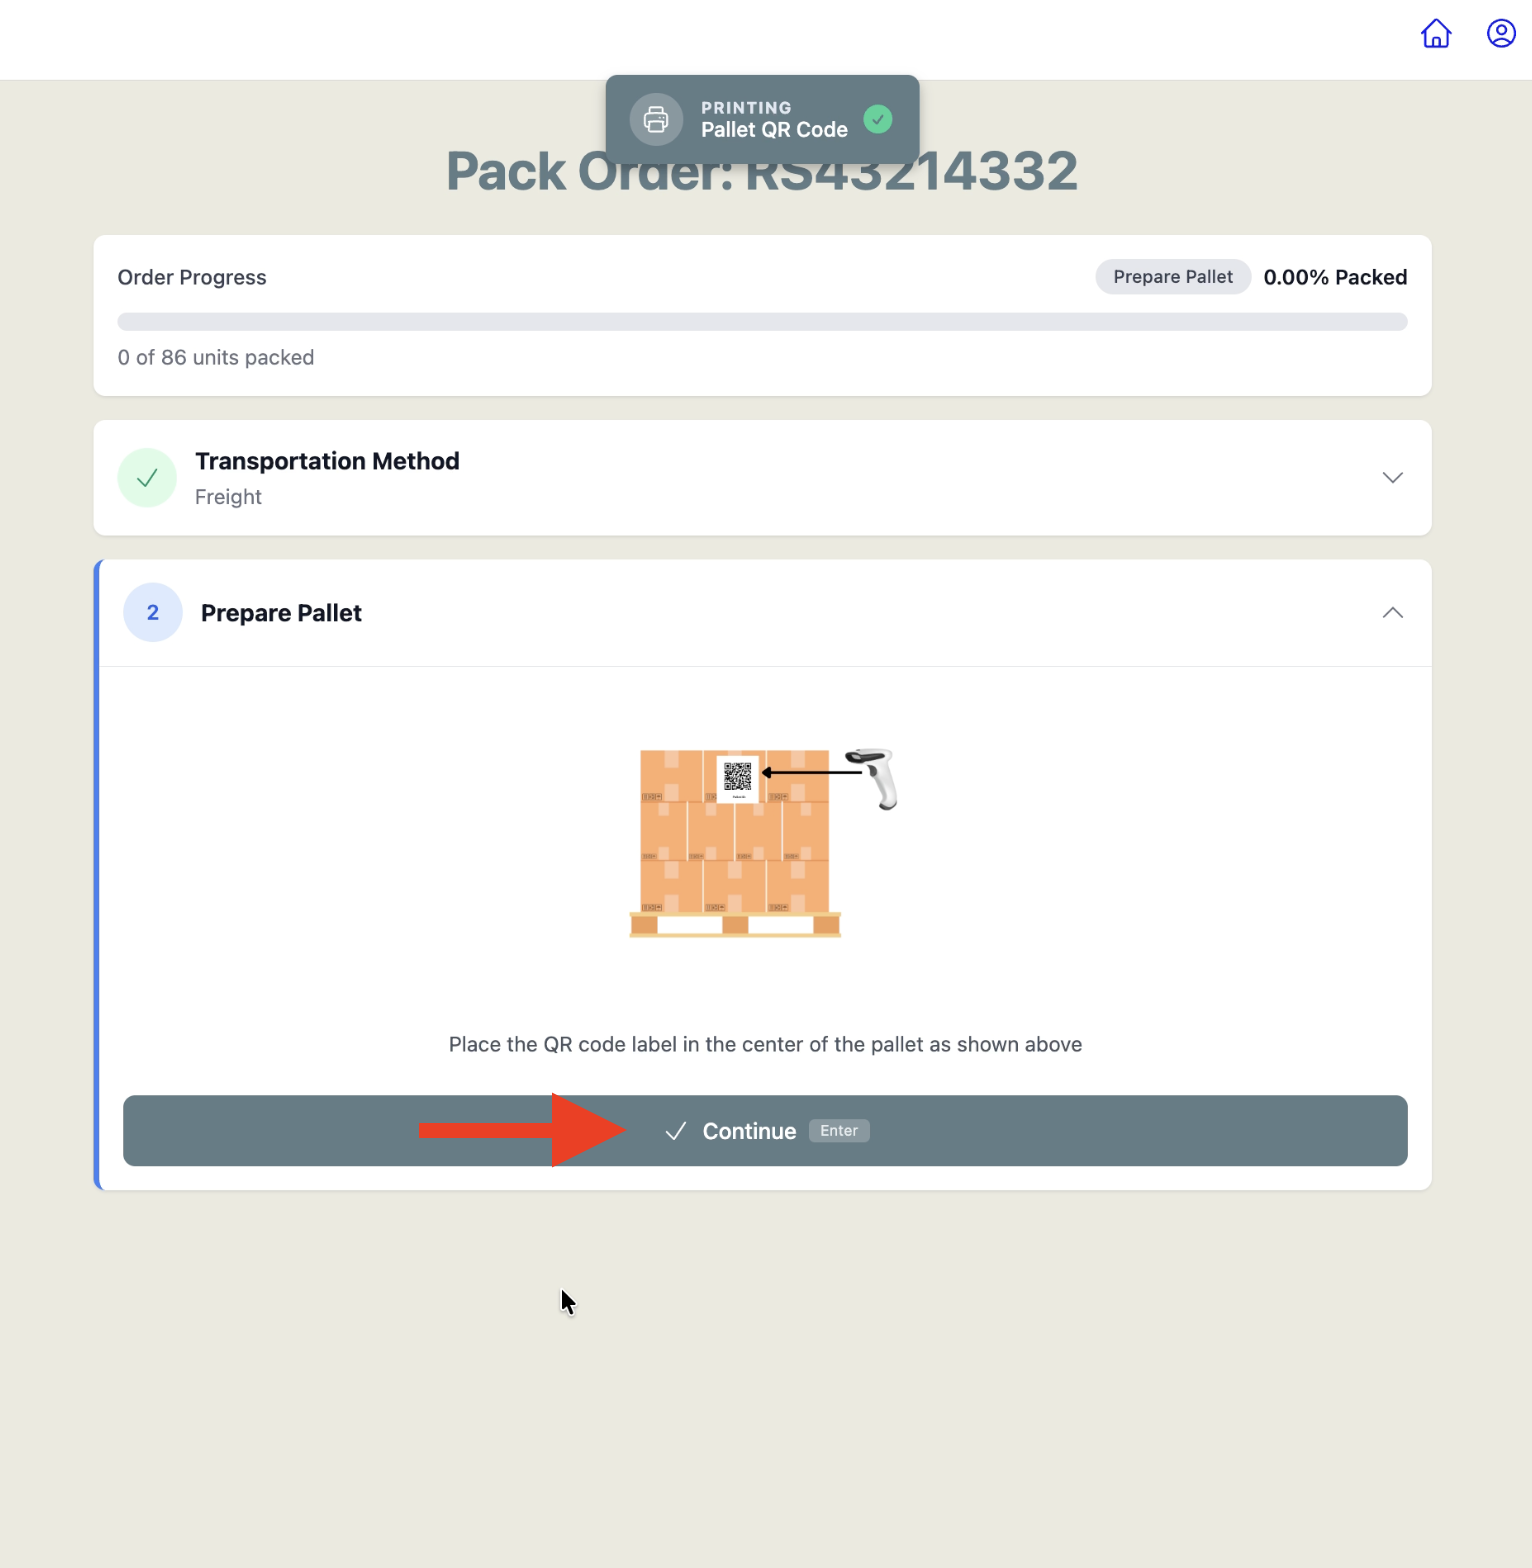
Scan the case barcode or UPC.
On the "Build Carton" screen, scan the case barcode or UPC using the built-in camera scanner, a Bluetooth scanner, or type it in manually using the 'Scan case barcode or UPC...' field. You can also tap 'View Order Contents' to see the full item list.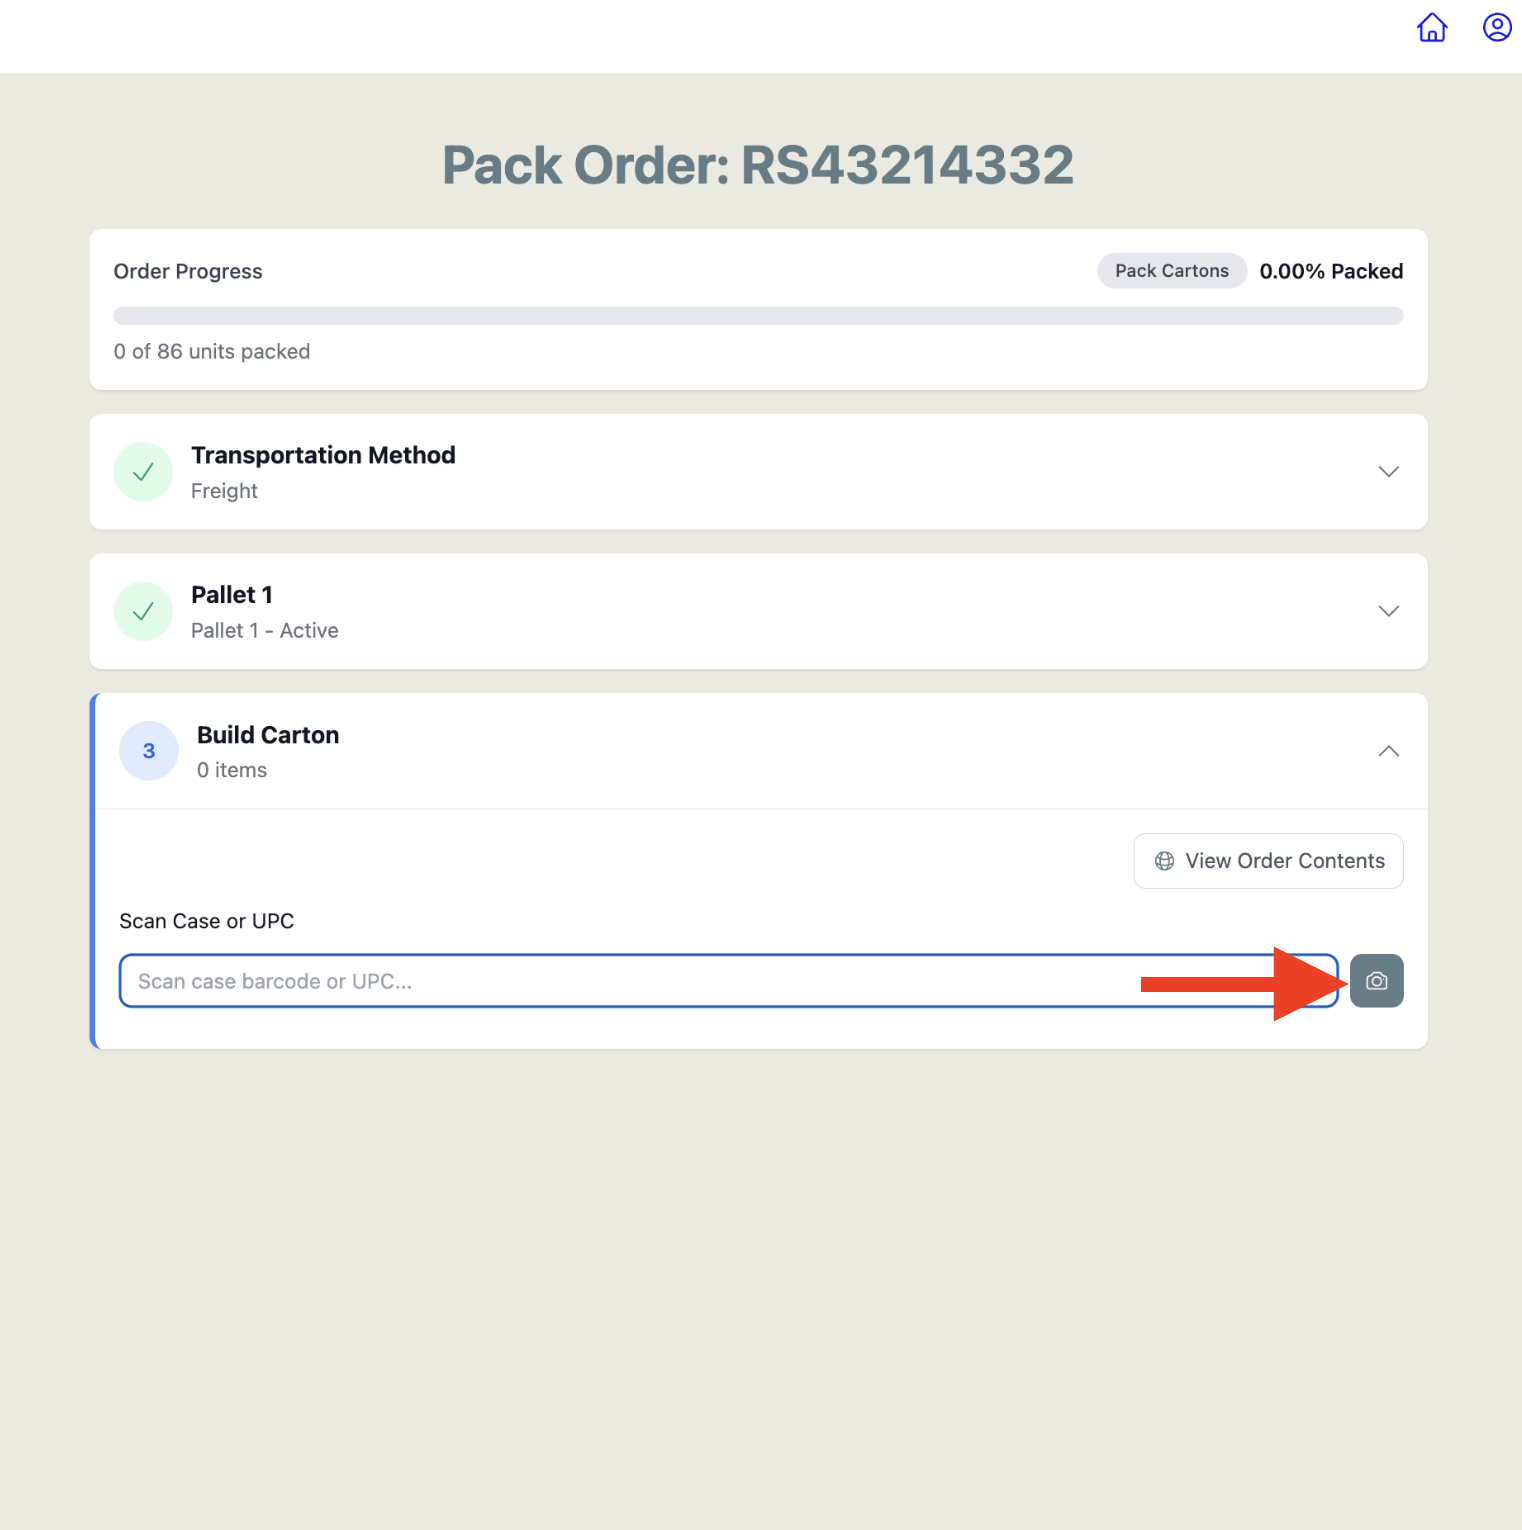
Enter SKU quantity and tap 'Continue with X item(s)'.
After scanning, the item appears under Carton Contents with a unit count. Adjust the quantity if needed or scan additional items. When ready, tap 'Continue with X item' (or press Enter).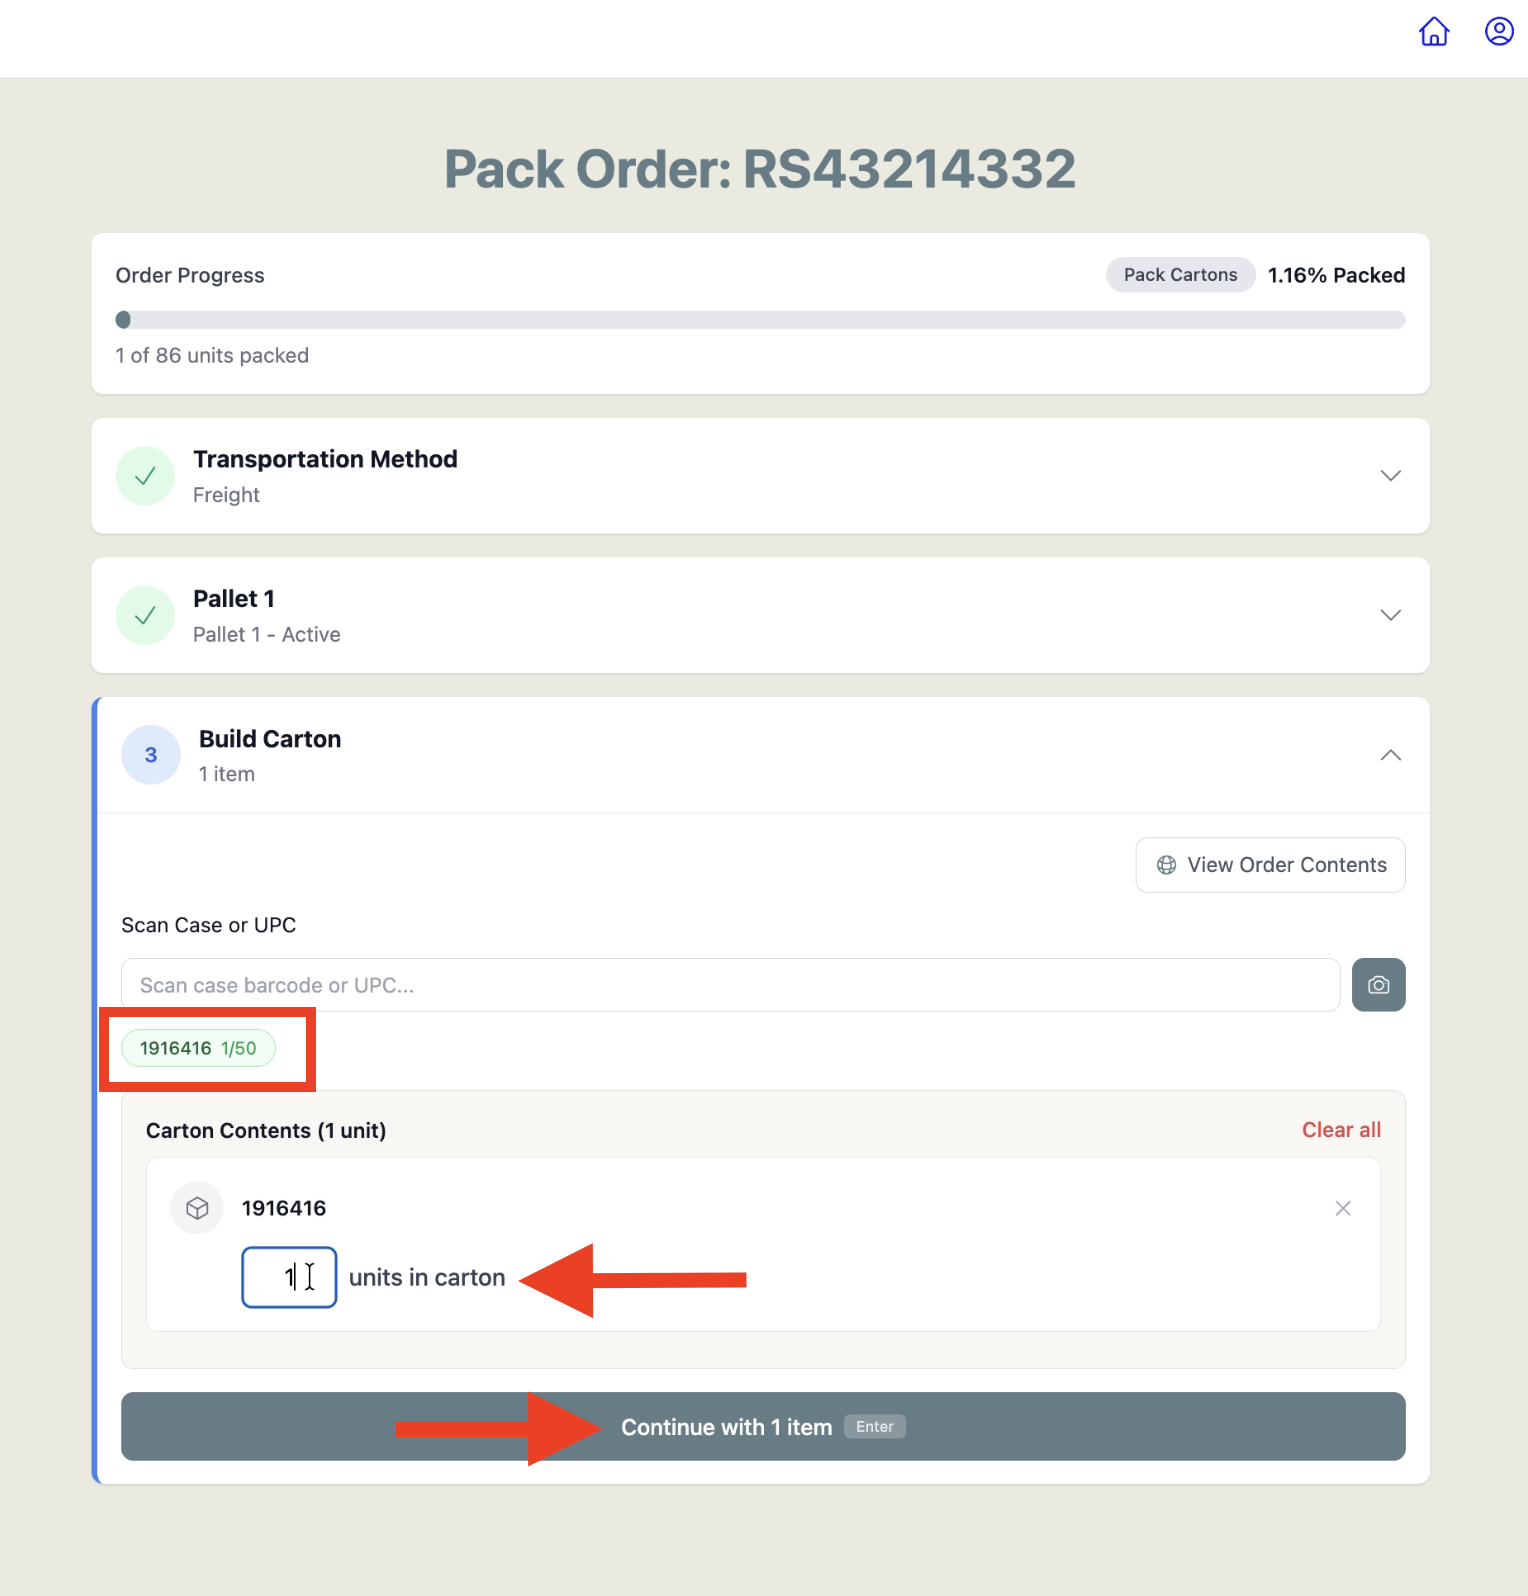
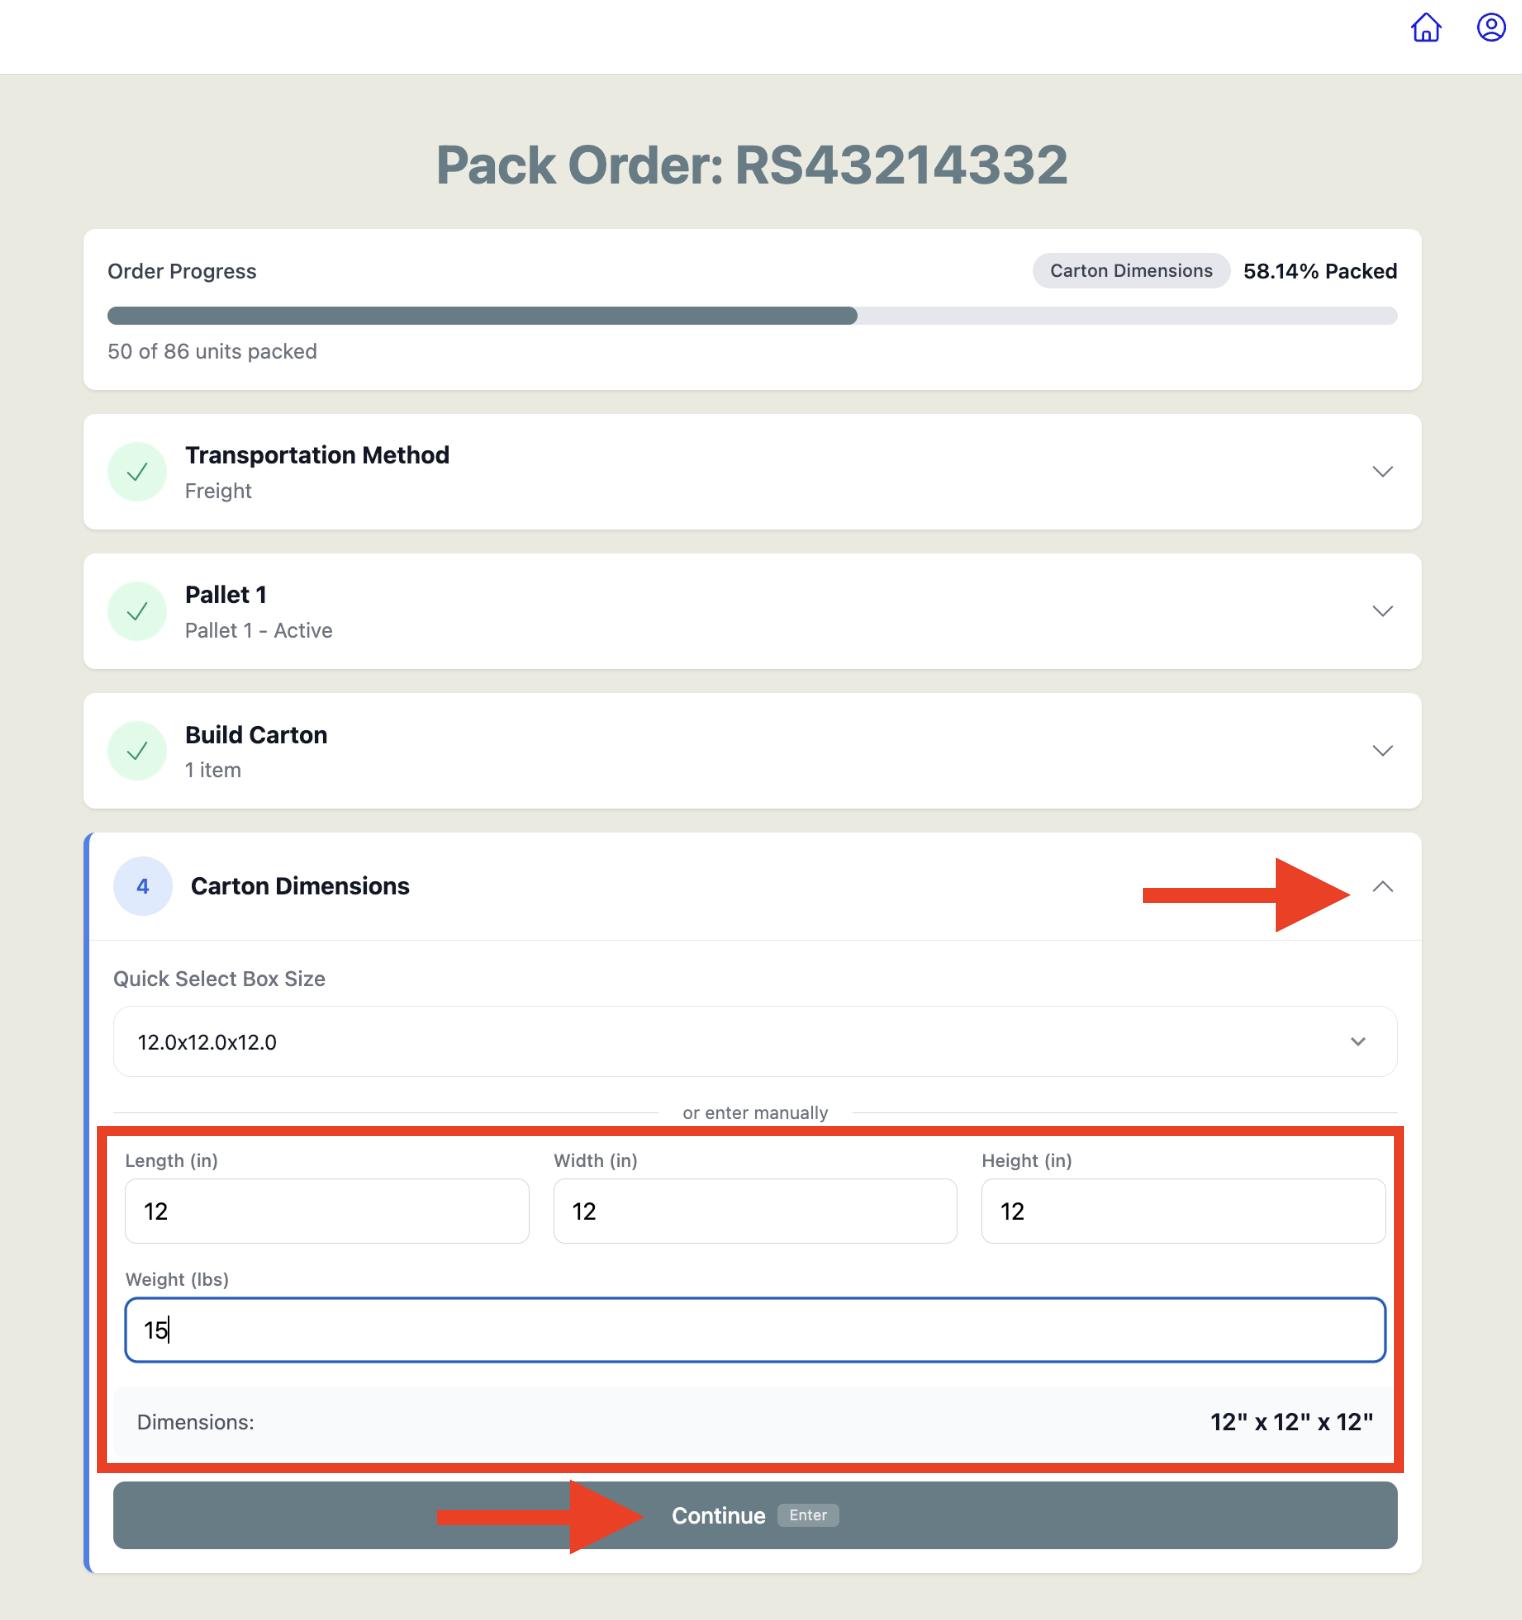
Enter carton dimensions and weight, then tap 'Continue'.
Carton Dimensions, requires the box size and weight. There are three ways dimensions may be filled in:If your facility has Quick Select box sizes configured, select a preset from the 'Quick Select Box Size' dropdown. Not set up yet? Check out this help article to get started. 📄 Quick Select Box Sizes Setup
If case dimensions and weight are entered in the Item Master for this SKU, the Length, Width, Height, and Weight fields will pre-fill automatically.
If neither is set up, manually type in the Length, Width, Height (in inches), and Weight (in lbs) fields.
The calculated dimensions display at the bottom of the screen. Tap 'Continue' (or press Enter on your keyboard) when complete
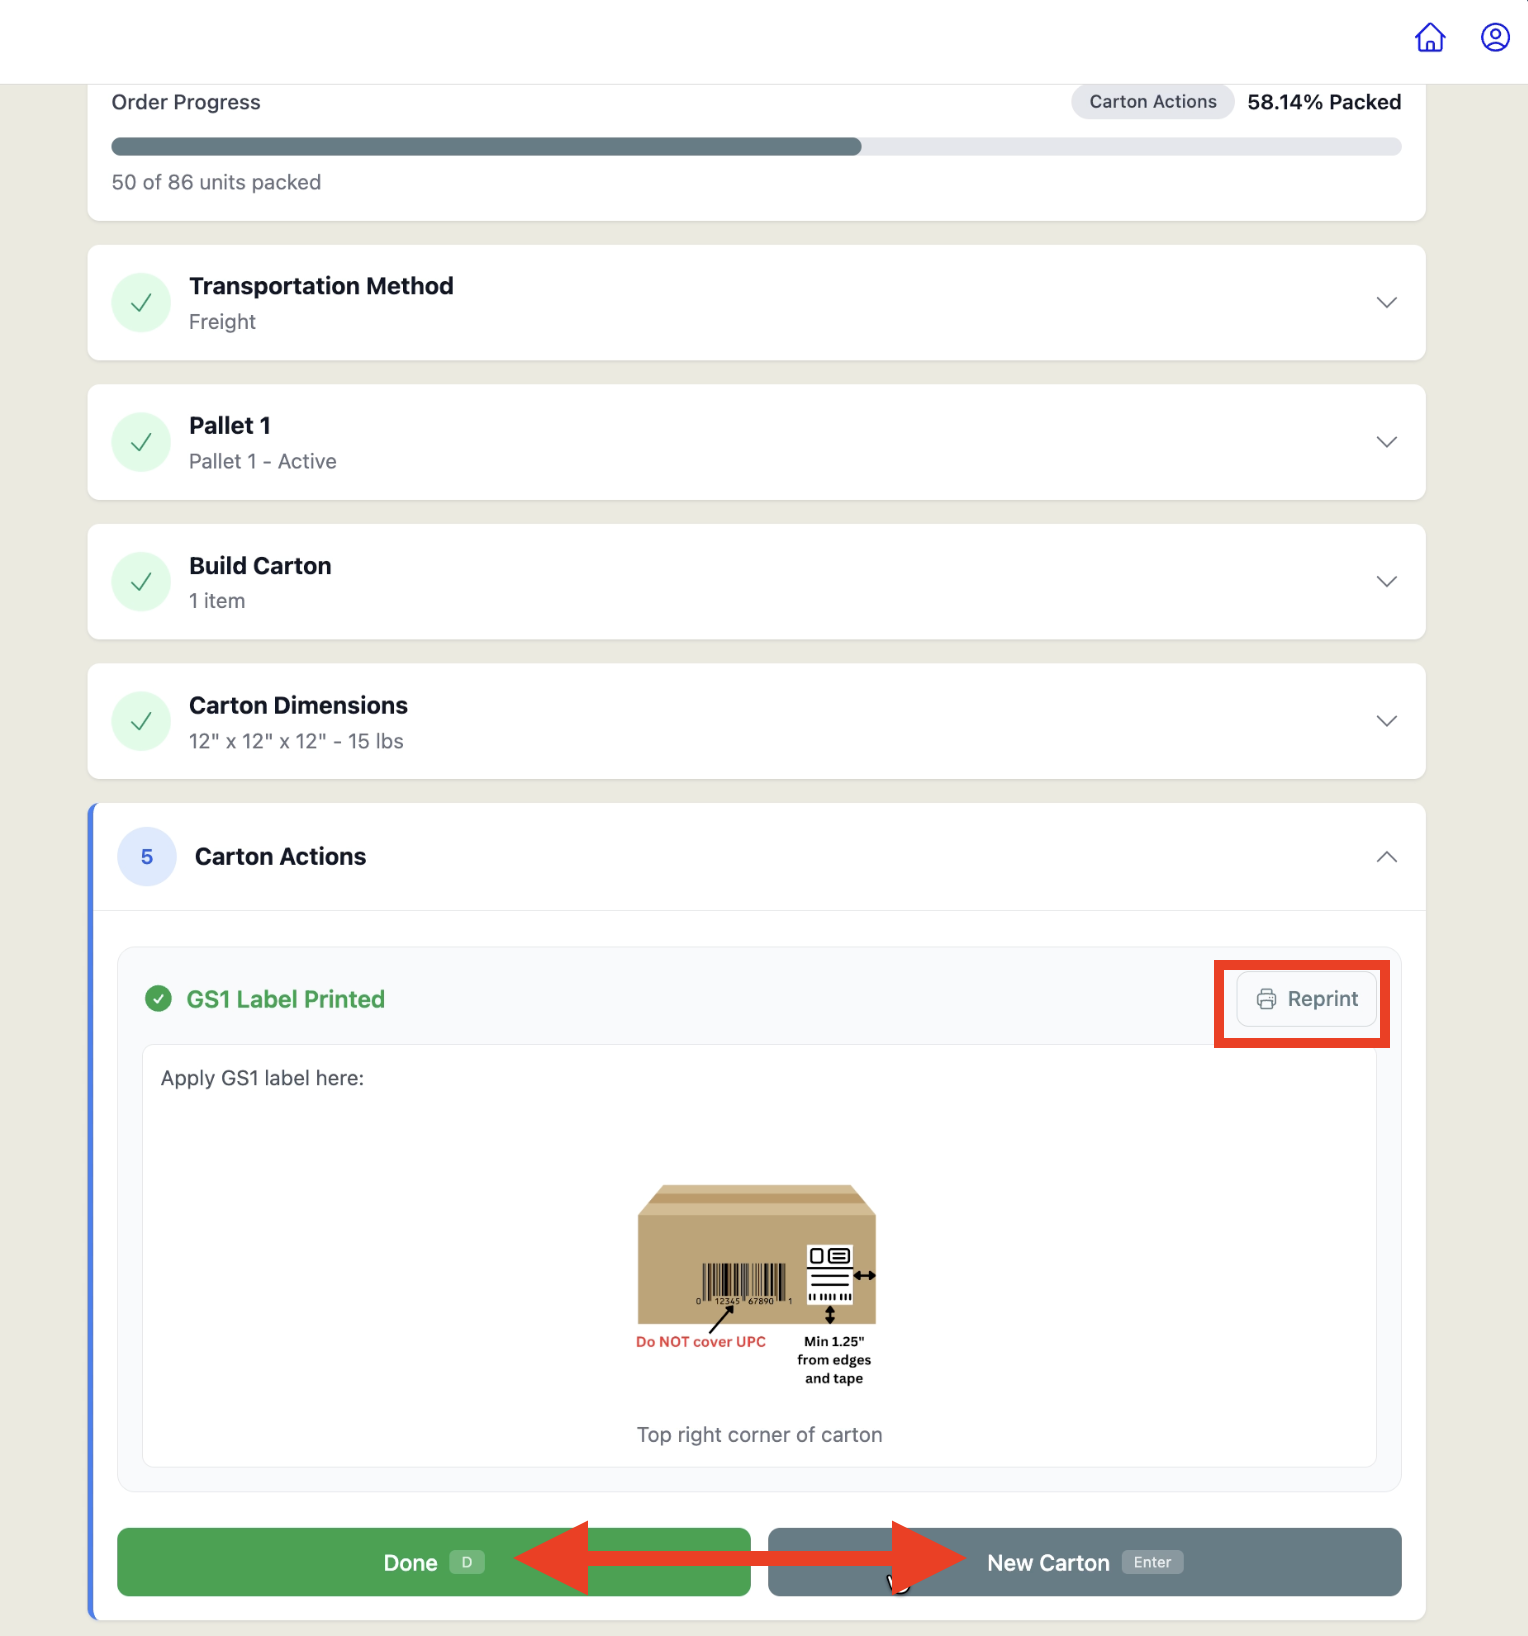
Apply the GS1 label and tap 'Done' or 'New Carton'.
Carton Actions confirms the GS1 label has printed. Carton Actions, confirms the GS1 label has printed and shows exactly where to apply it on the carton. Apply the label as shown, then:Click 'Done' if this is the last carton for the order.
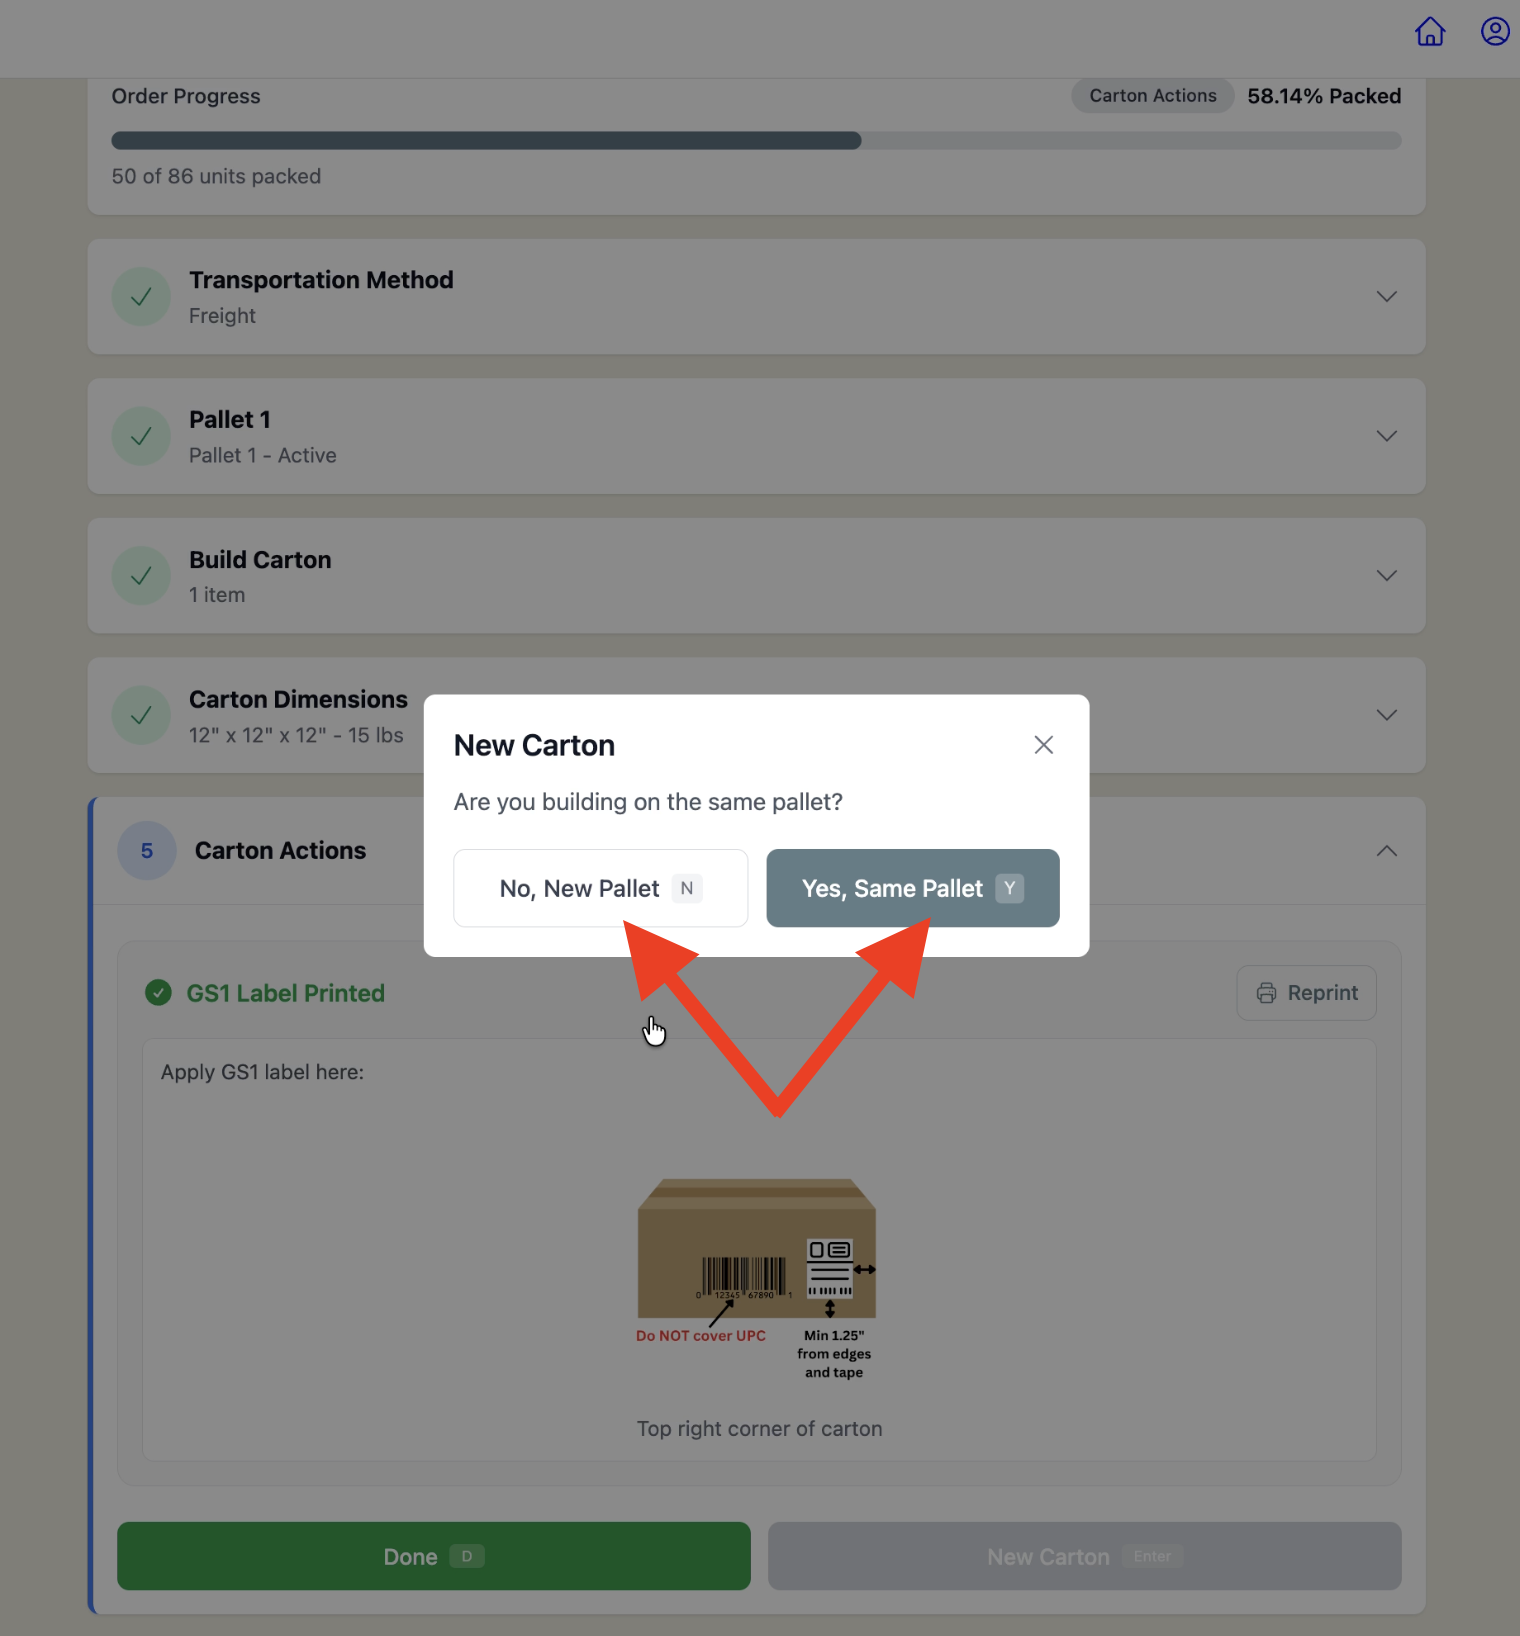
Click 'New Carton' to pack the next carton. RetailReady will ask whether it belongs on the same pallet or a new one.
When adding a new carton, choose 'Yes, Same Pallet' or 'No, New Pallet'.
Tapping New Carton opens a prompt: "Are you building on the same pallet?"Tap Yes, Same Pallet to add the carton to the current pallet and repeat Steps 9–12.
Tap No, New Pallet to start a new pallet — RetailReady will print a new Pallet QR Code and repeat Steps 7–12.
SUCCESS — Order packed
Once all cartons are packed, you will receive a SUCCESS screen, click 'Done'.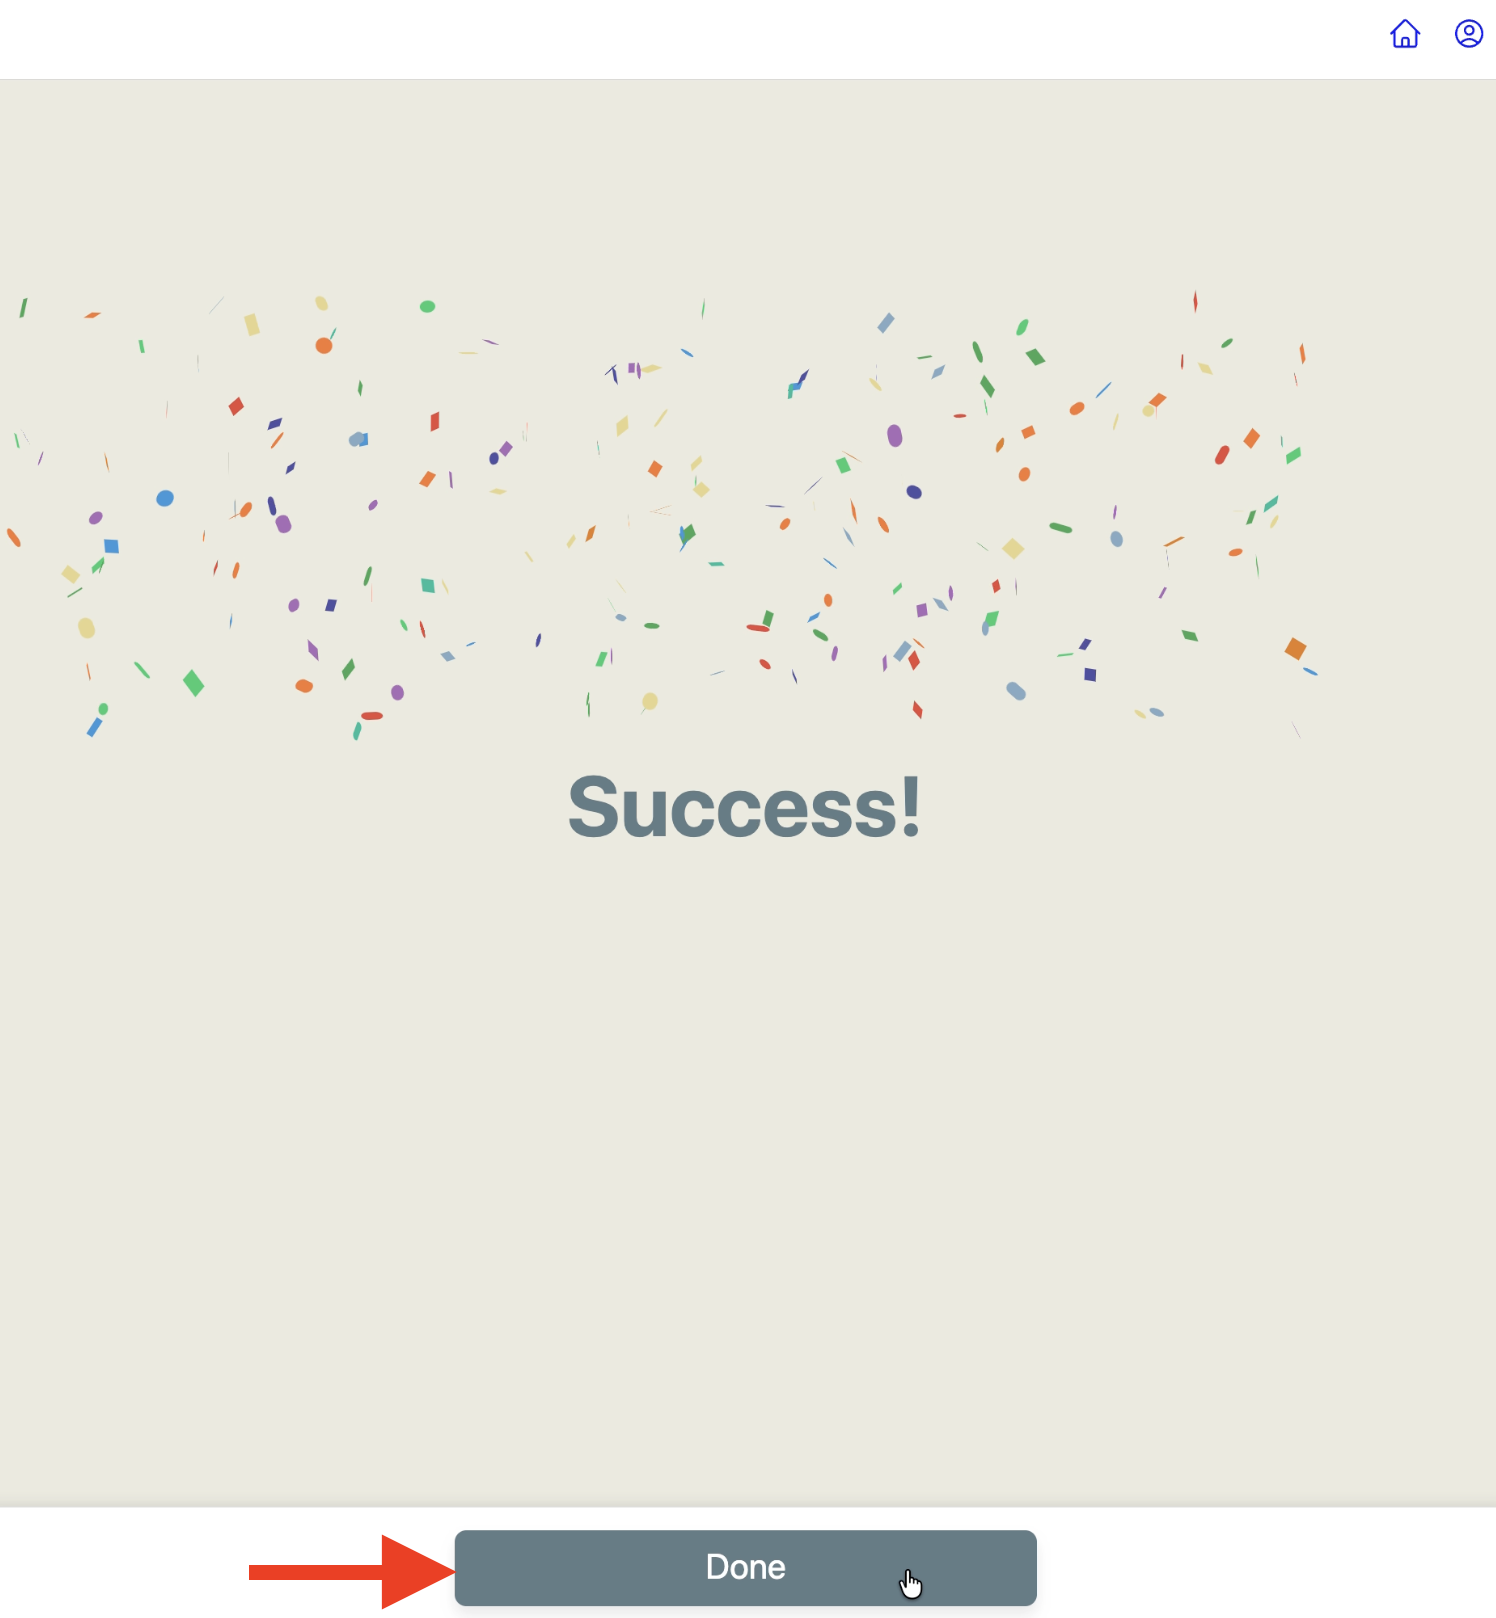
Stage Pallets
When all cartons are packed, scan the pallet QR to begin staging.
Once all cartons across all pallets are packed and GS1-labeled, scan the pallet QR code (or search the order) on the Get Started screen. The order status will show Stage Pallets as the active step. Tap 'Stage Pallets' to continue.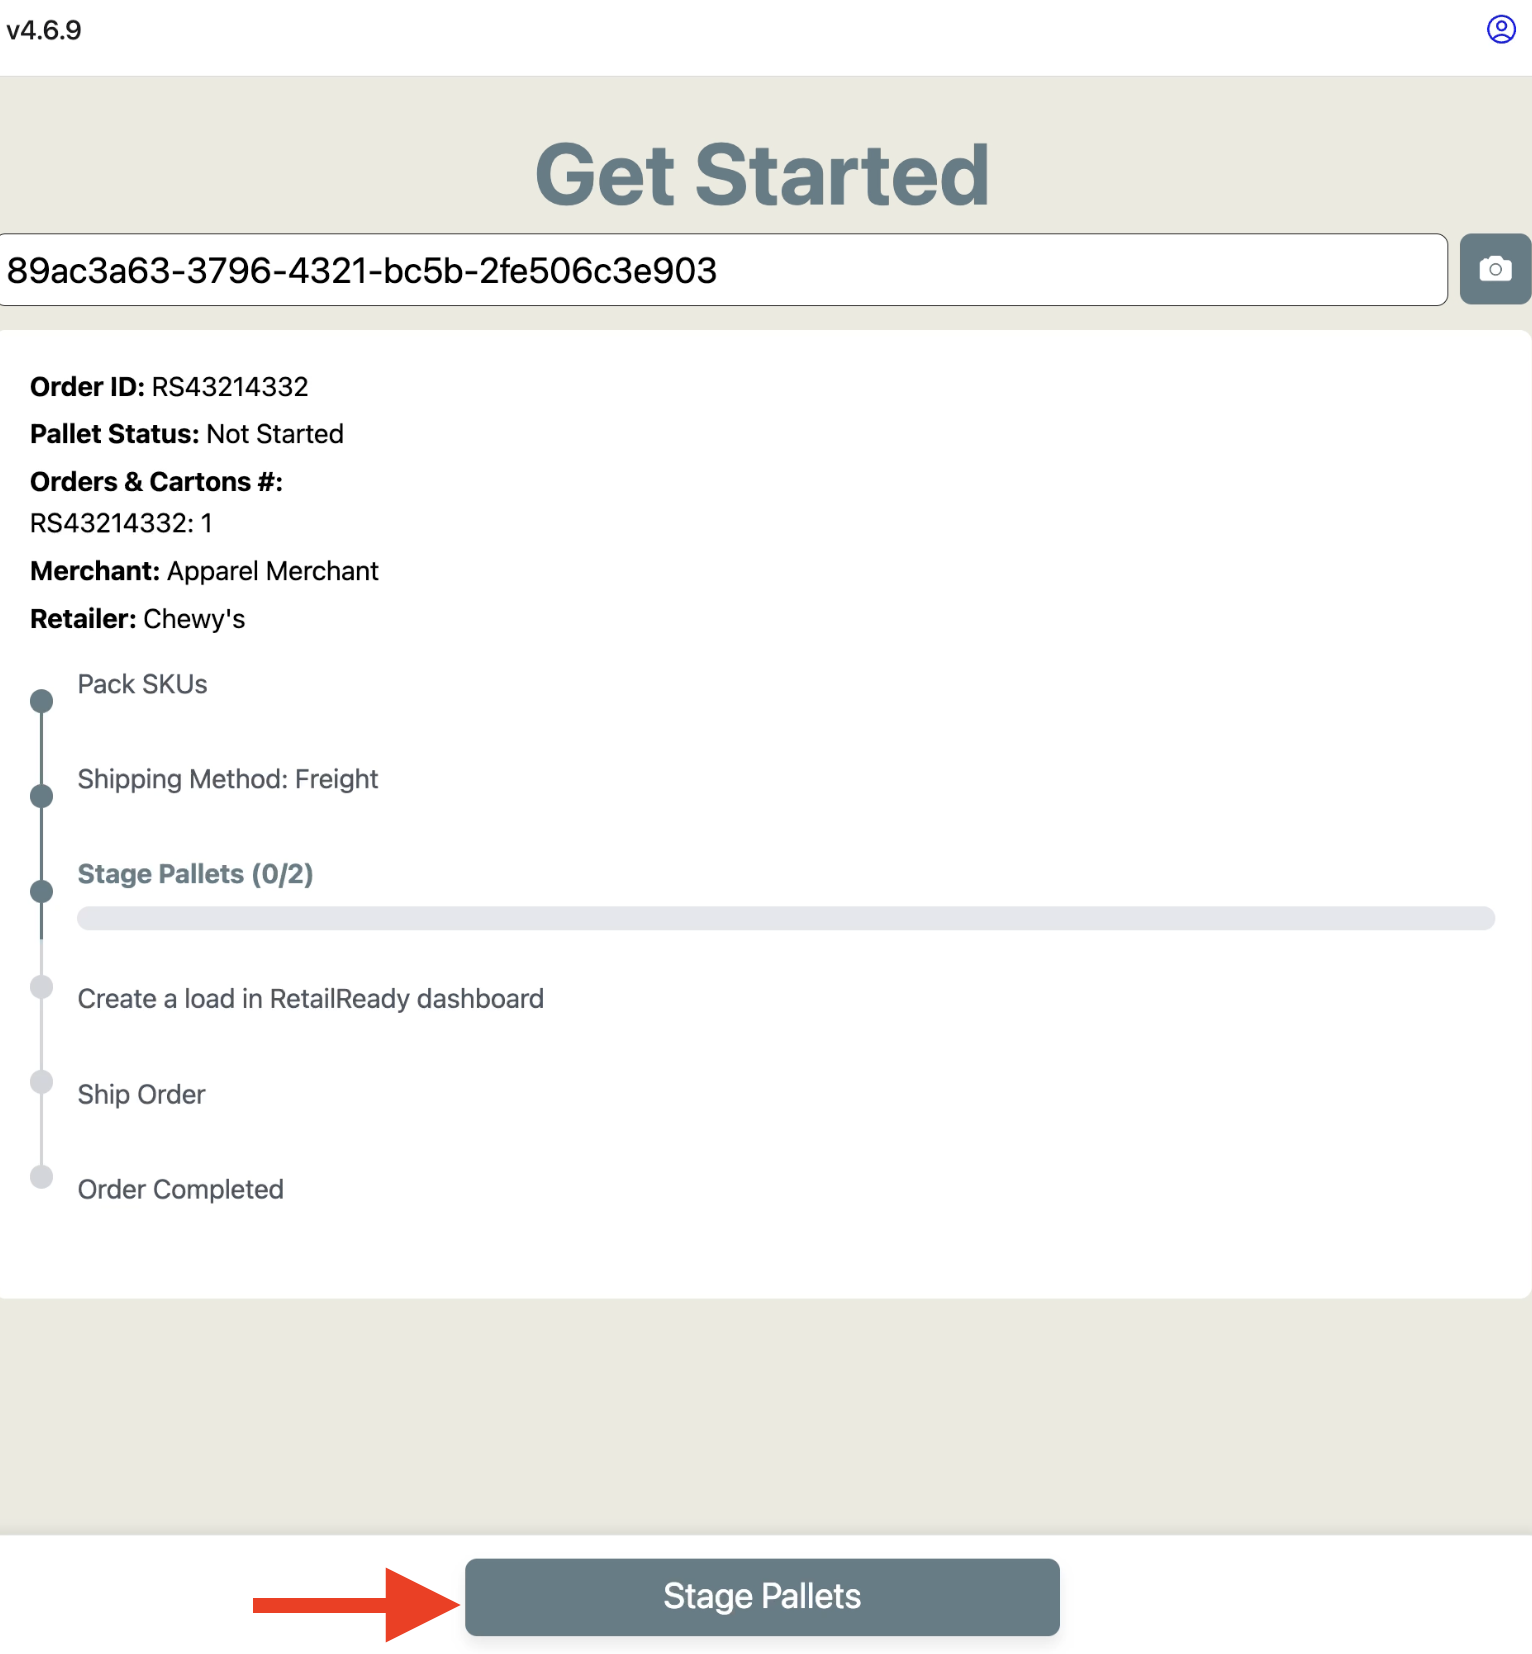
Enter pallet dimensions and tap 'Next: Print Labels'.
The Pallet Dimensions screen appears for each pallet. Measure height from the floor to the top of the loaded pallet. The Length, Width, and Weight will auto-populate. Enter Height and tap 'Next: Print Labels' when complete.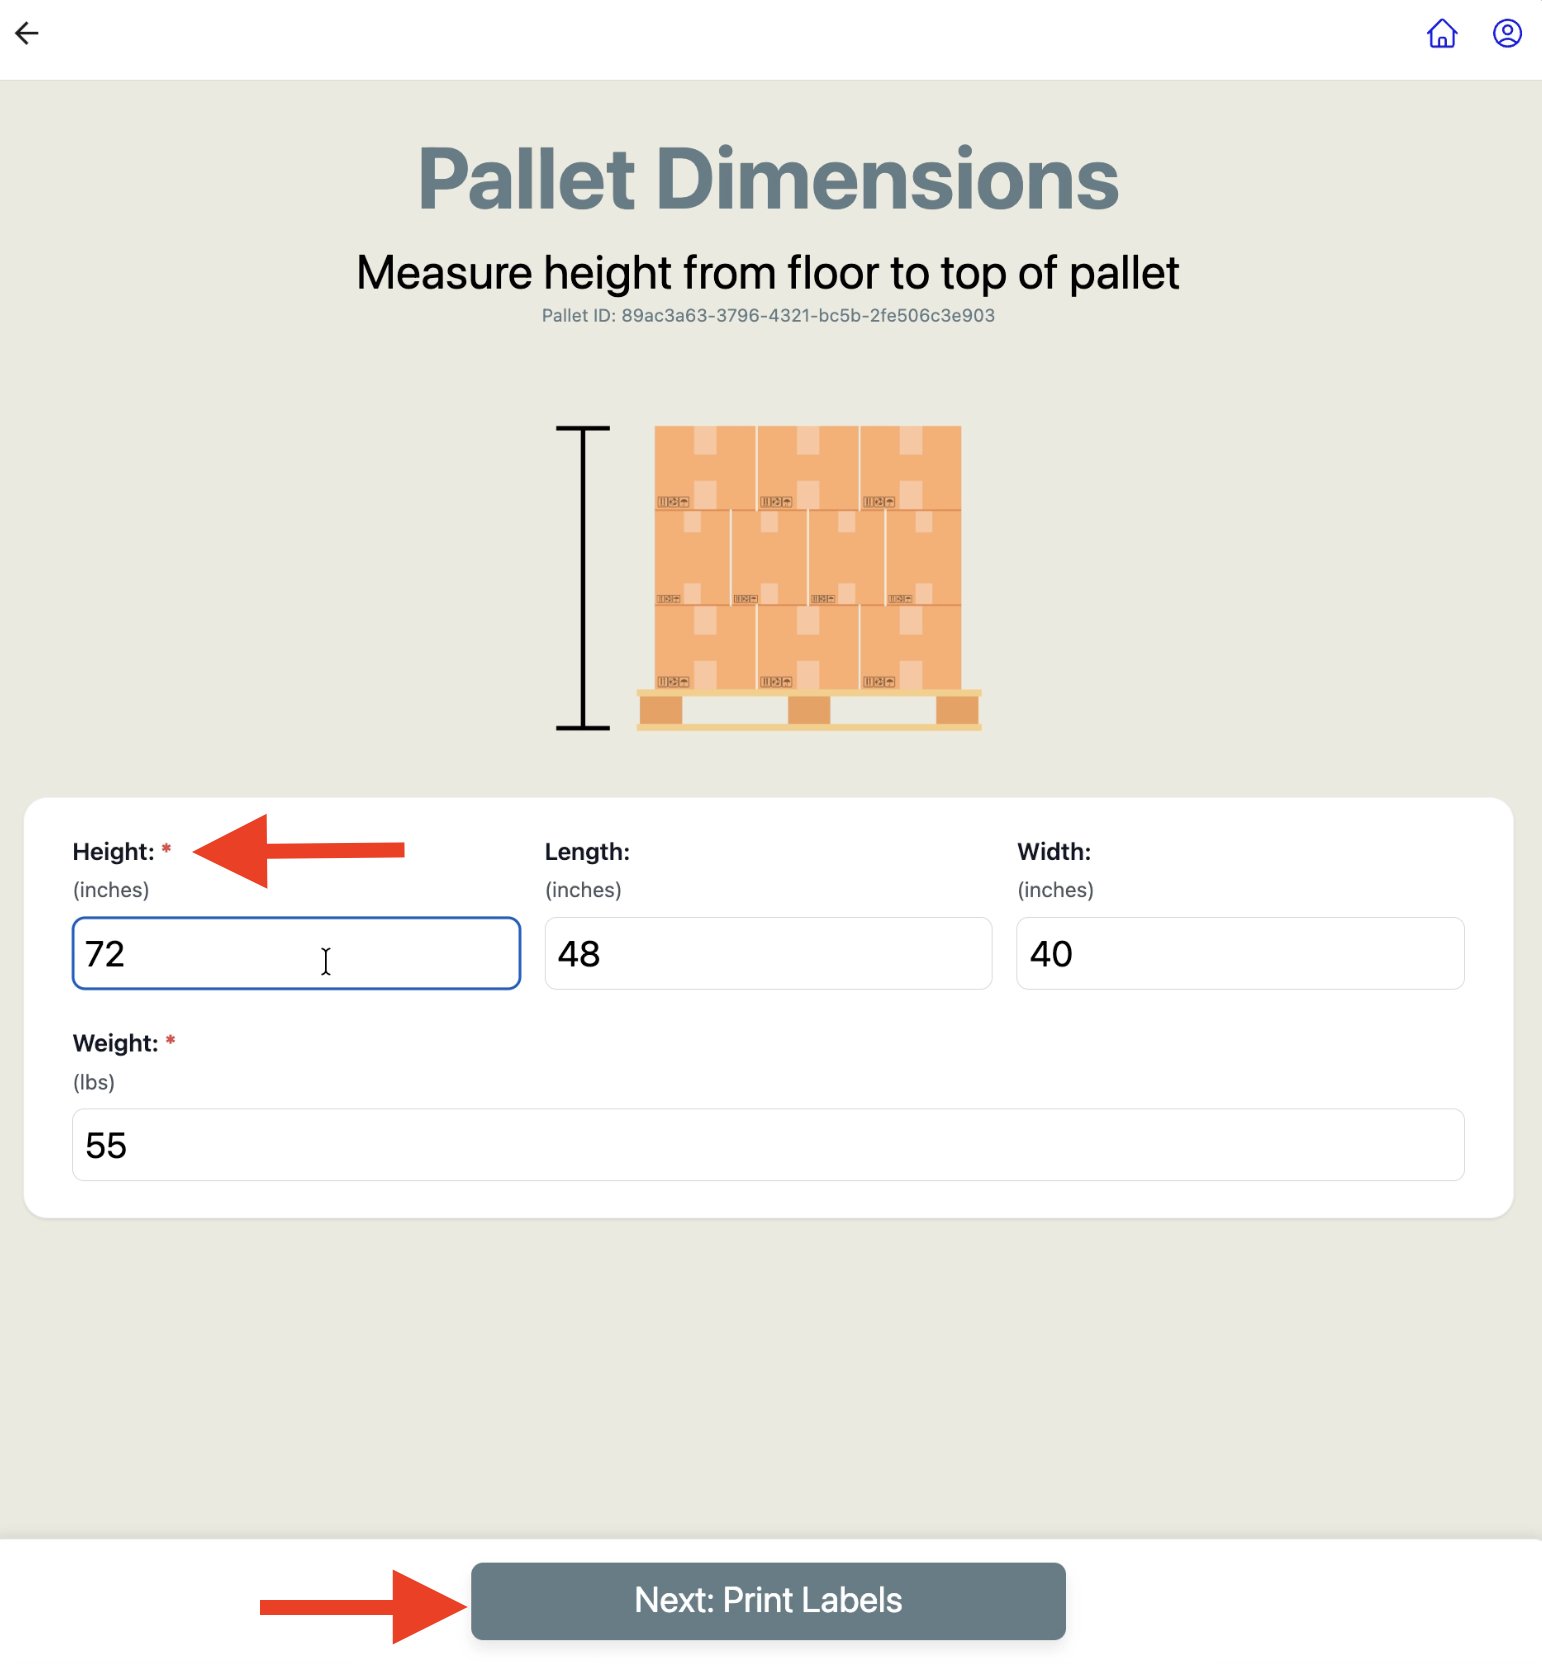
Dimensions Out of Range: If your entered height exceeds the retailer's maximum, a warning will appear. Tap OK, correct the height, and tap 'Next: Print Labels' again.
Confirm the pallet label printed and tap 'OK'.
After tapping 'Next: Print Labels', RetailReady sends the pallet label to the Zebra printer and displays a confirmation: "Printing Pallet Label at Zebra Printer." Tap 'OK' to dismiss the dialog and proceed to the Pallet Rules checklist.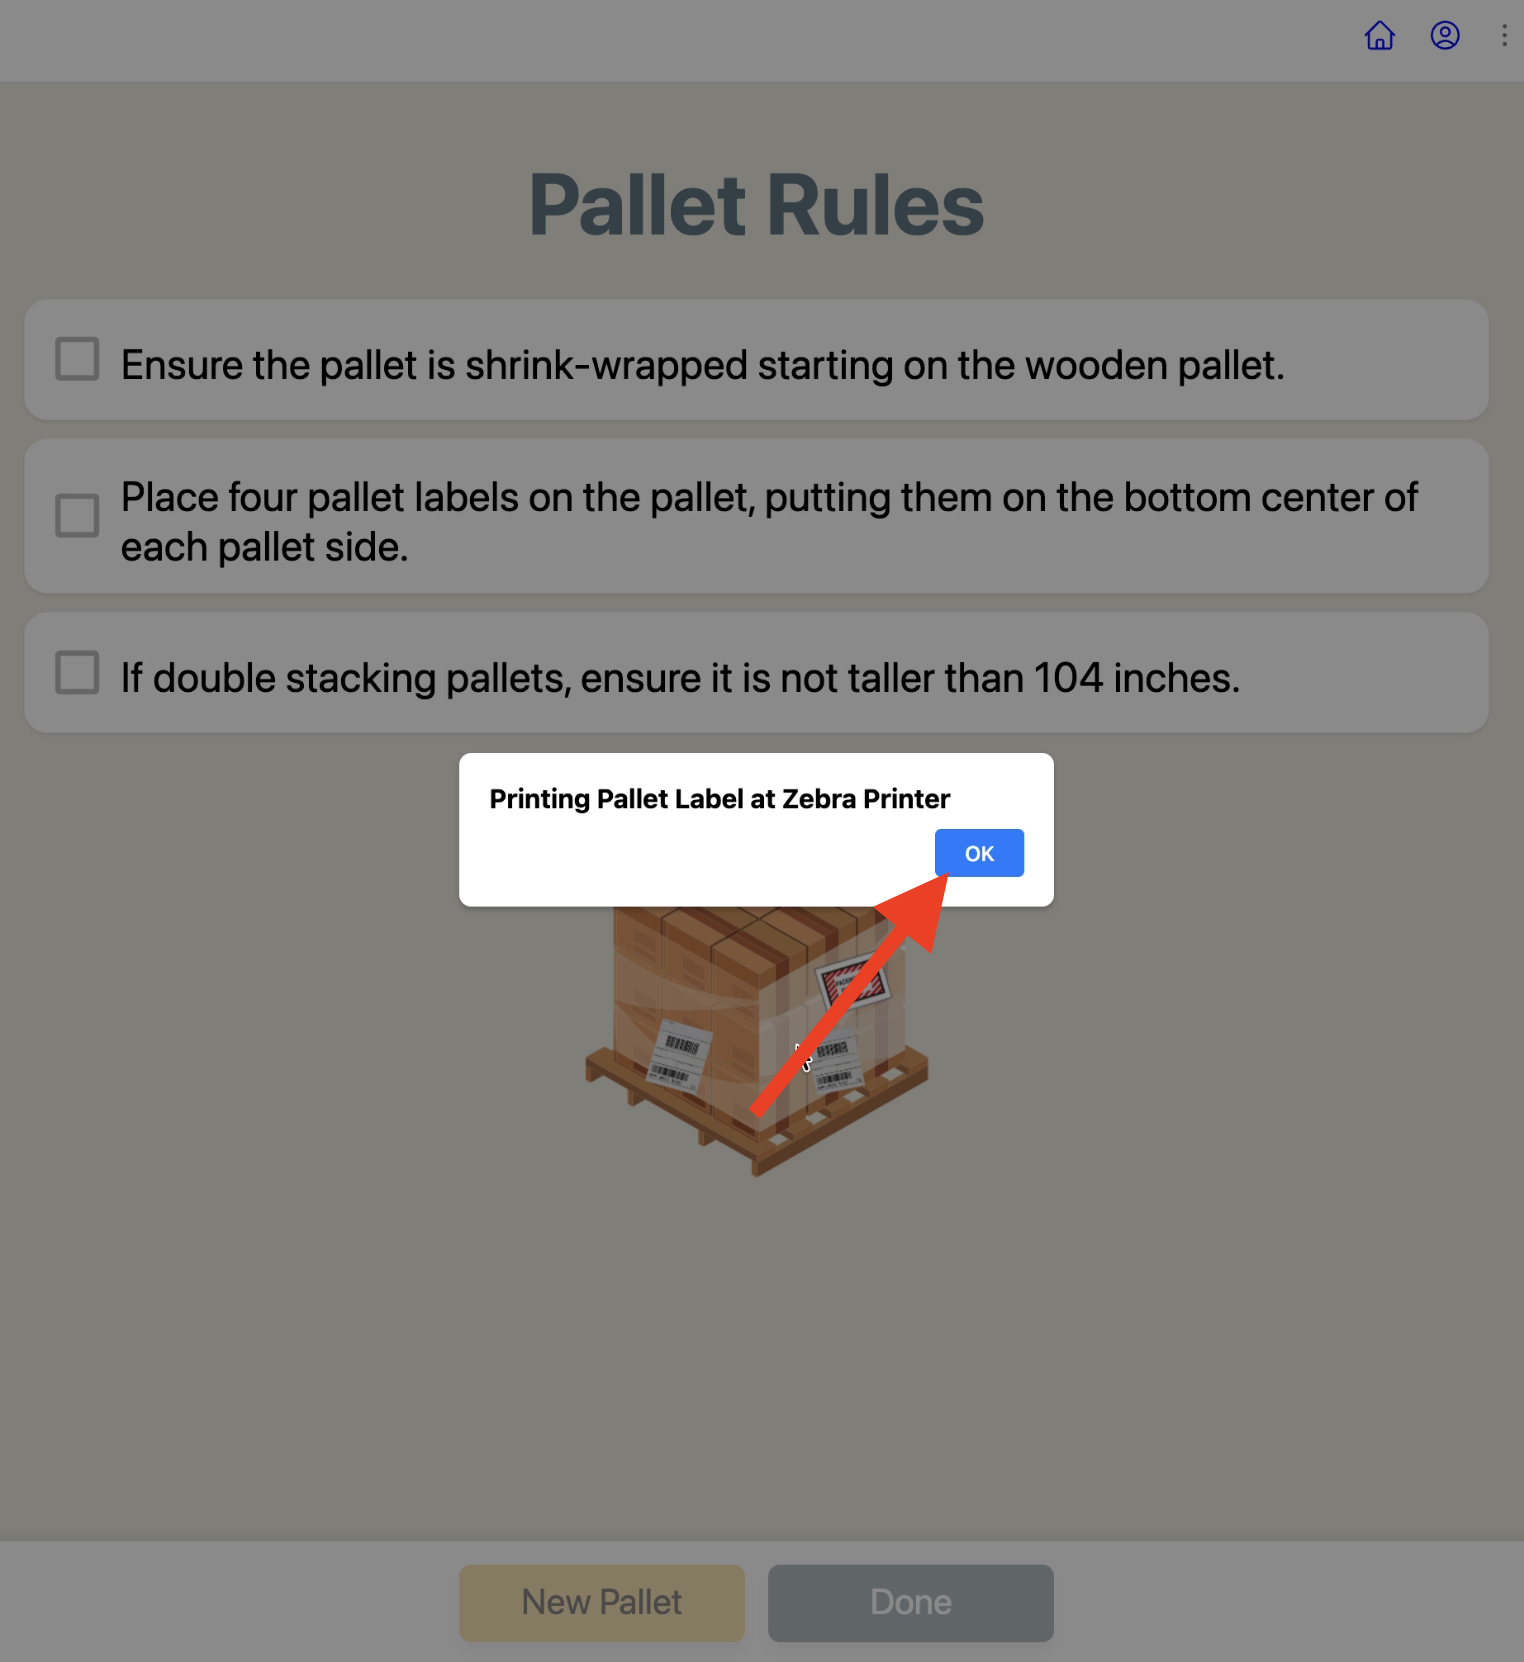
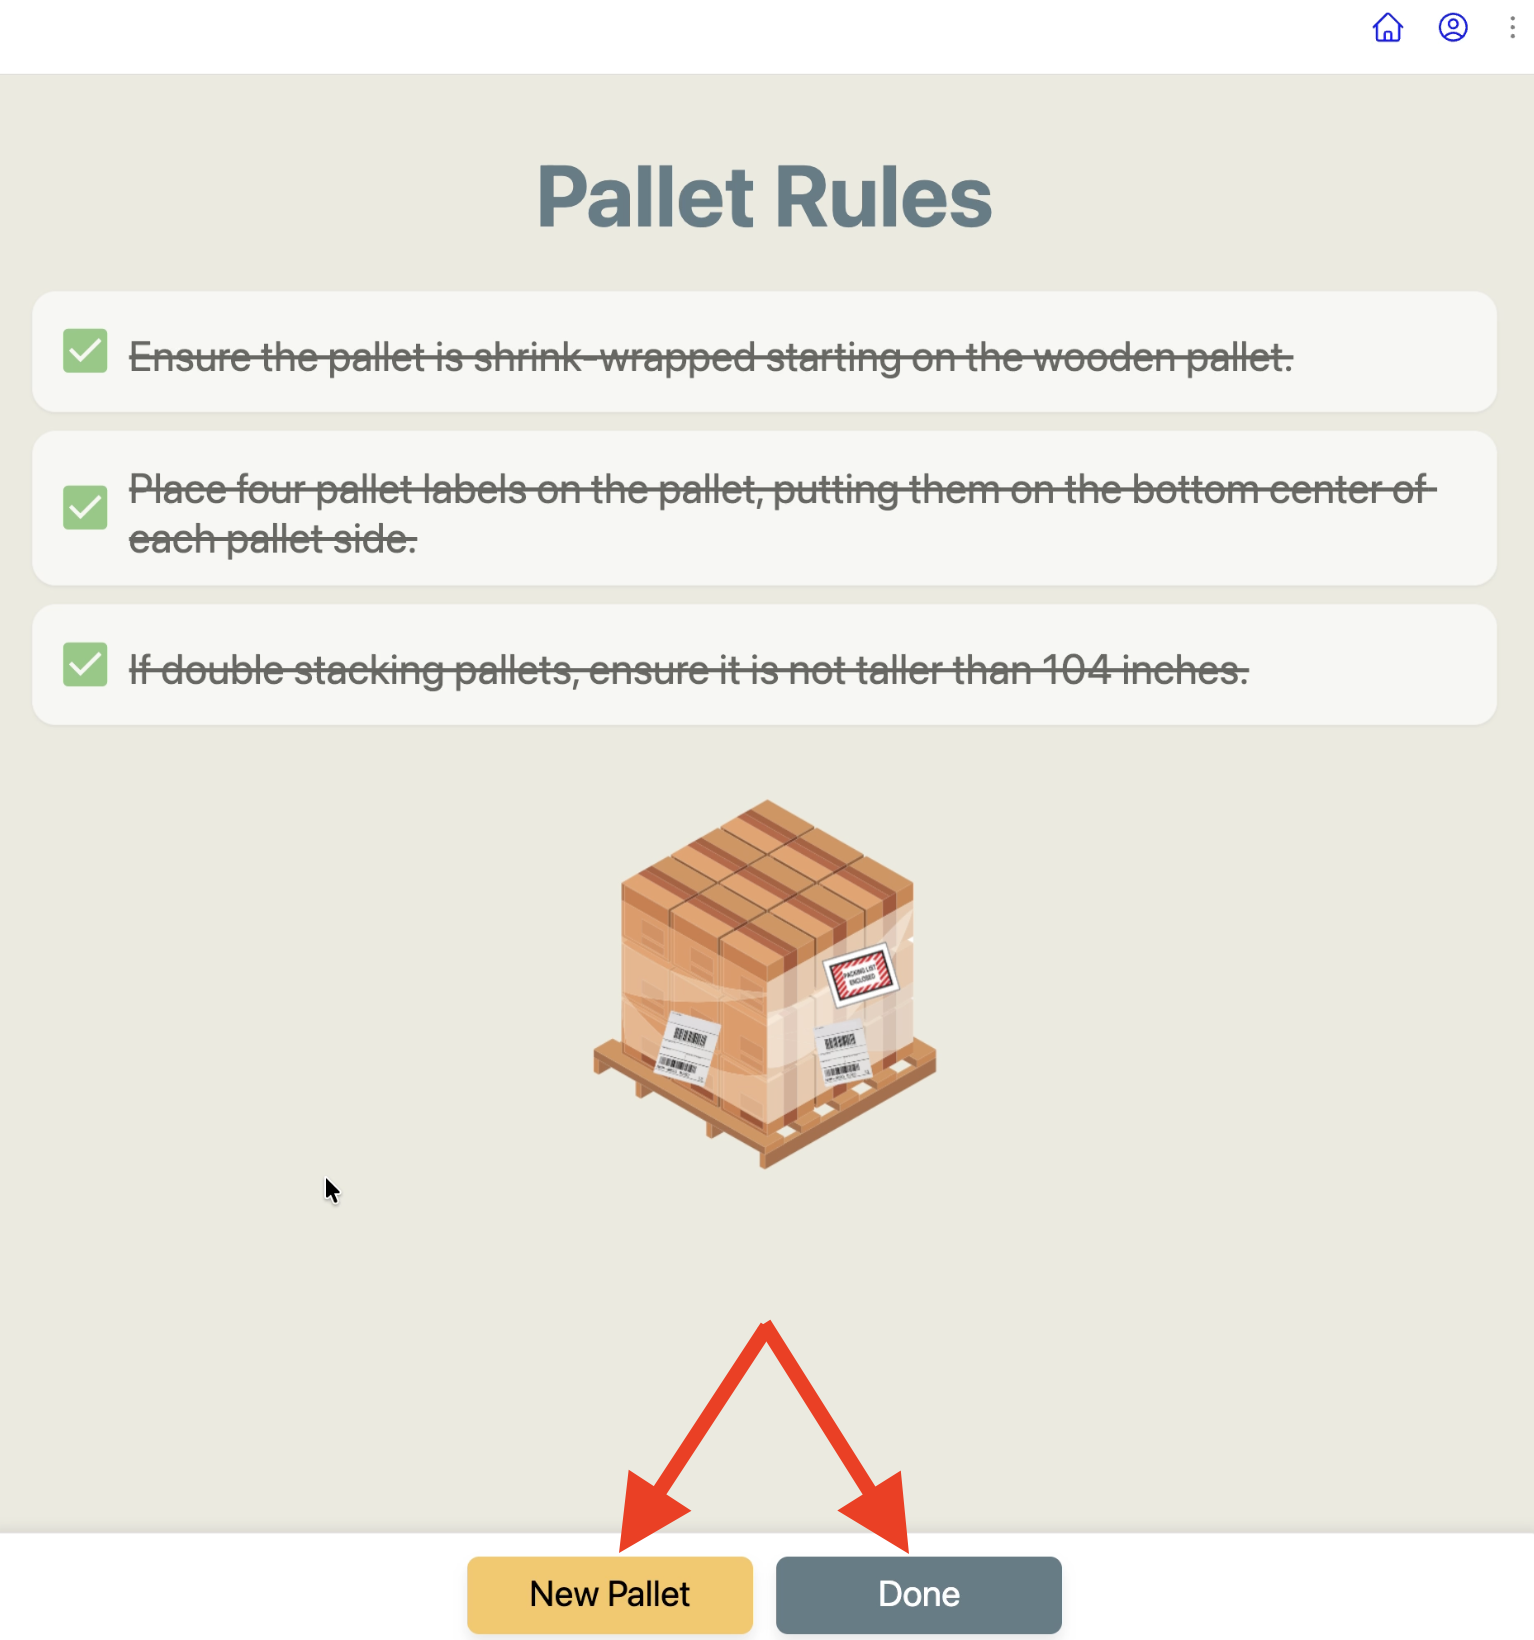
Complete the Pallet Rules checklist and tap 'Done' or 'New Pallet'.
The Pallet Rules screen lists required actions per retailer to check off before the pallet is staged. Check off each item as you complete it. When all are checked:Tap 'Done 'if this is the last pallet
Or tap 'New Pallet' to stage the next pallet and repeat Steps 1-4.
Create a Load
After all pallets are staged, a task is generated to create load in RetailReady dashboard. This step is completed in the RetailReady web dashboard, not the RetailReady app.
In the left navigation panel, click 'Loads'.
From the RetailReady dashboard, find the left-hand navigation panel and click 'Loads' under the Logistics section. You can also create a load though tasks as well.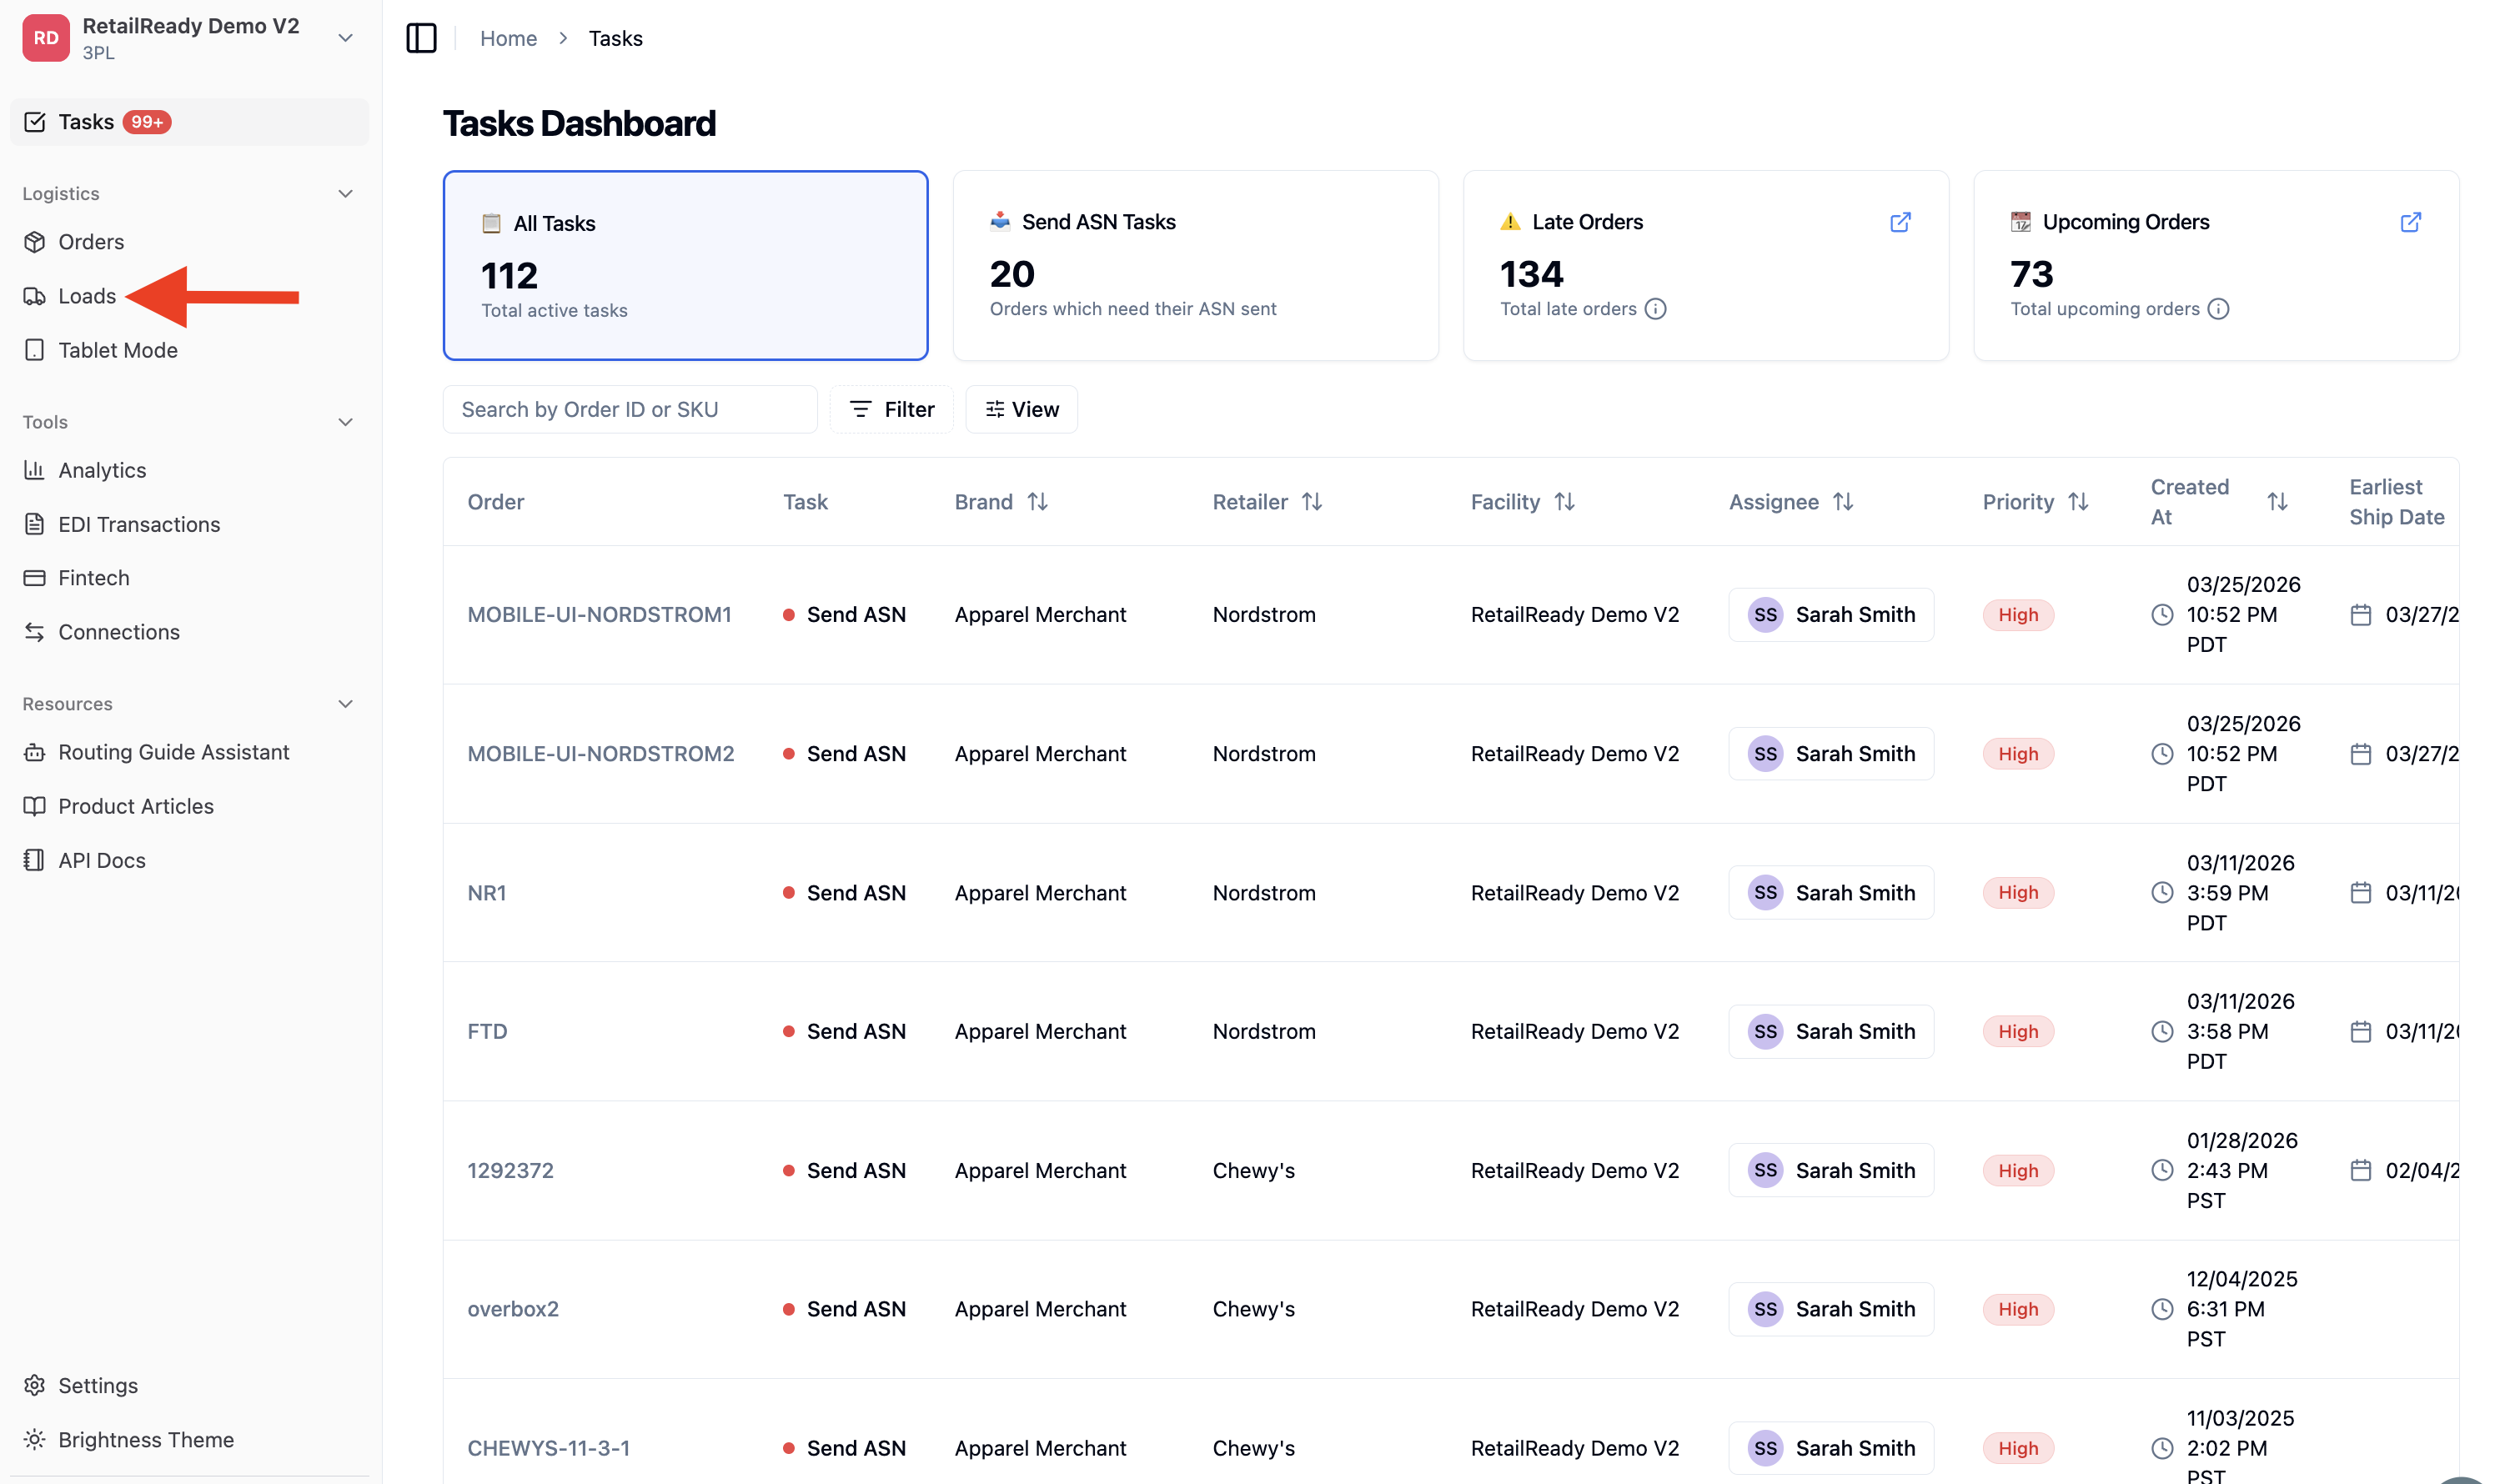
On the Loads Dashboard, click '+ Single Entry'.
The Loads Dashboard shows all existing loads. Click '+ Single Entry' in the top right to open the Add Load form.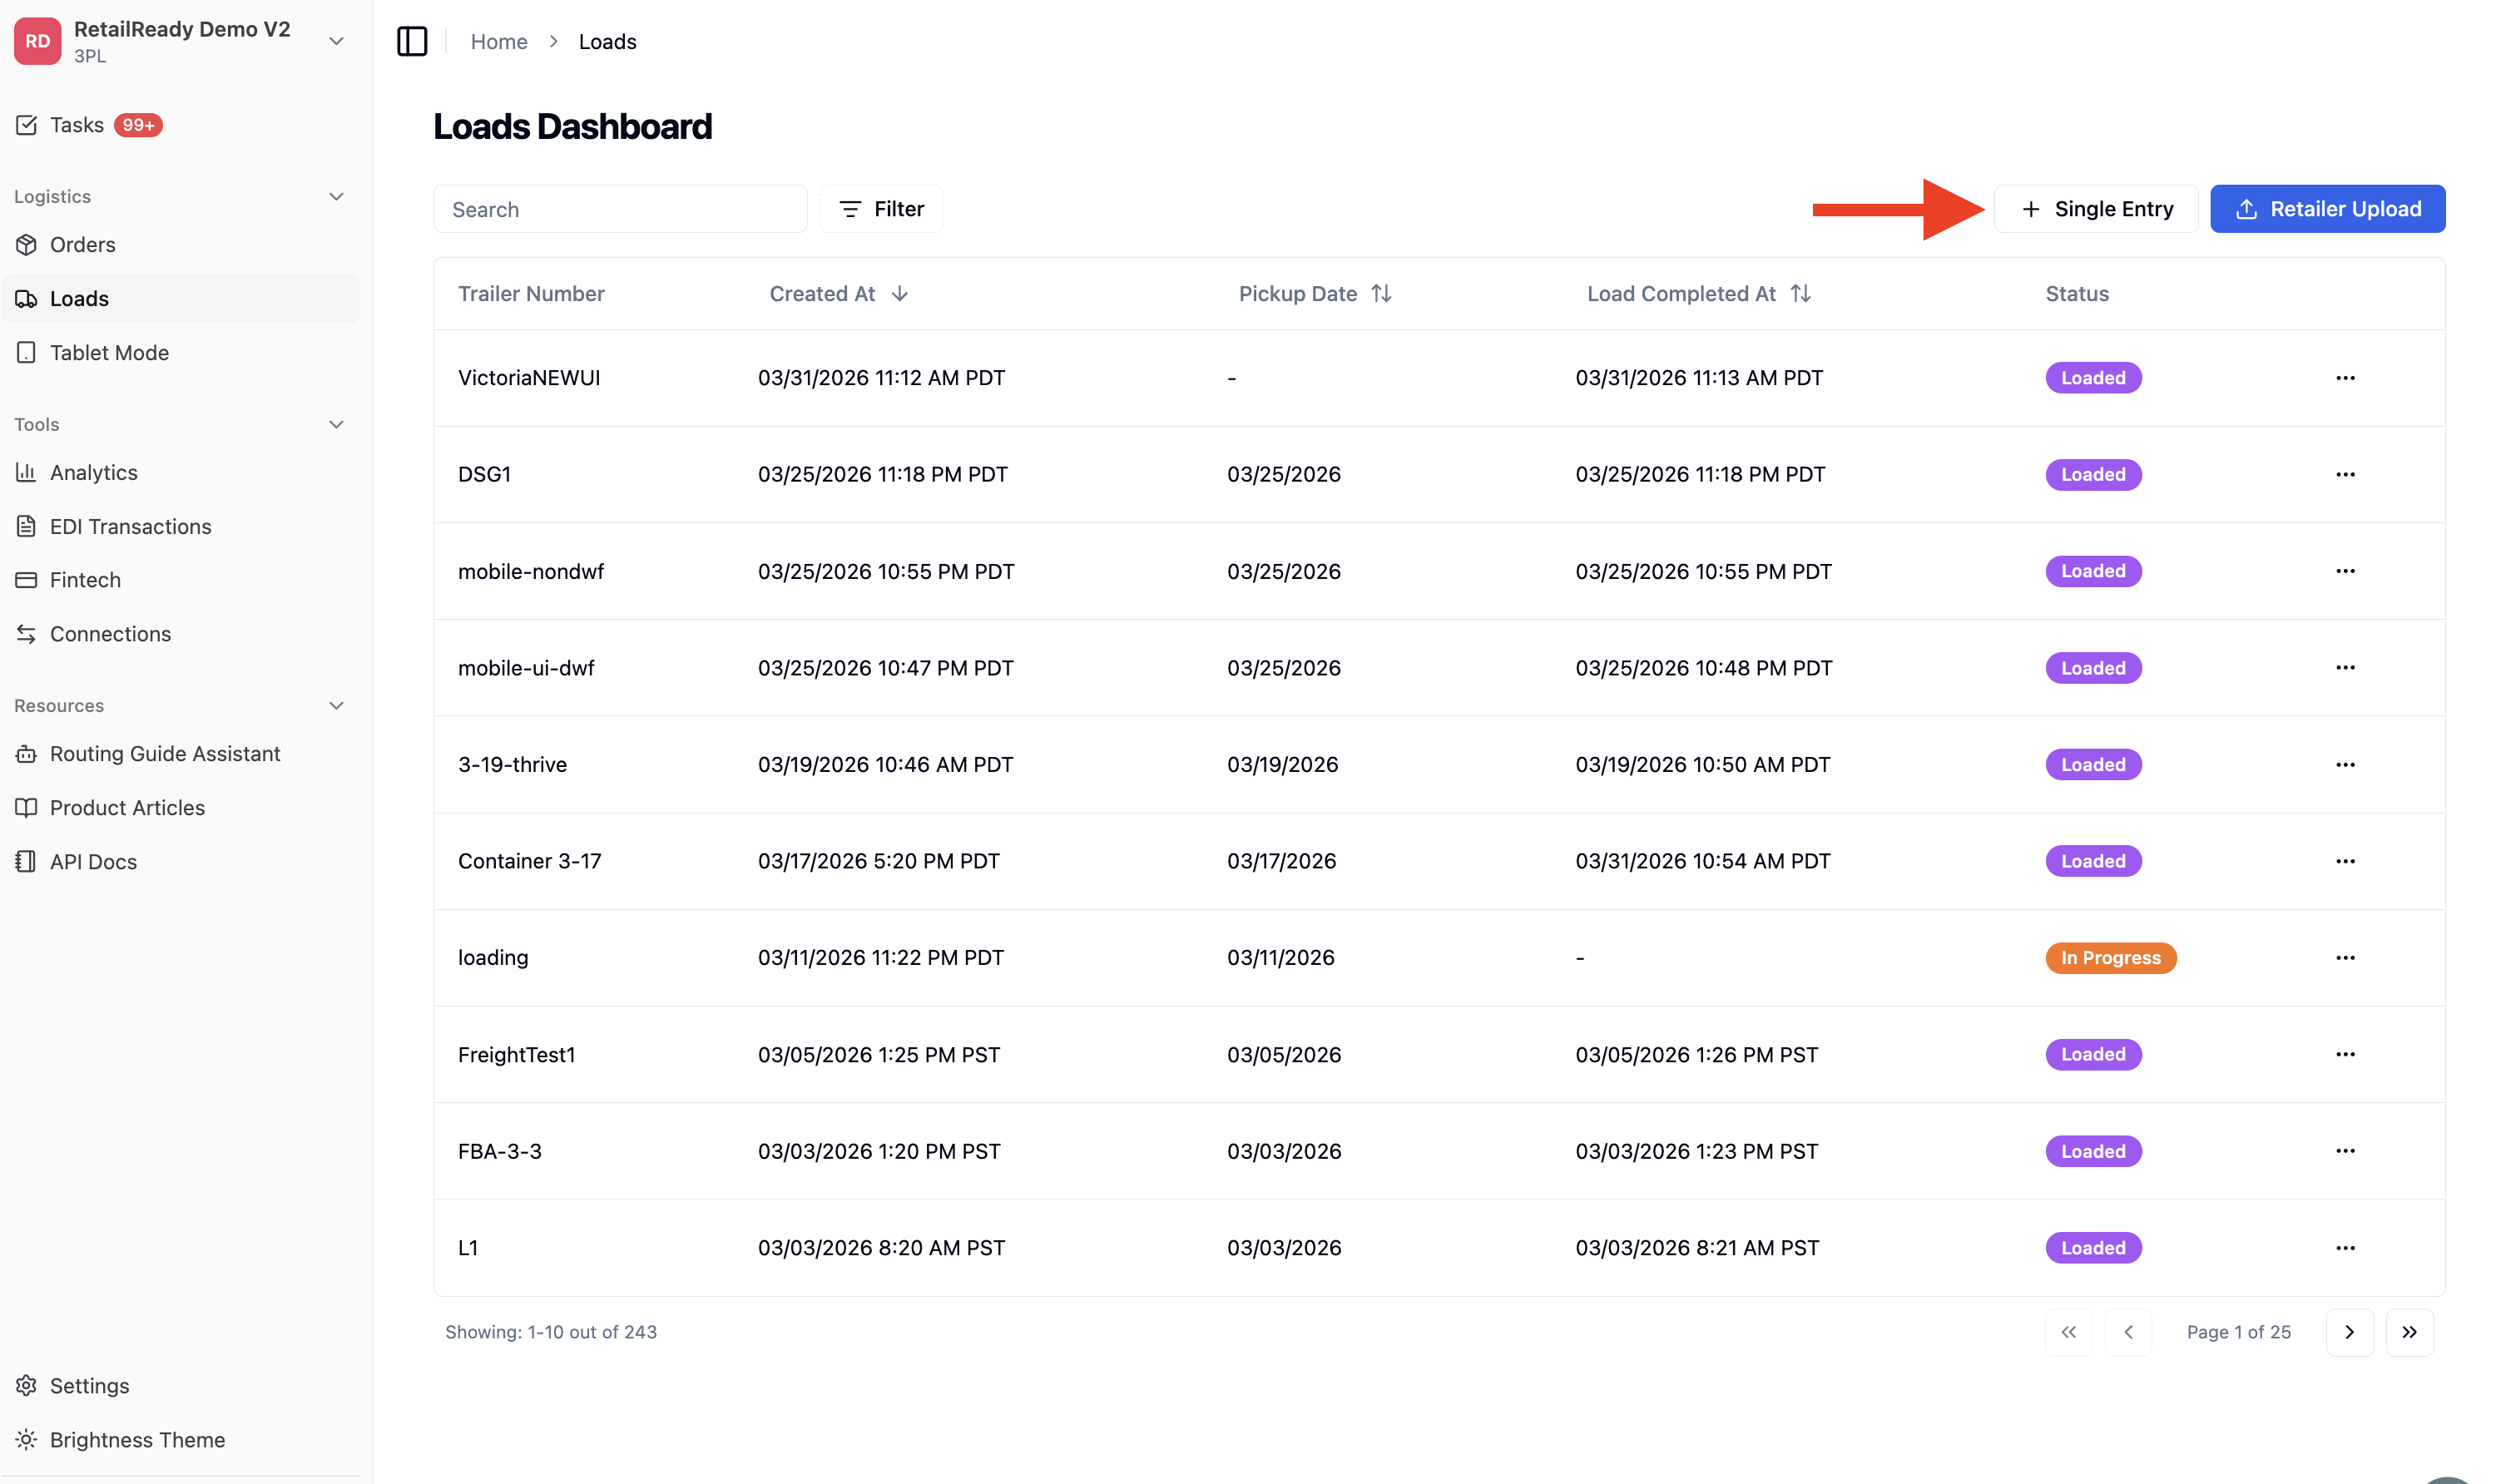
Enter a Load Name.
In the Add Load modal, type a name into the Load Name field. Use a clear, descriptive name such as the trailer number or order number.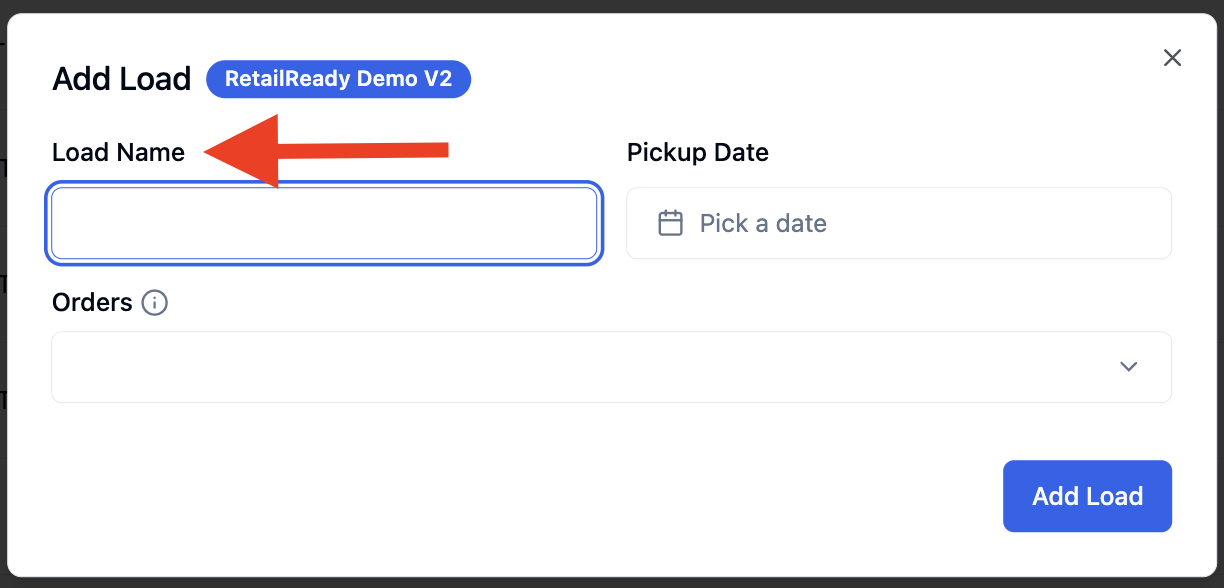
Select a Pickup Date (optional).
Click the Pickup Date field and choose the date the carrier will pick up the load from the calendar. This field is optional and can be left blank if the pickup date is not yet confirmed.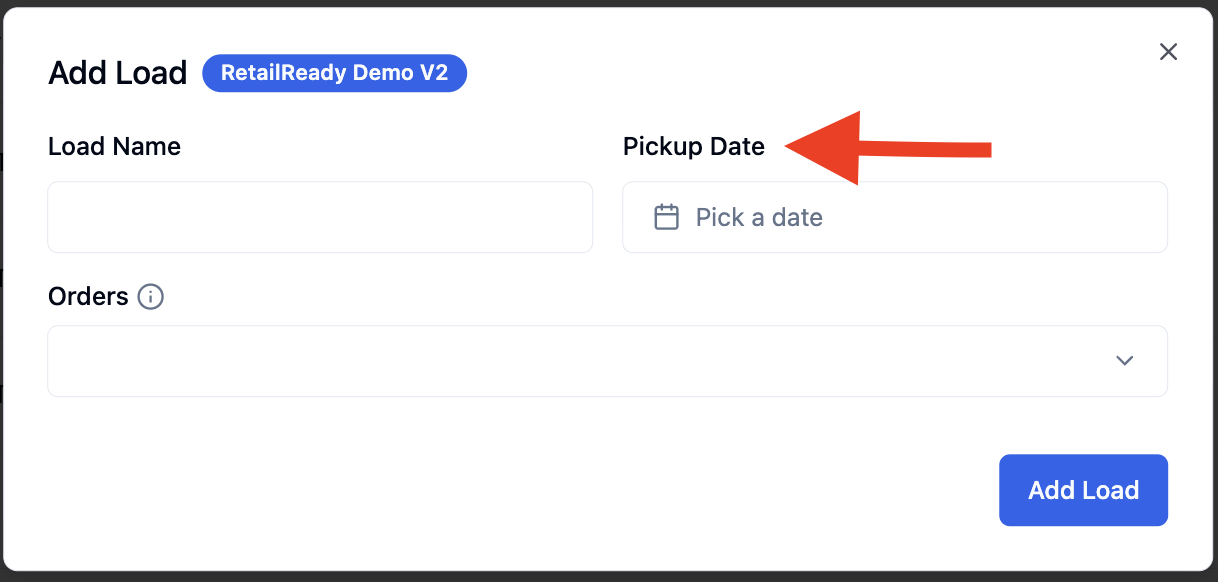
Search for and select your order(s) under 'Orders'.
Click the Orders dropdown. A search box will appear, type the order number to find it. Only orders that have been staged as Freight and are not already on another load will appear. Check the box next to your order(s) to select them.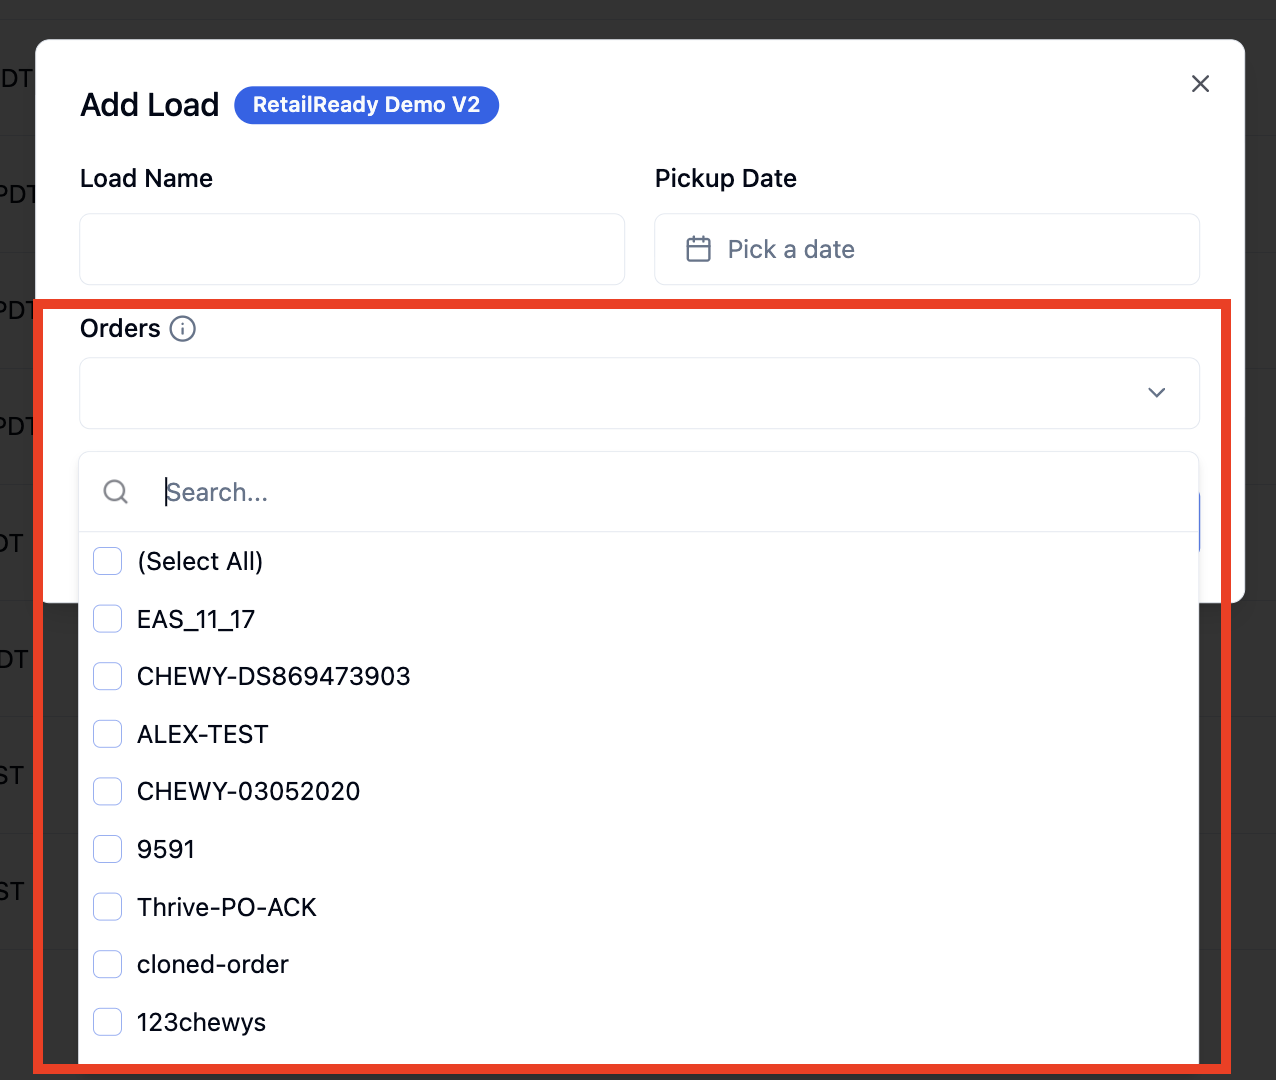
Click 'Add Load' to create the load.
Once the Load Name and Orders are filled in, click 'Add Load' to save.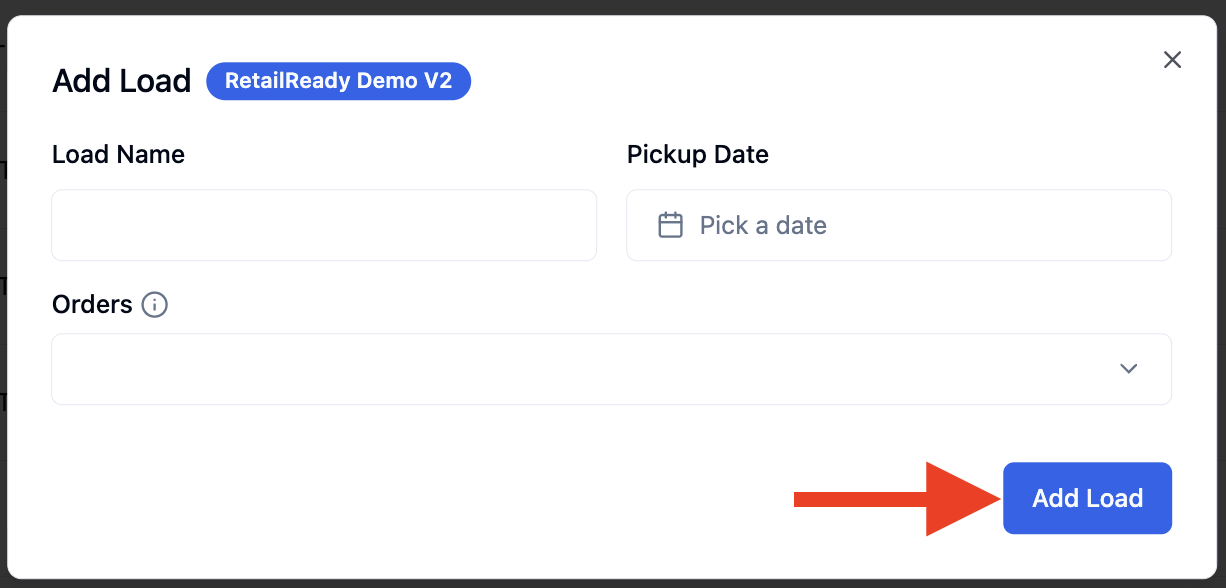
Confirm the load was created successfully.
RetailReady will take you to the load detail page. Confirm the load name, status (Not Started), Pickup Date, and that the correct pallet(s) appear in the Pallets tab with a Staged status and the correct order(s) appear in the Orders tab.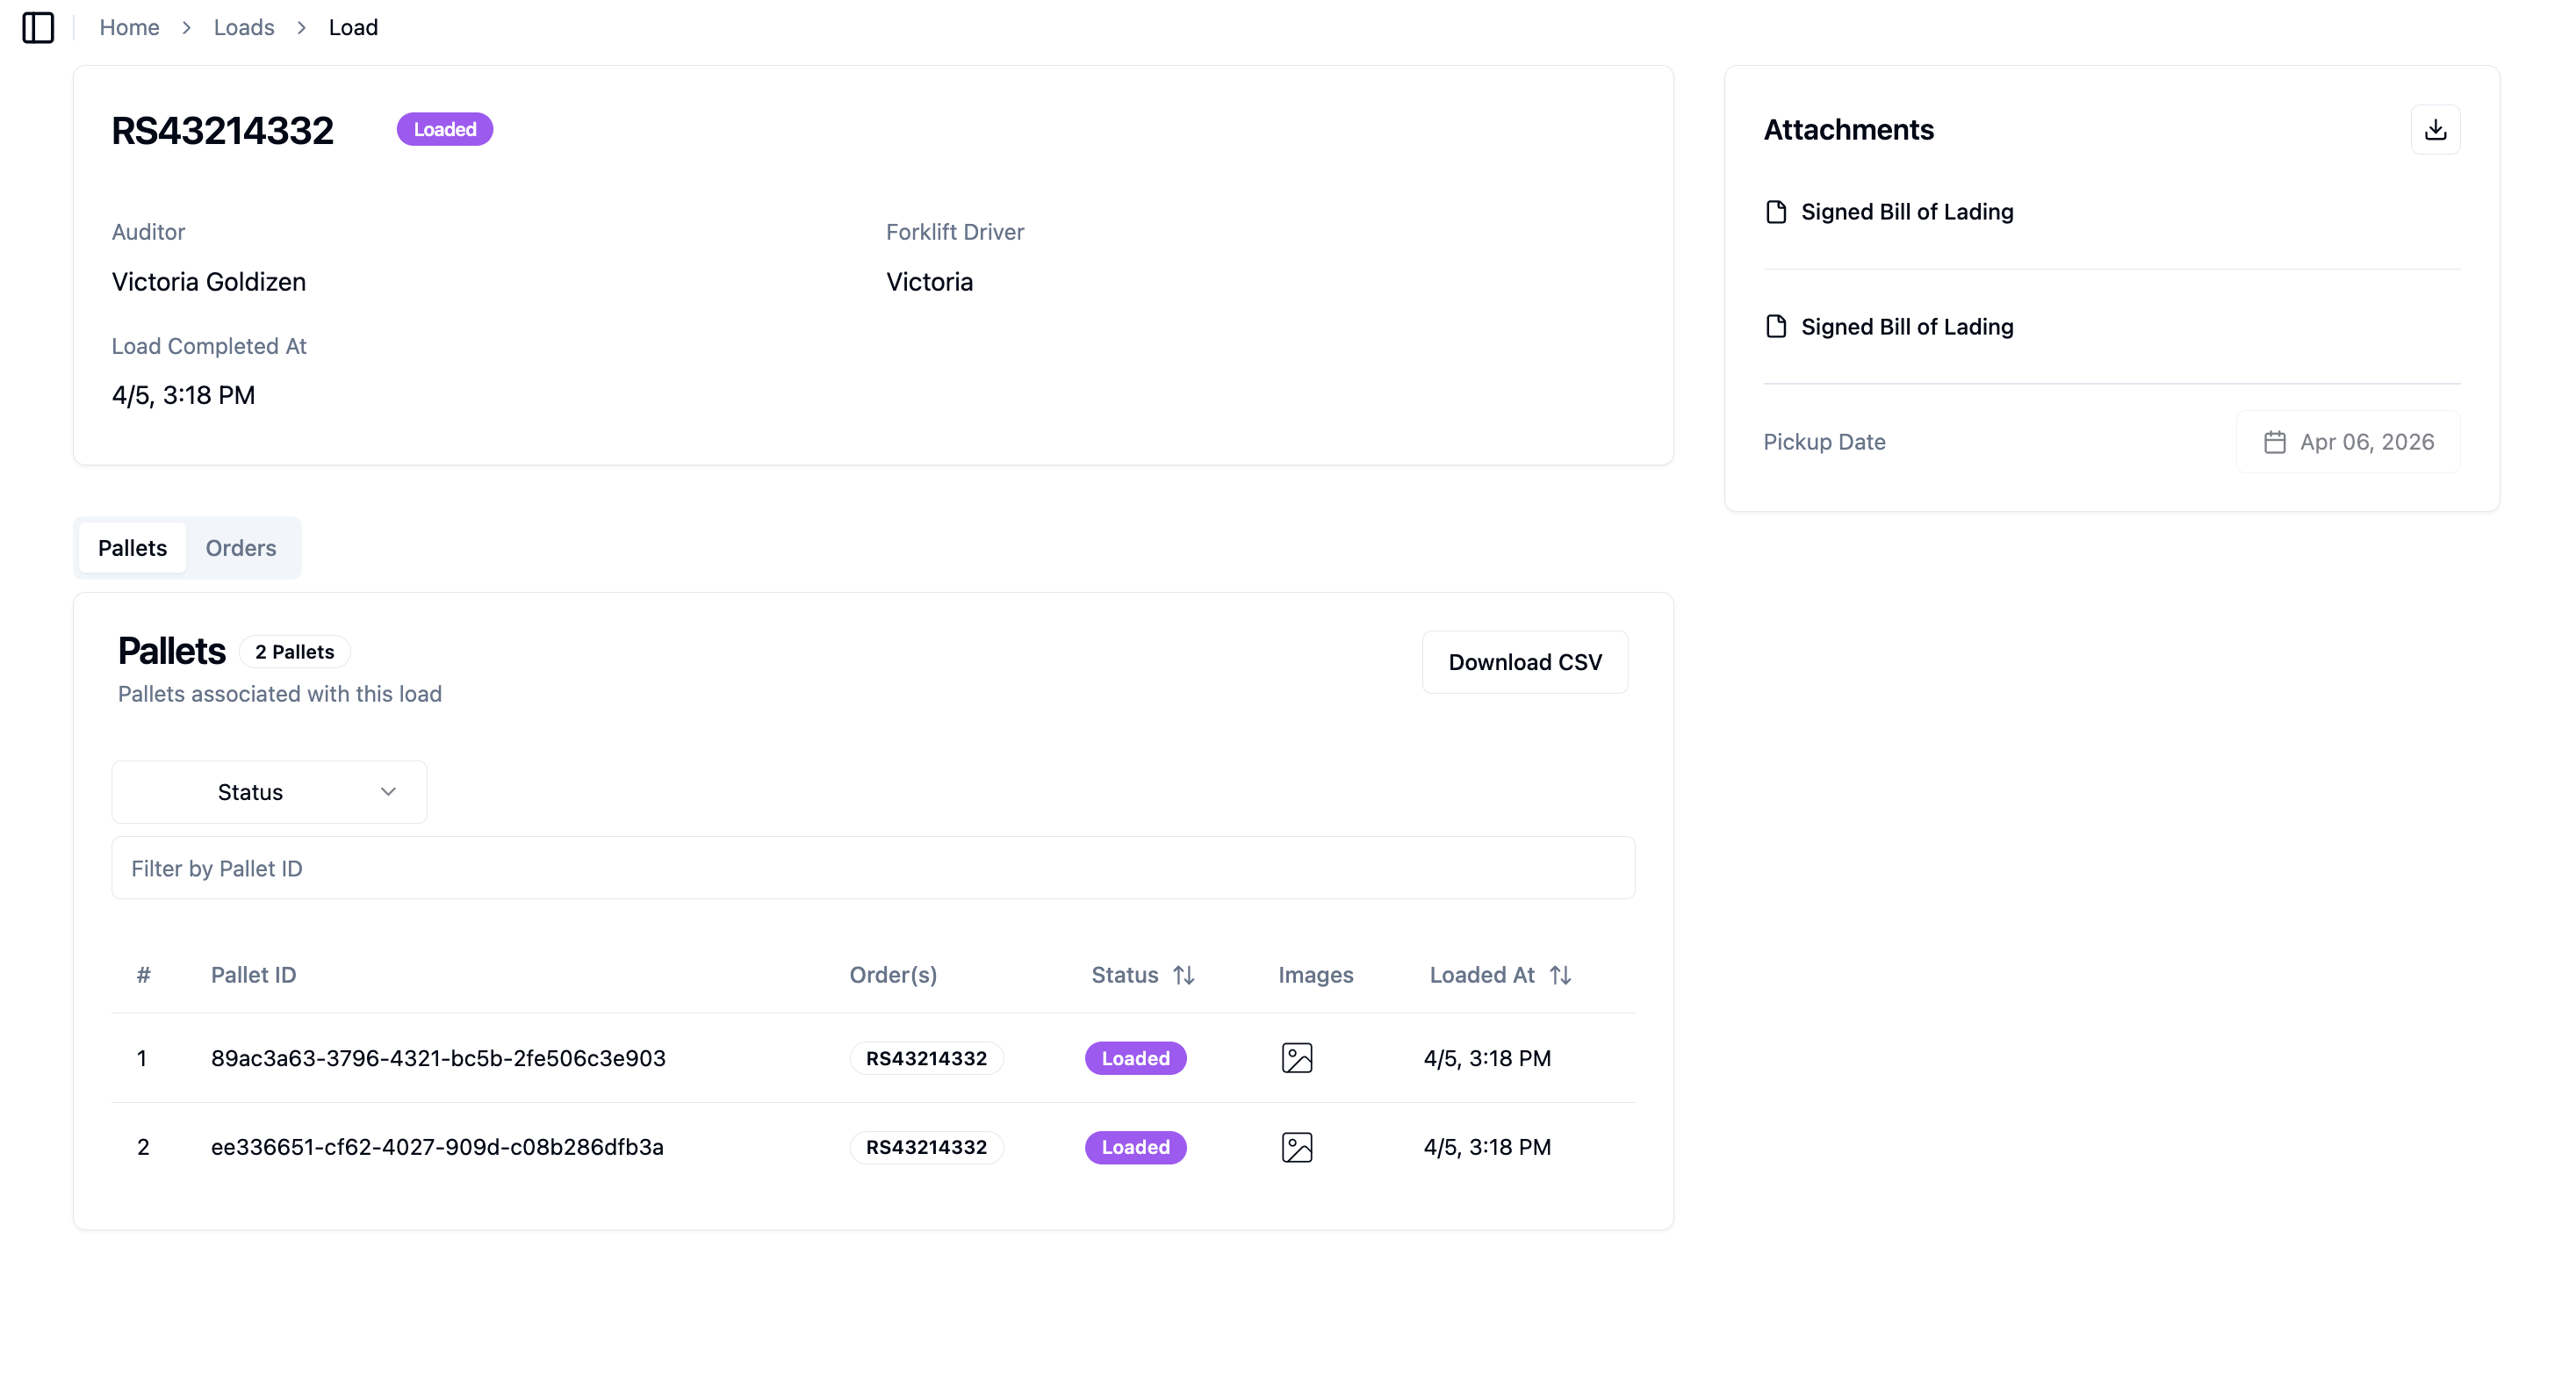
Ship Order
Pro Tip: We recommend waiting to complete this step until the trailer has physically arrived for the load.
Return to the app and tap 'Ship Order'.
Once the load is created in the dashboard, scan the order or pallet QR on the Get Started screen. The status will show Ship Order (Pallets 0/X) as the active step. Tap 'Ship Order' to begin loading.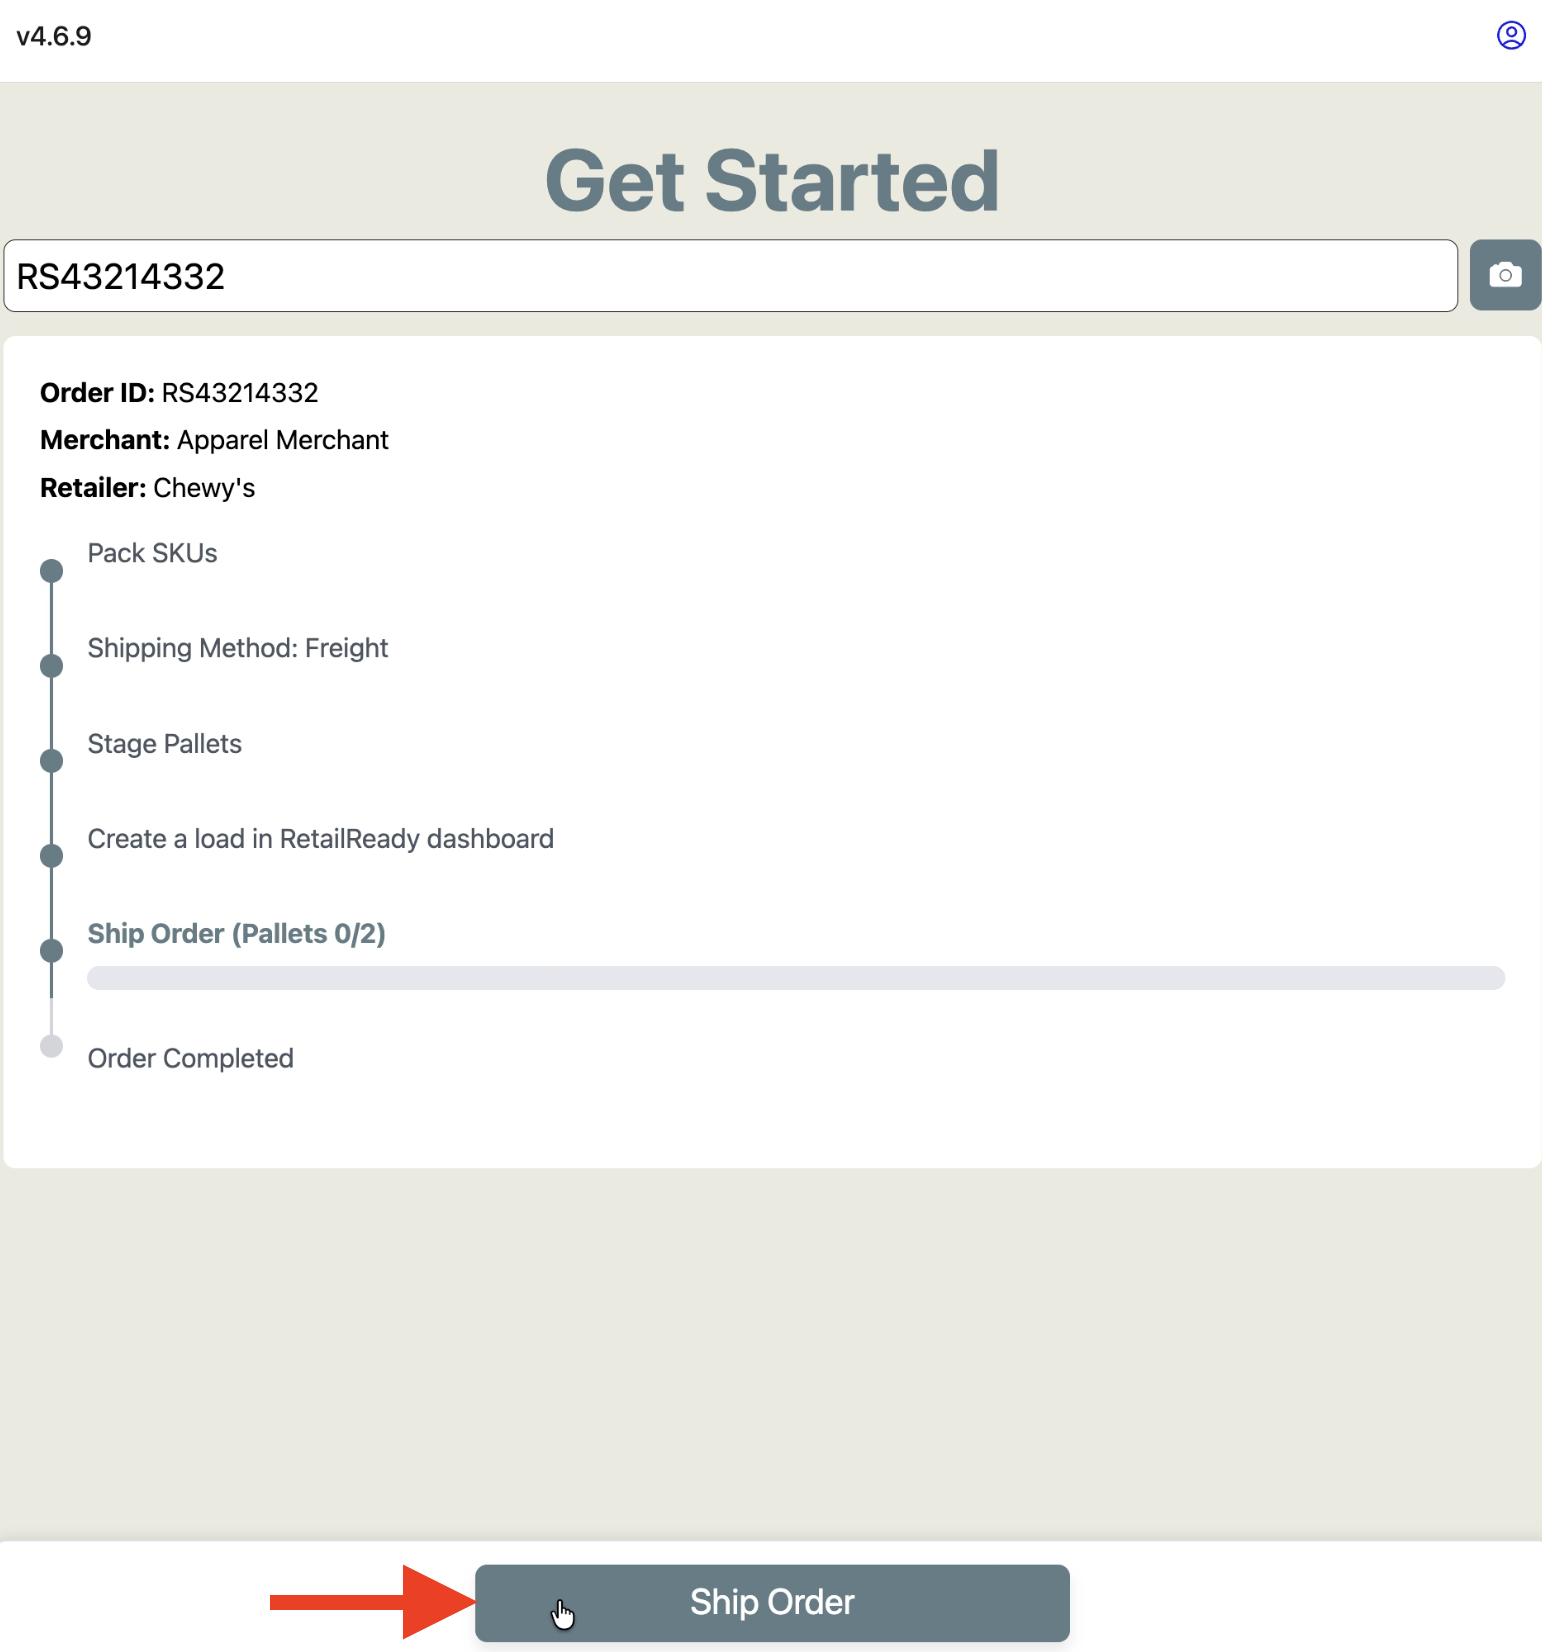
On the Load Truck screen, tap '+ Add Pallet'.
The Load Truck screen shows Load Progress (0 / X pallets loaded) and the Forklift Driver name. Enter a forklift driver name and tap '+ Add Pallet' to begin scanning pallets onto the truck.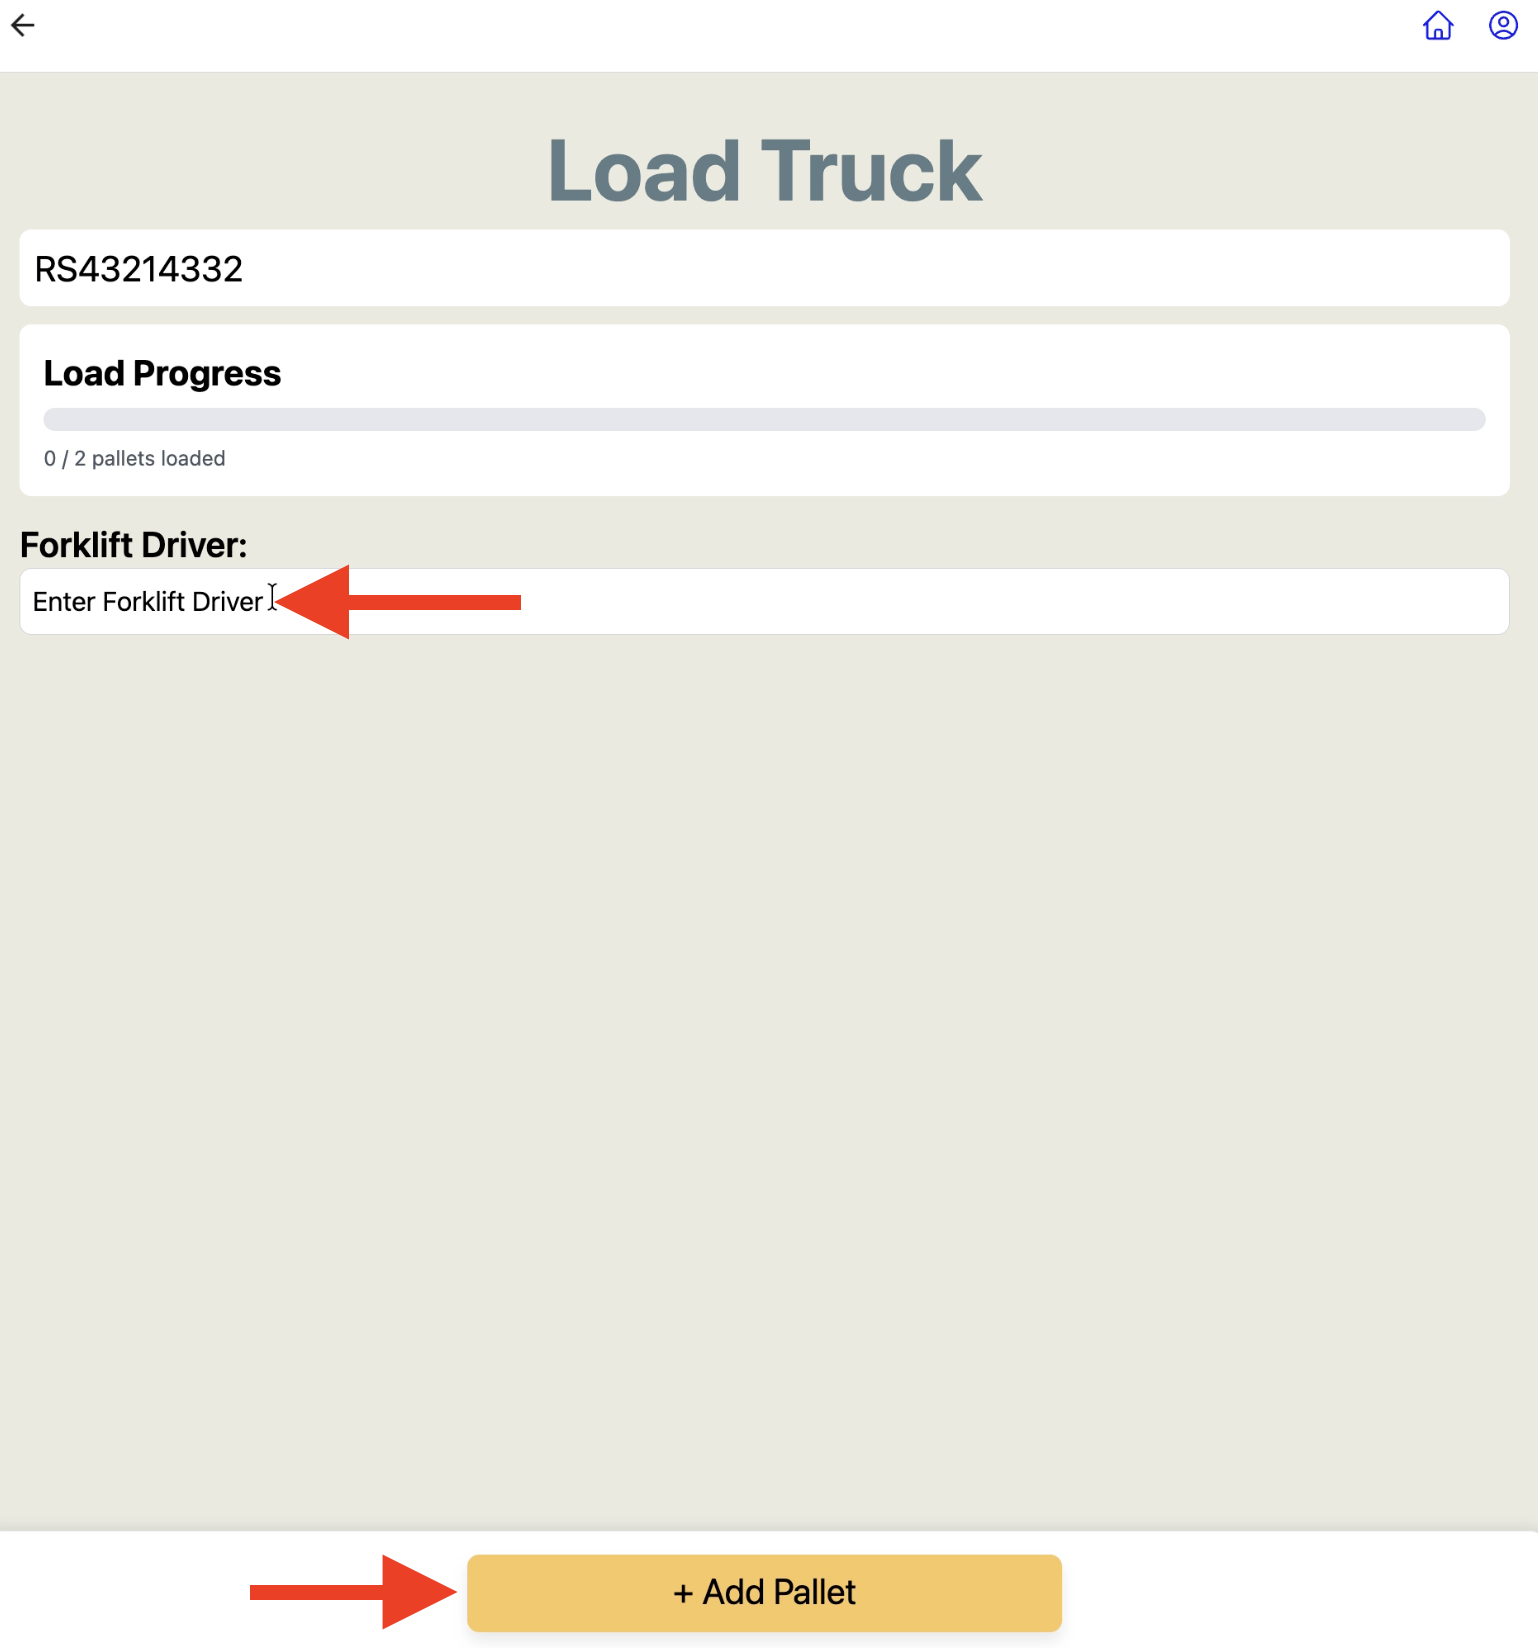
Scan each pallet QR code to load it out.
The Scan Pallet to Load Out screen prompts you to scan the Pallet QR Code for each pallet. Scan the QR label from the pallet one at a time.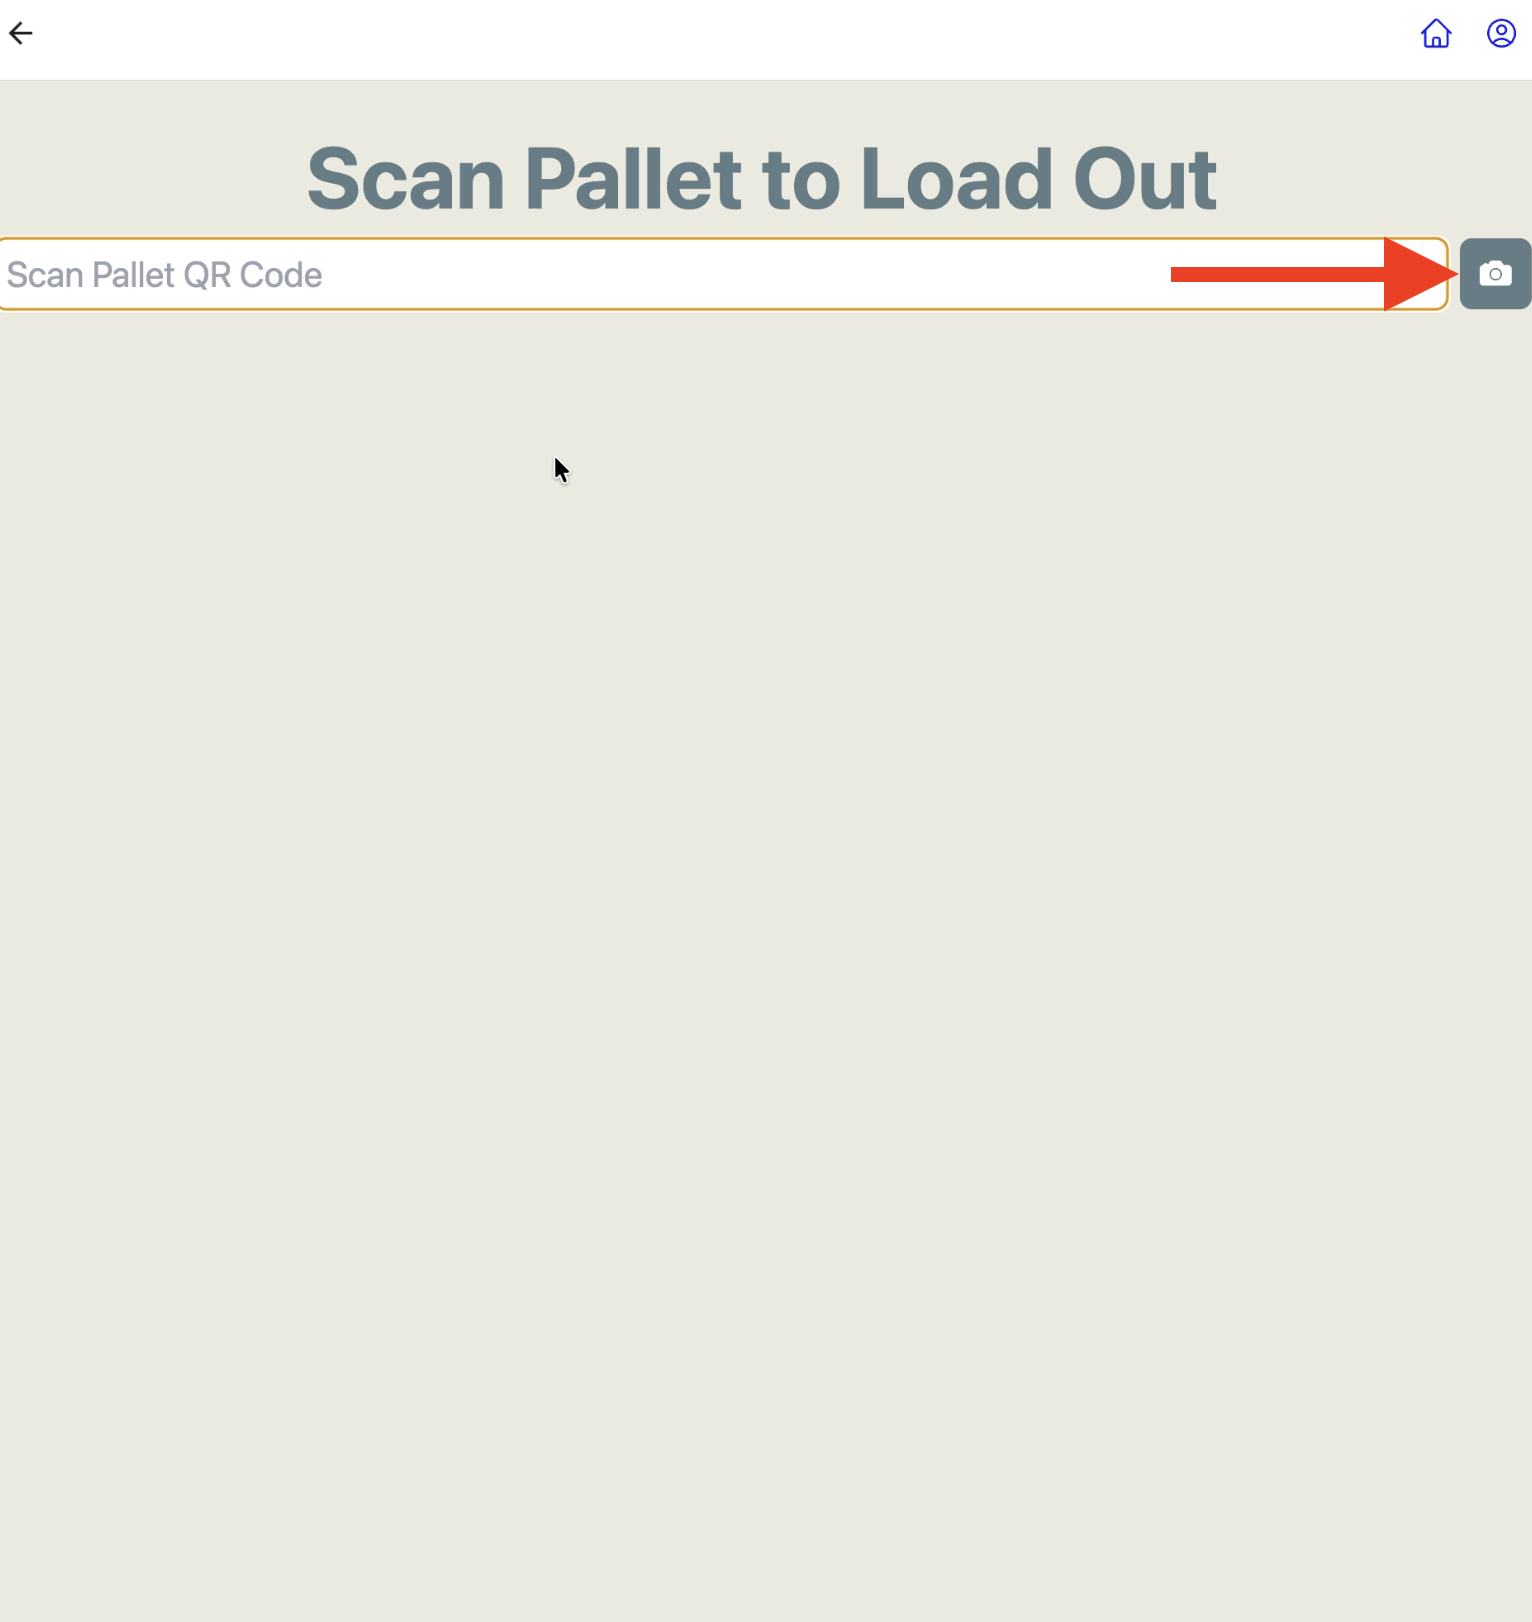
Review the Pallet Details and tap 'Continue'.
After scanning the pallet QR code, the Scan Pallet to Load Out screen displays the Pallet Details: the pallet's Status (Staged) and the Order(s) and carton count associated with it. Confirm the details are correct, then tap 'Continue' to proceed to loading.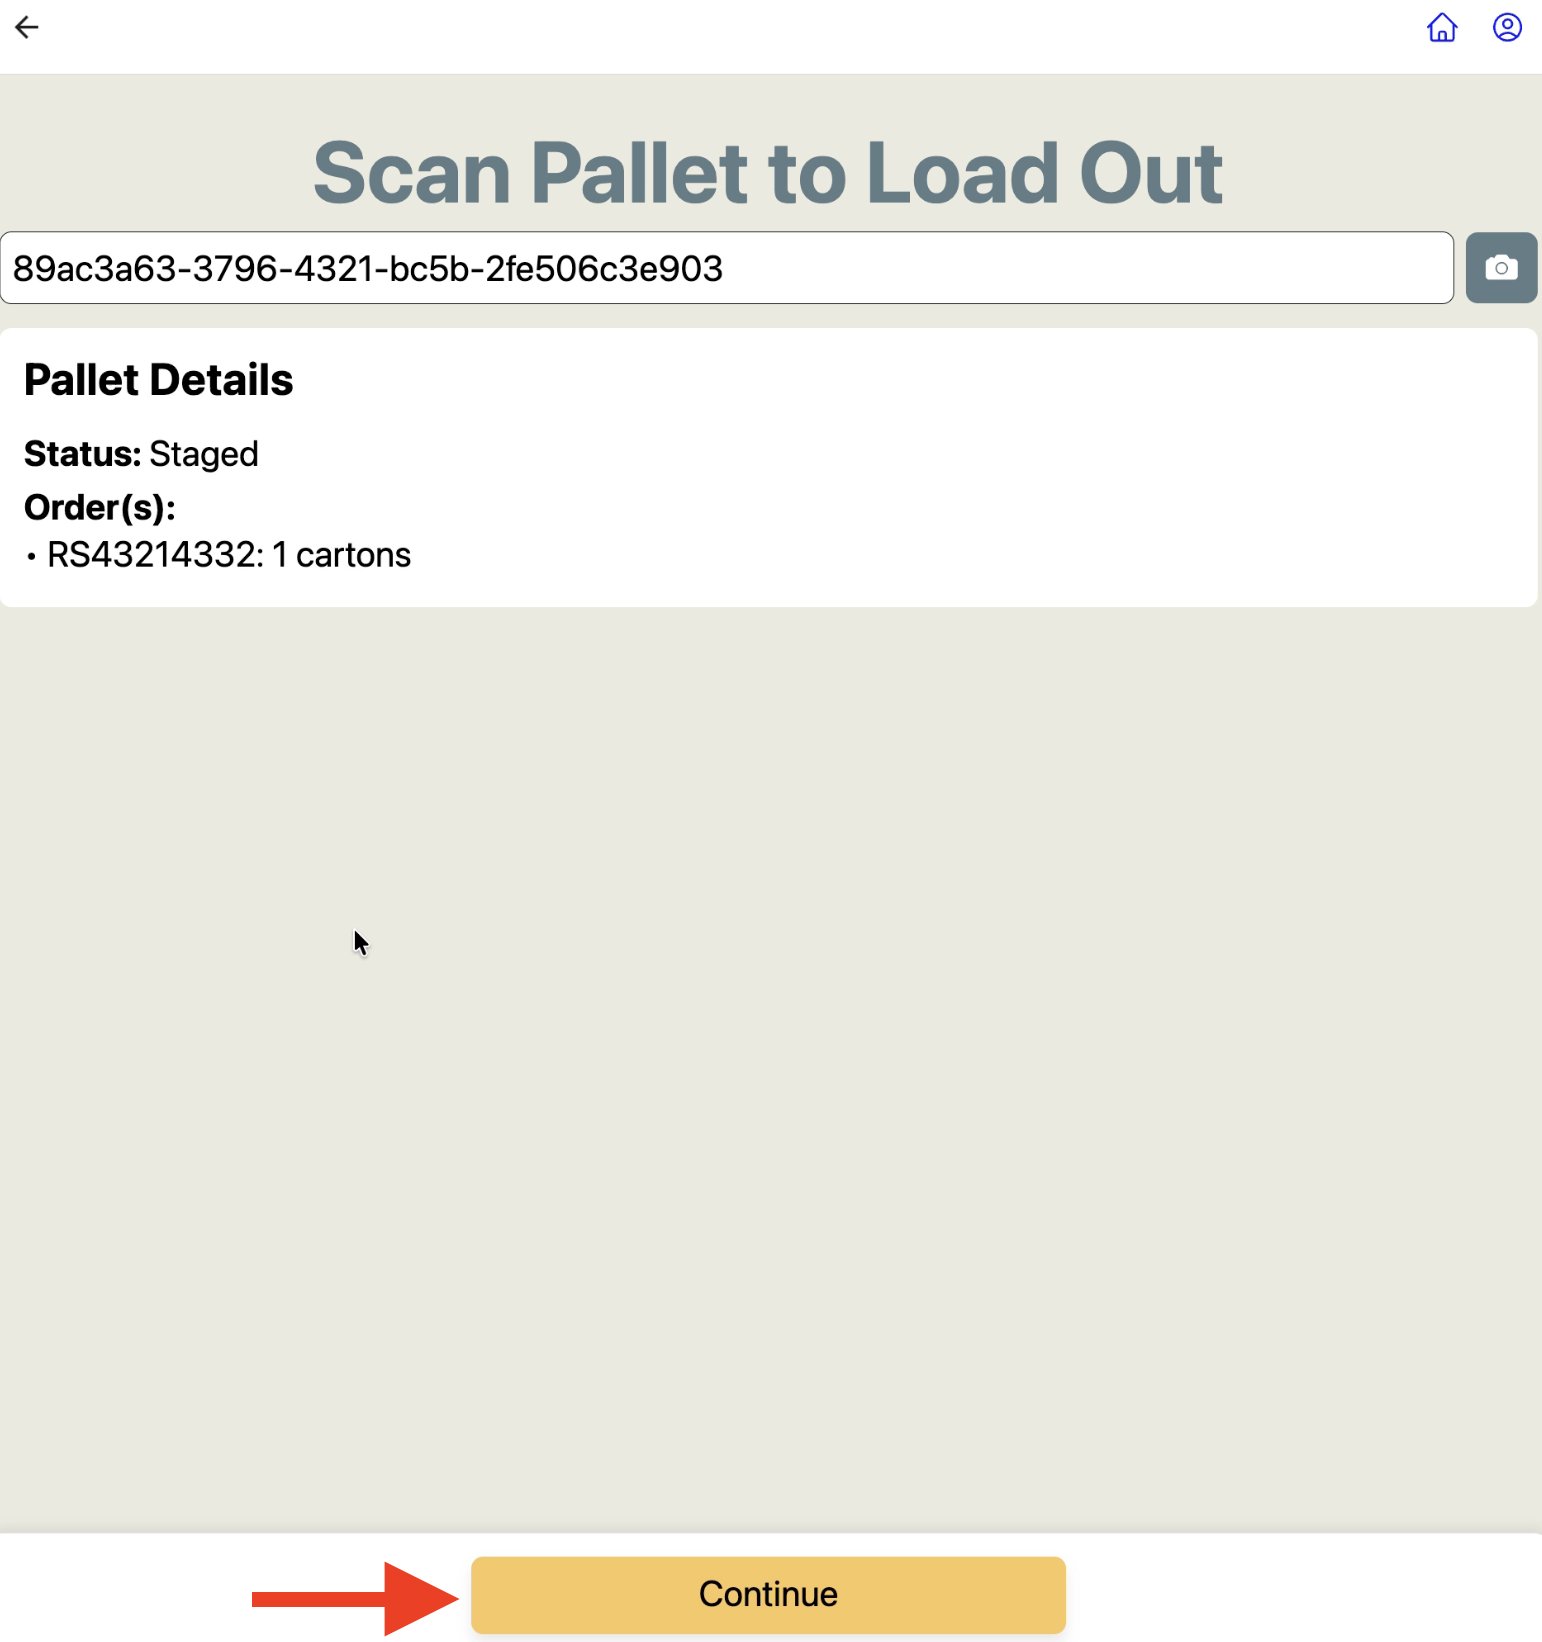
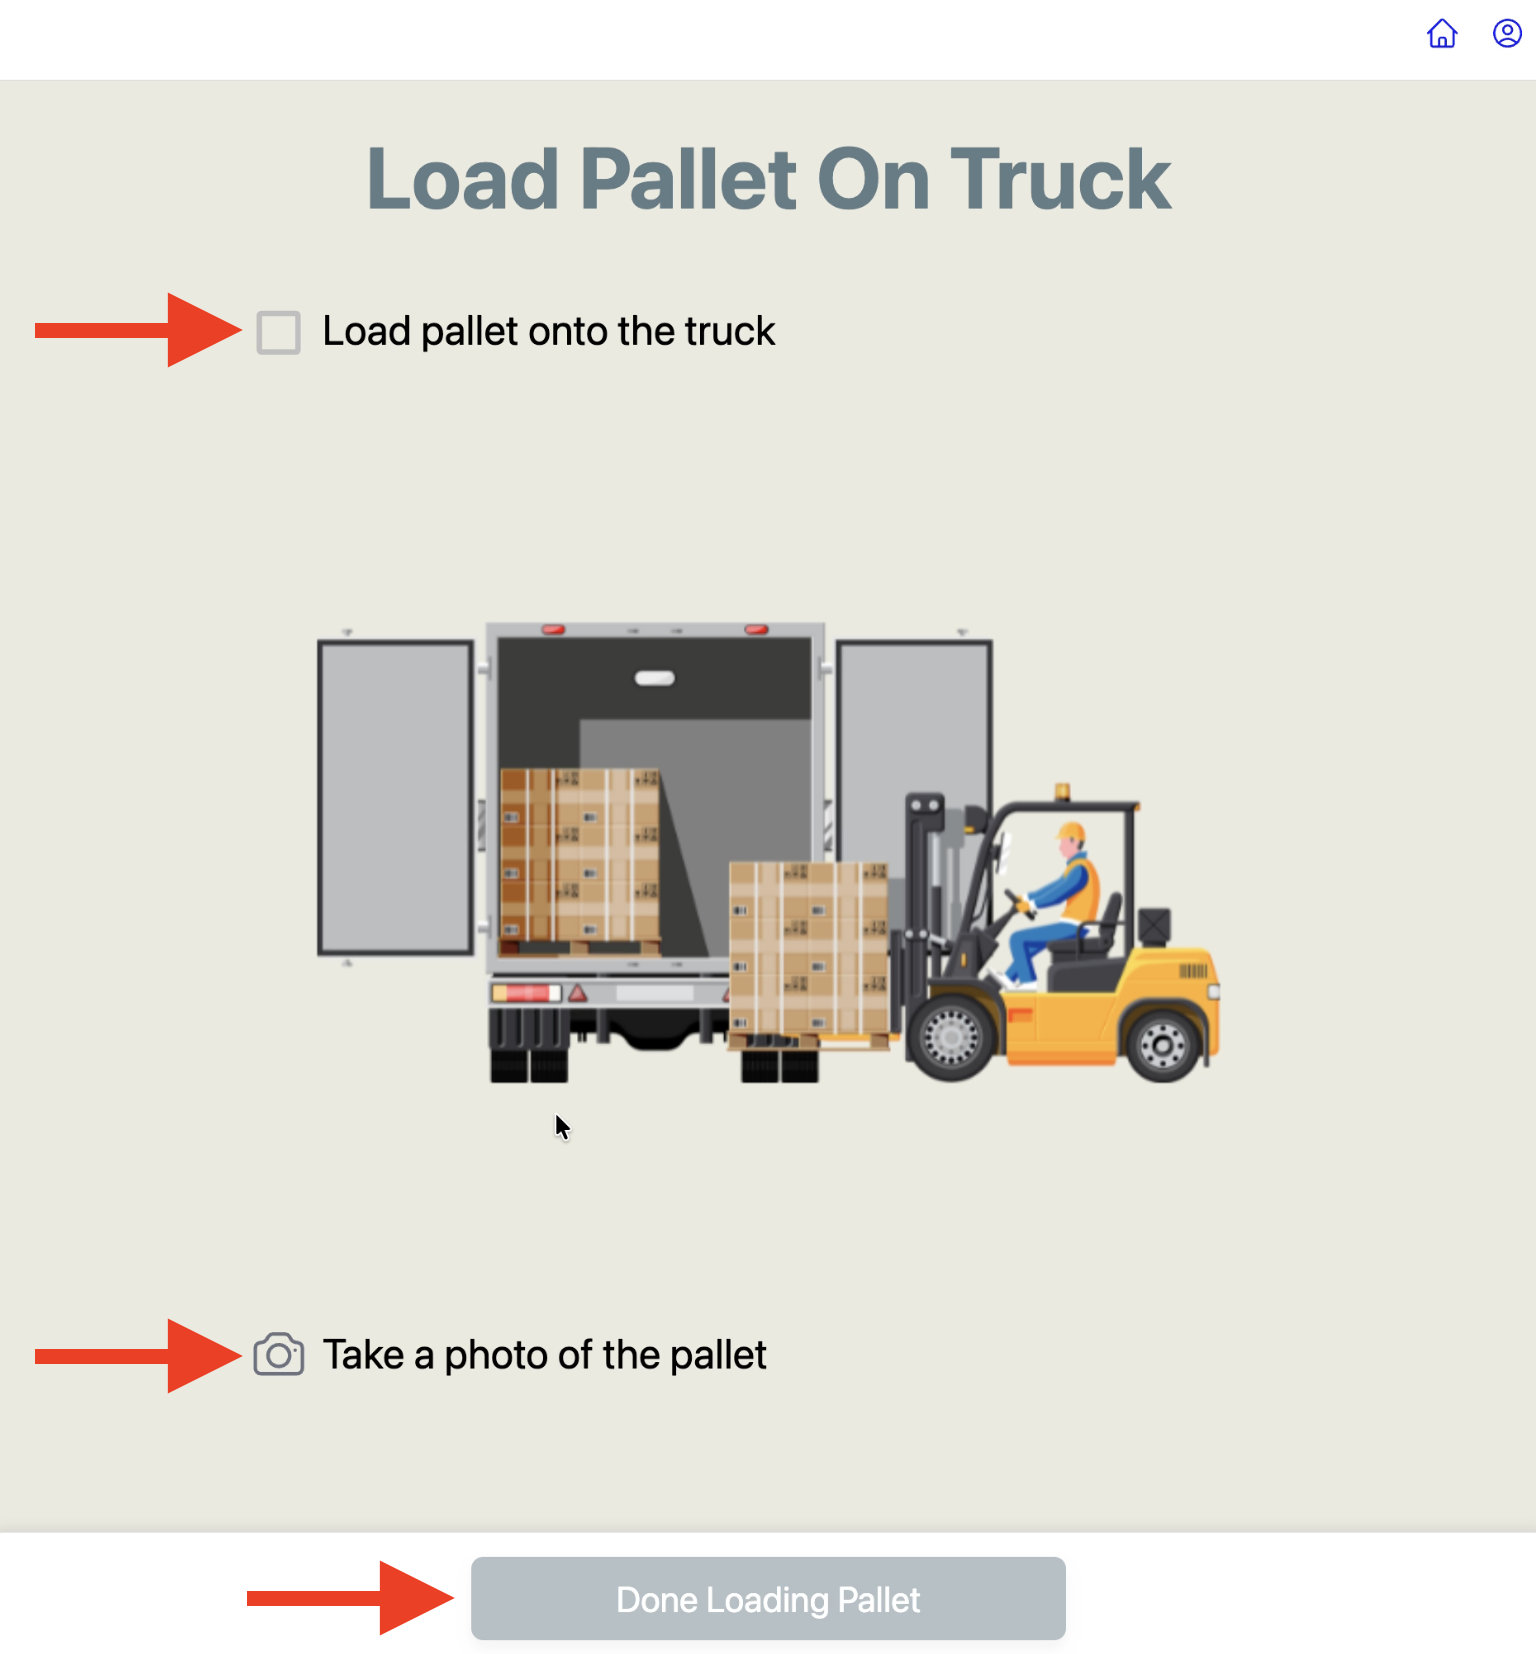
Confirm loading and submit the pallet photo, then tap 'Done Loading Pallet'.
The Load Pallet On Truck screen shows two tasks:Check Load pallet onto the truck once the forklift has physically loaded the pallet.
Tap the camera icon to take a photo of the pallet, a Photo Verification Required prompt will appear. Take the photo (ensure labels are clearly visible), then tap 'Submit Photos'.
Once both tasks are complete, tap 'Done Loading Pallet'.
Review the Pallet Loaded screen and tap '+ New Pallet' to load the next pallet.
After submitting the photo for the first pallet, the Pallet Loaded screen appears showing progress (e.g., 1 / 2 pallets loaded). Tap '+ New Pallet' and repeat Steps 3-5 for each remaining pallet.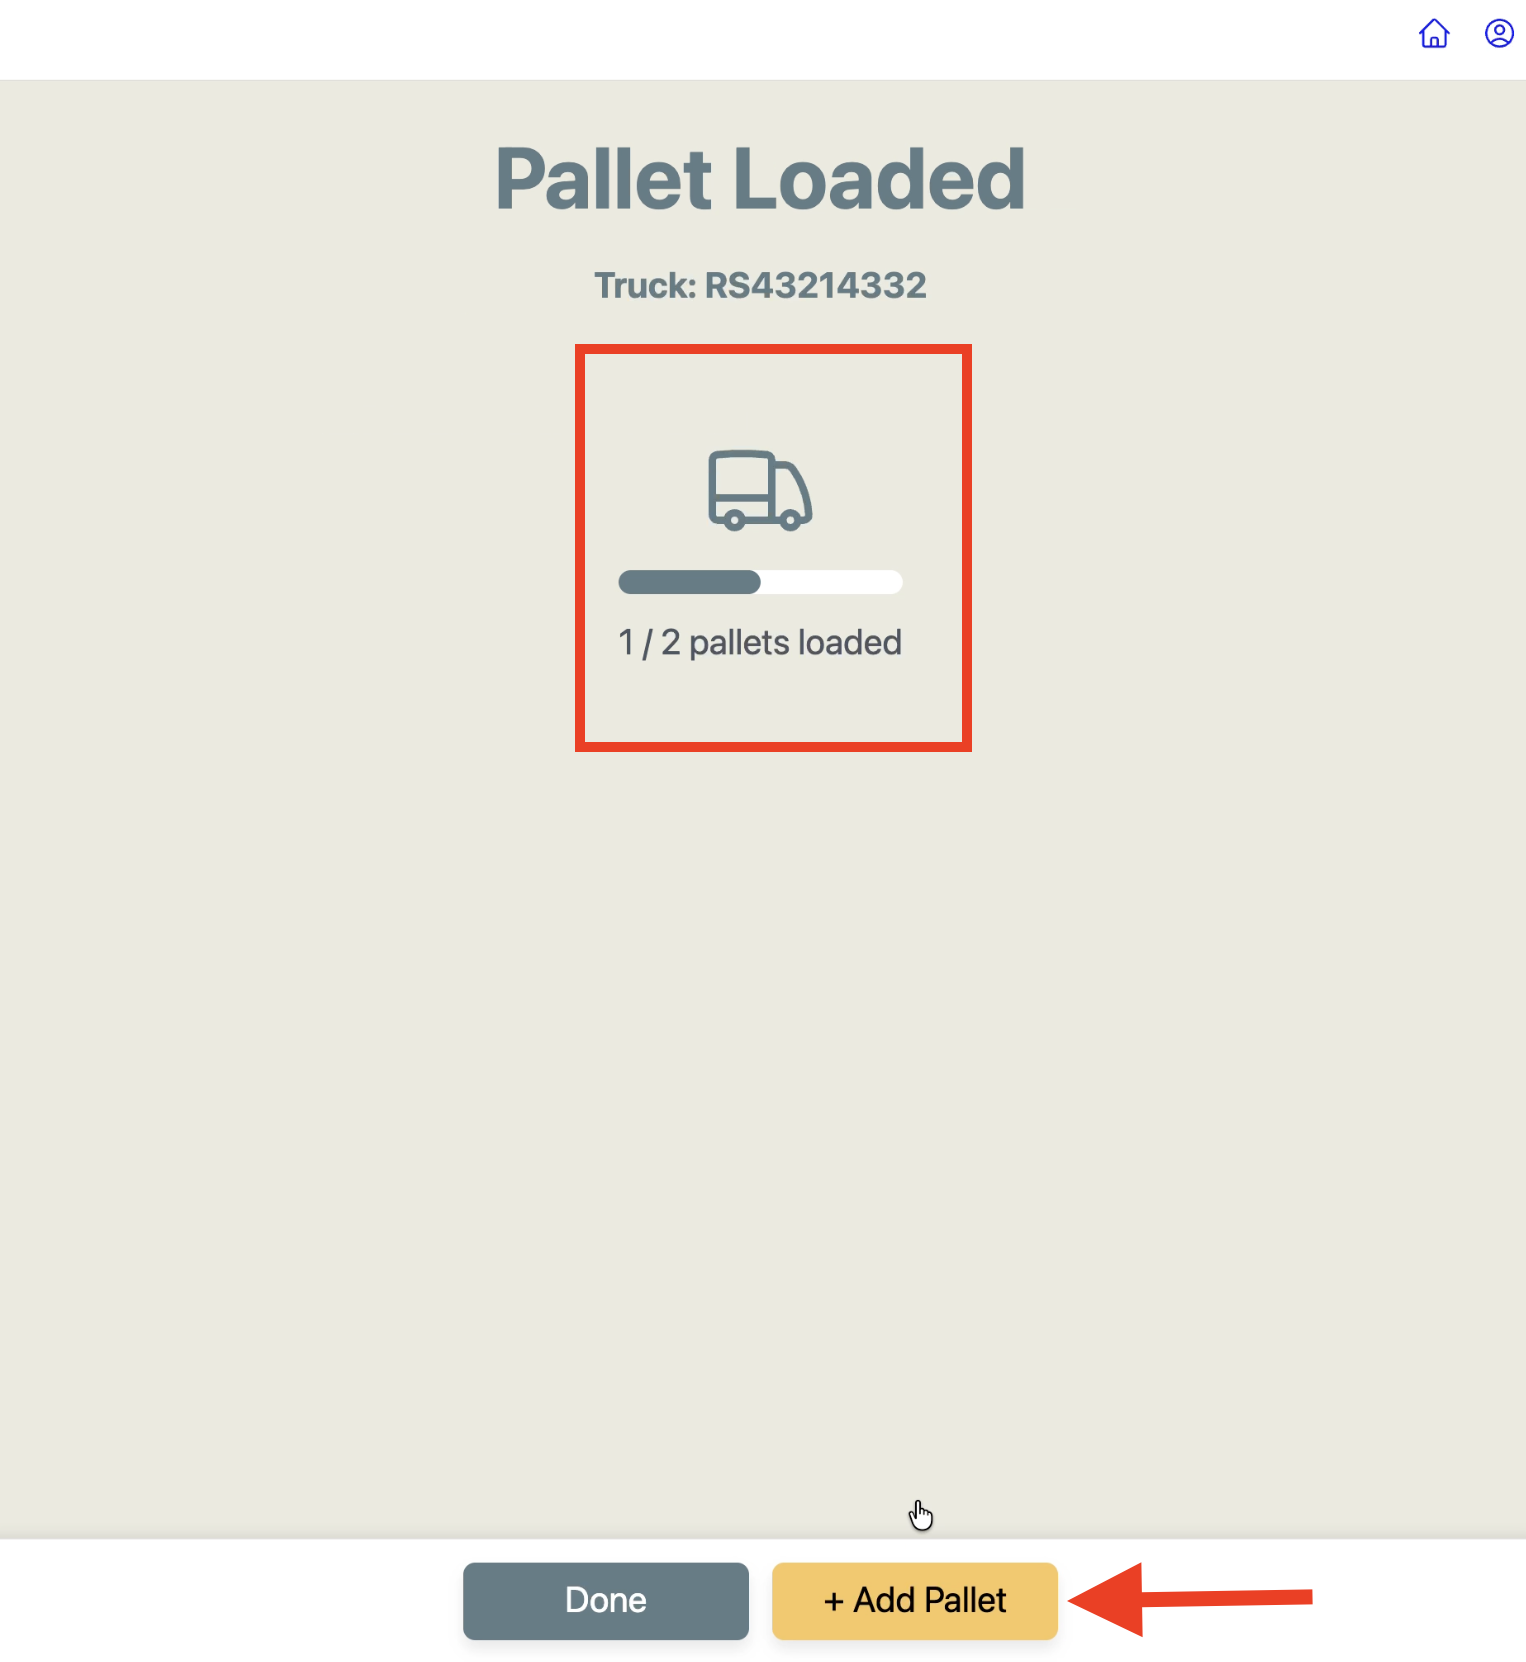
Review the Pallet Loaded screen and tap 'Next'.
Once all pallets are loaded, tap 'Next' to continue to the Upload Documents step.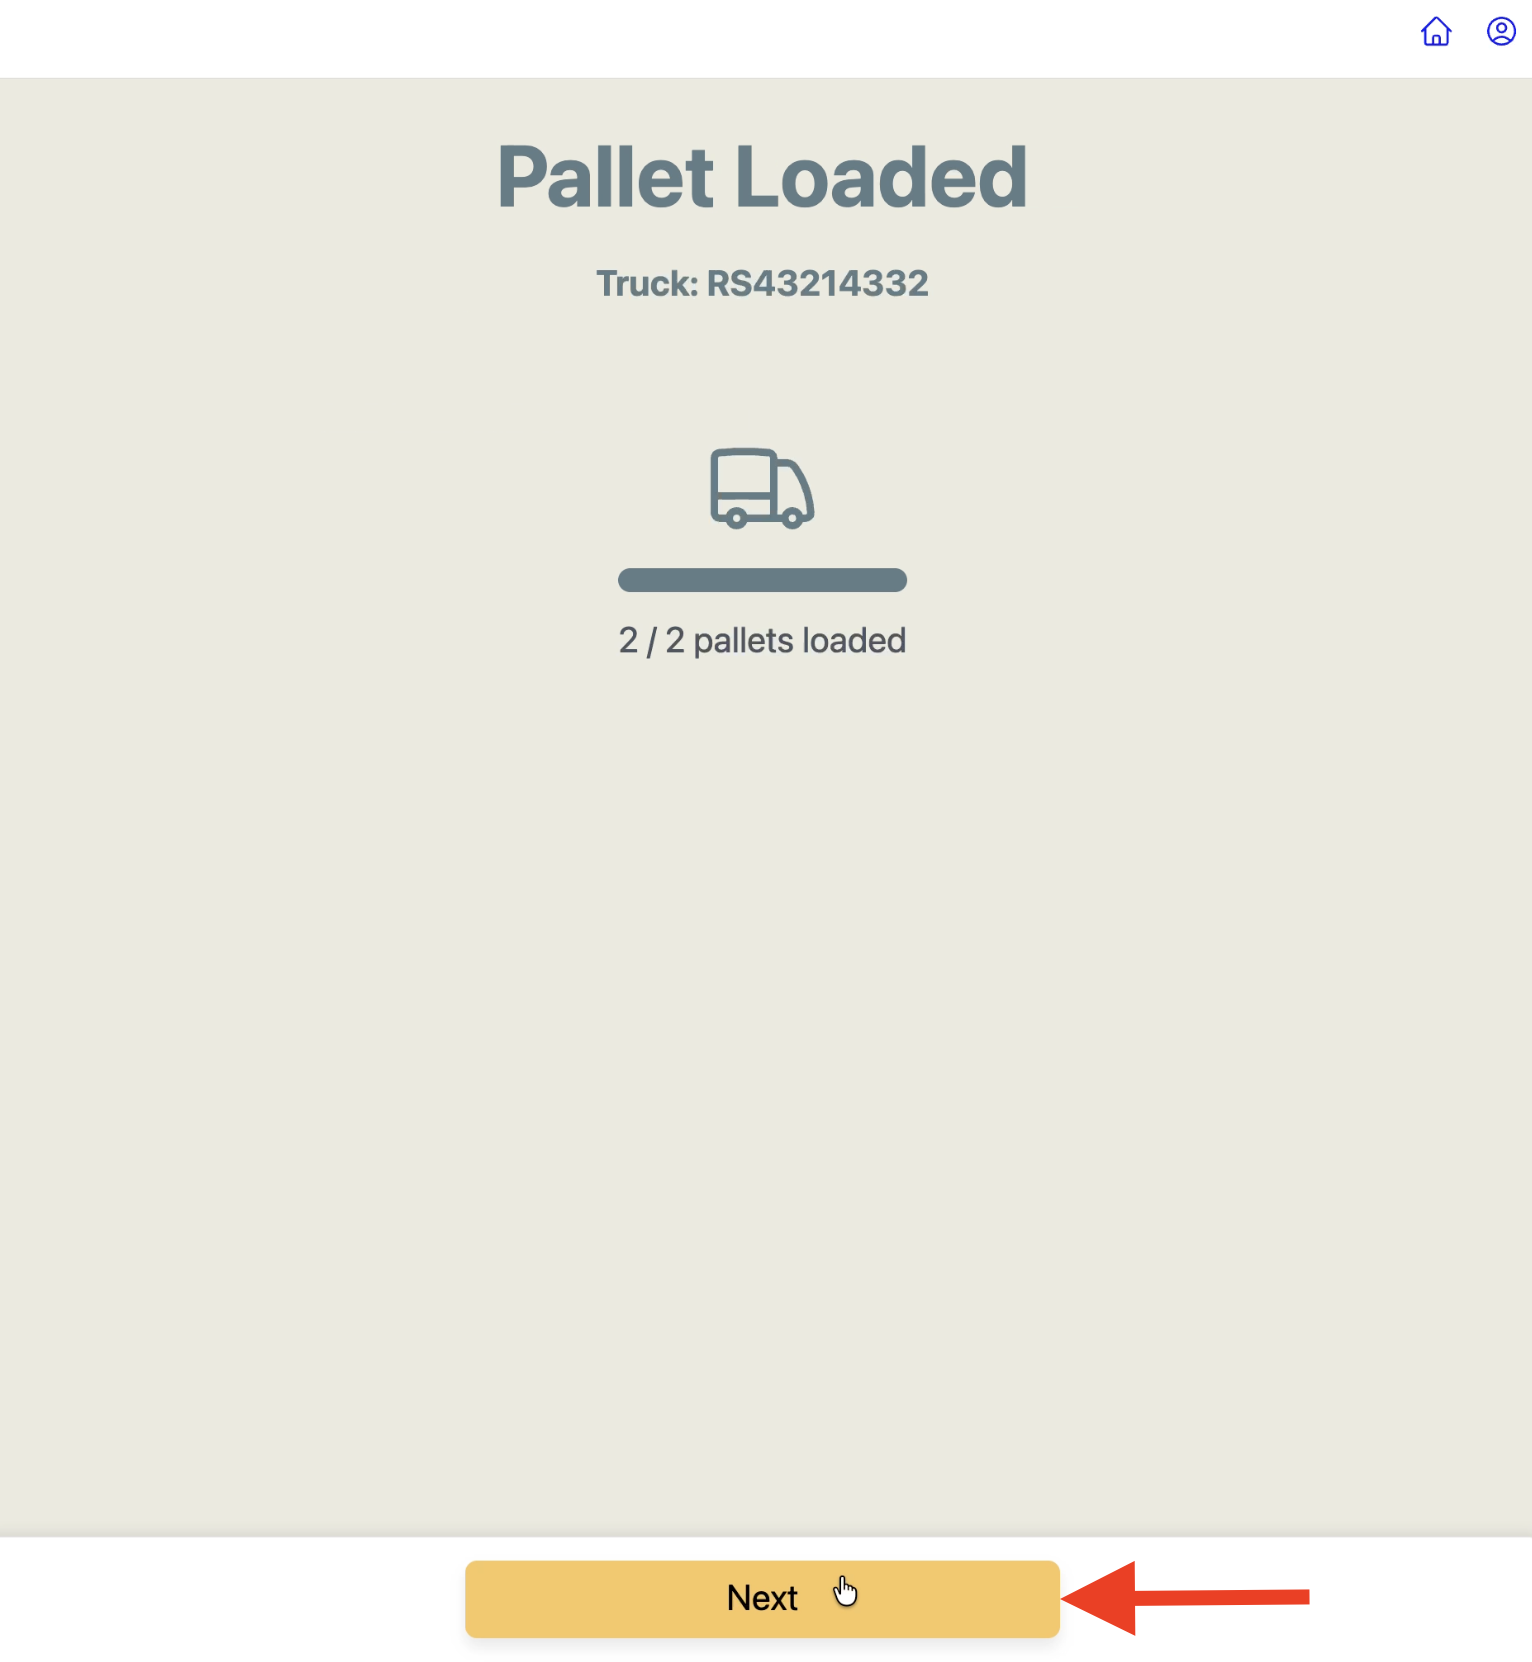
Download the BOL
The BOL will either be generated in RetailReady or provided directly from the carrier, follow the path that applies to your shipment.
Option A: RetailReady-generated BOL
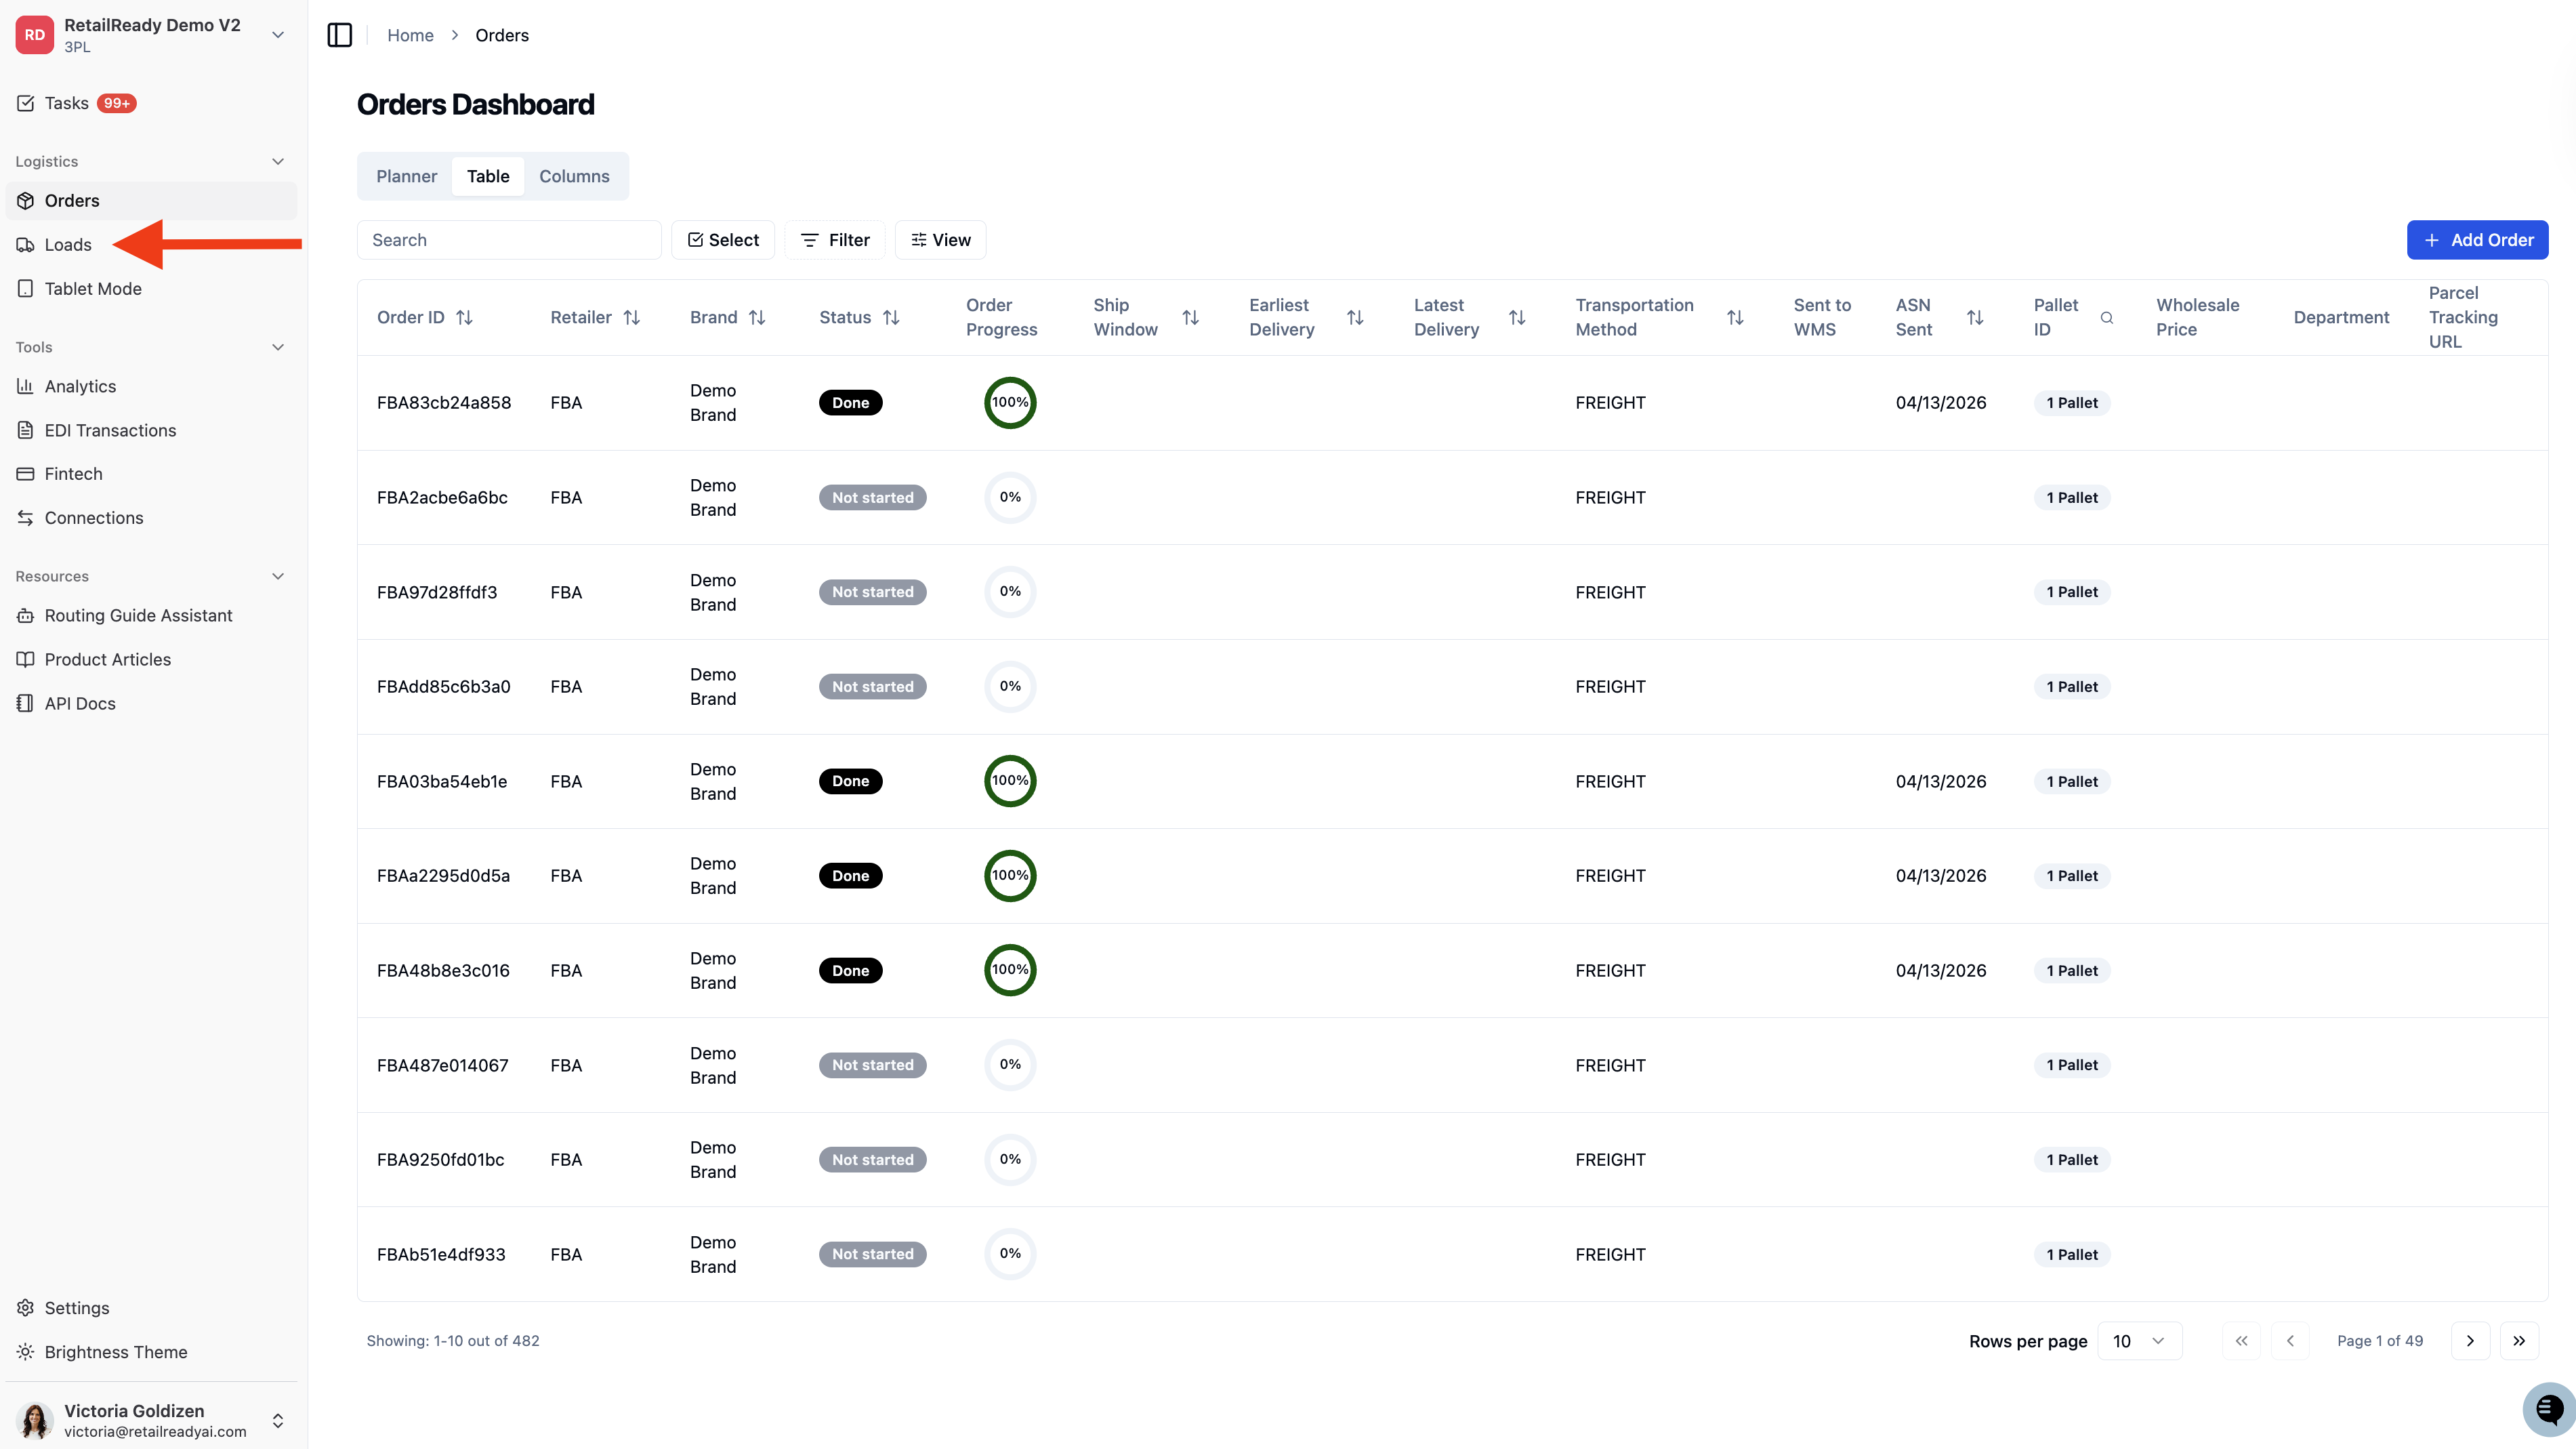
From the left navigation panel, click "Loads". Find the load associated with your order and click into it."
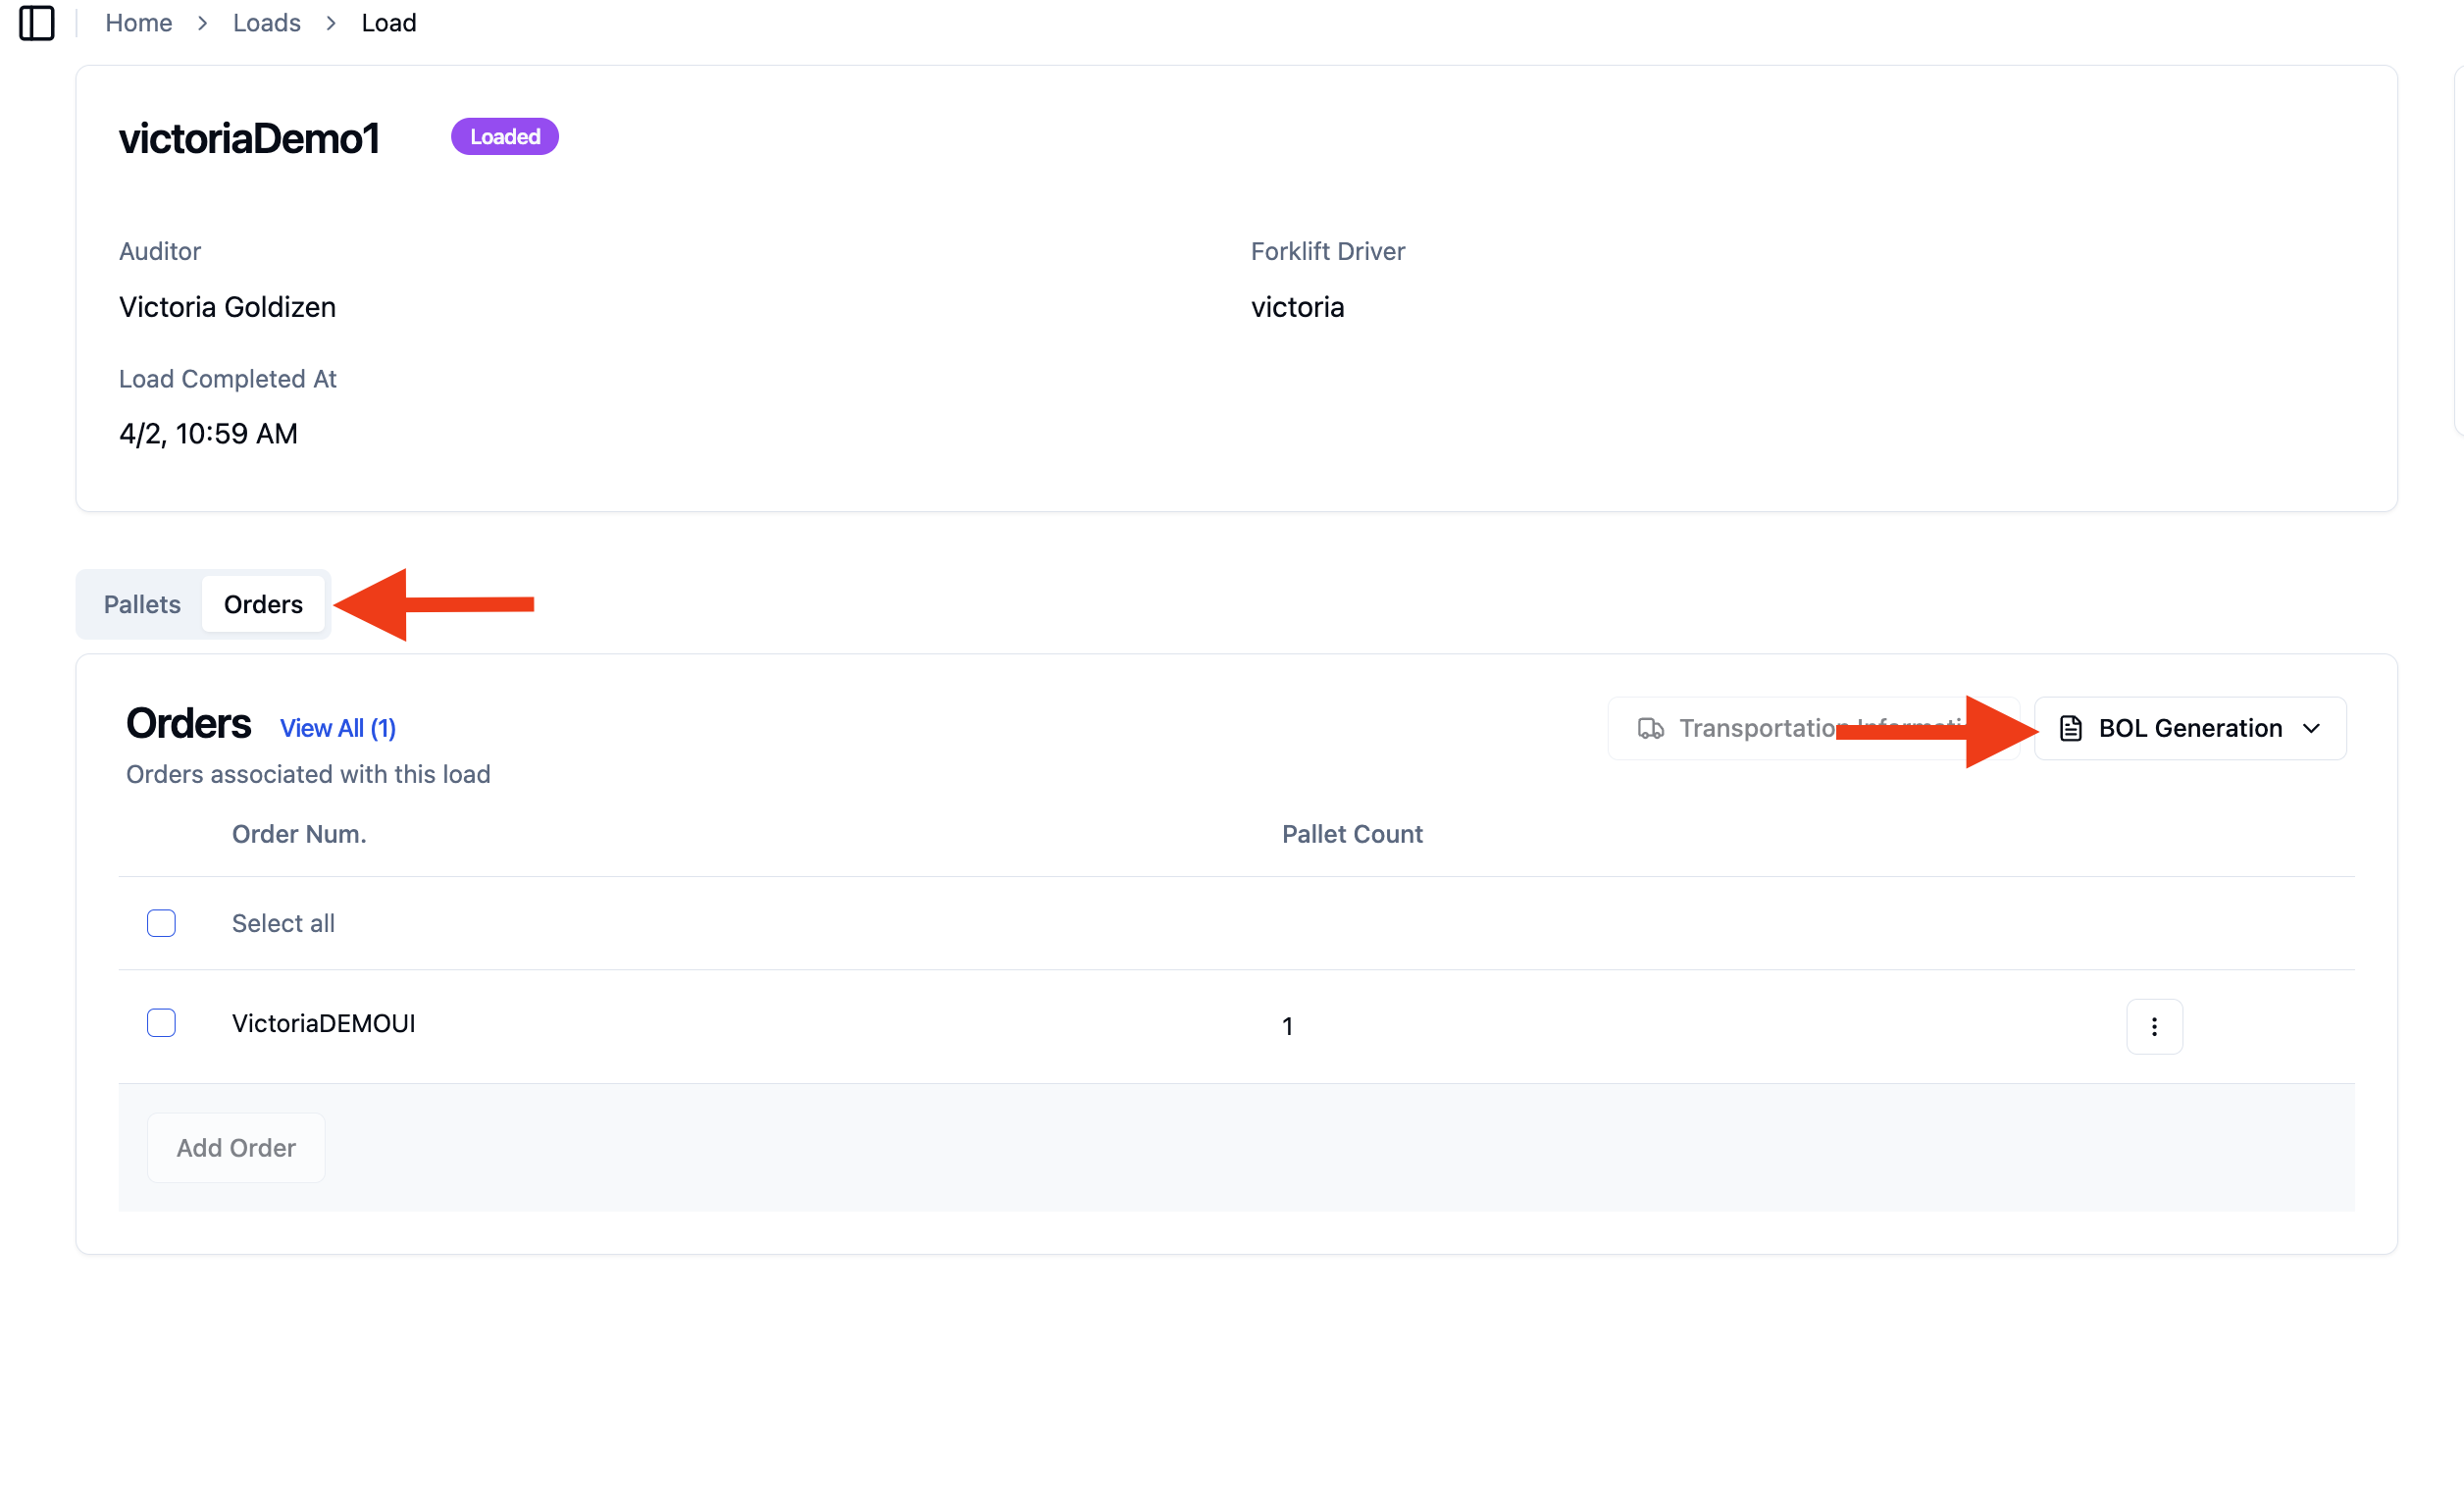
Click the "Orders" tab, then click "BOL Generation".
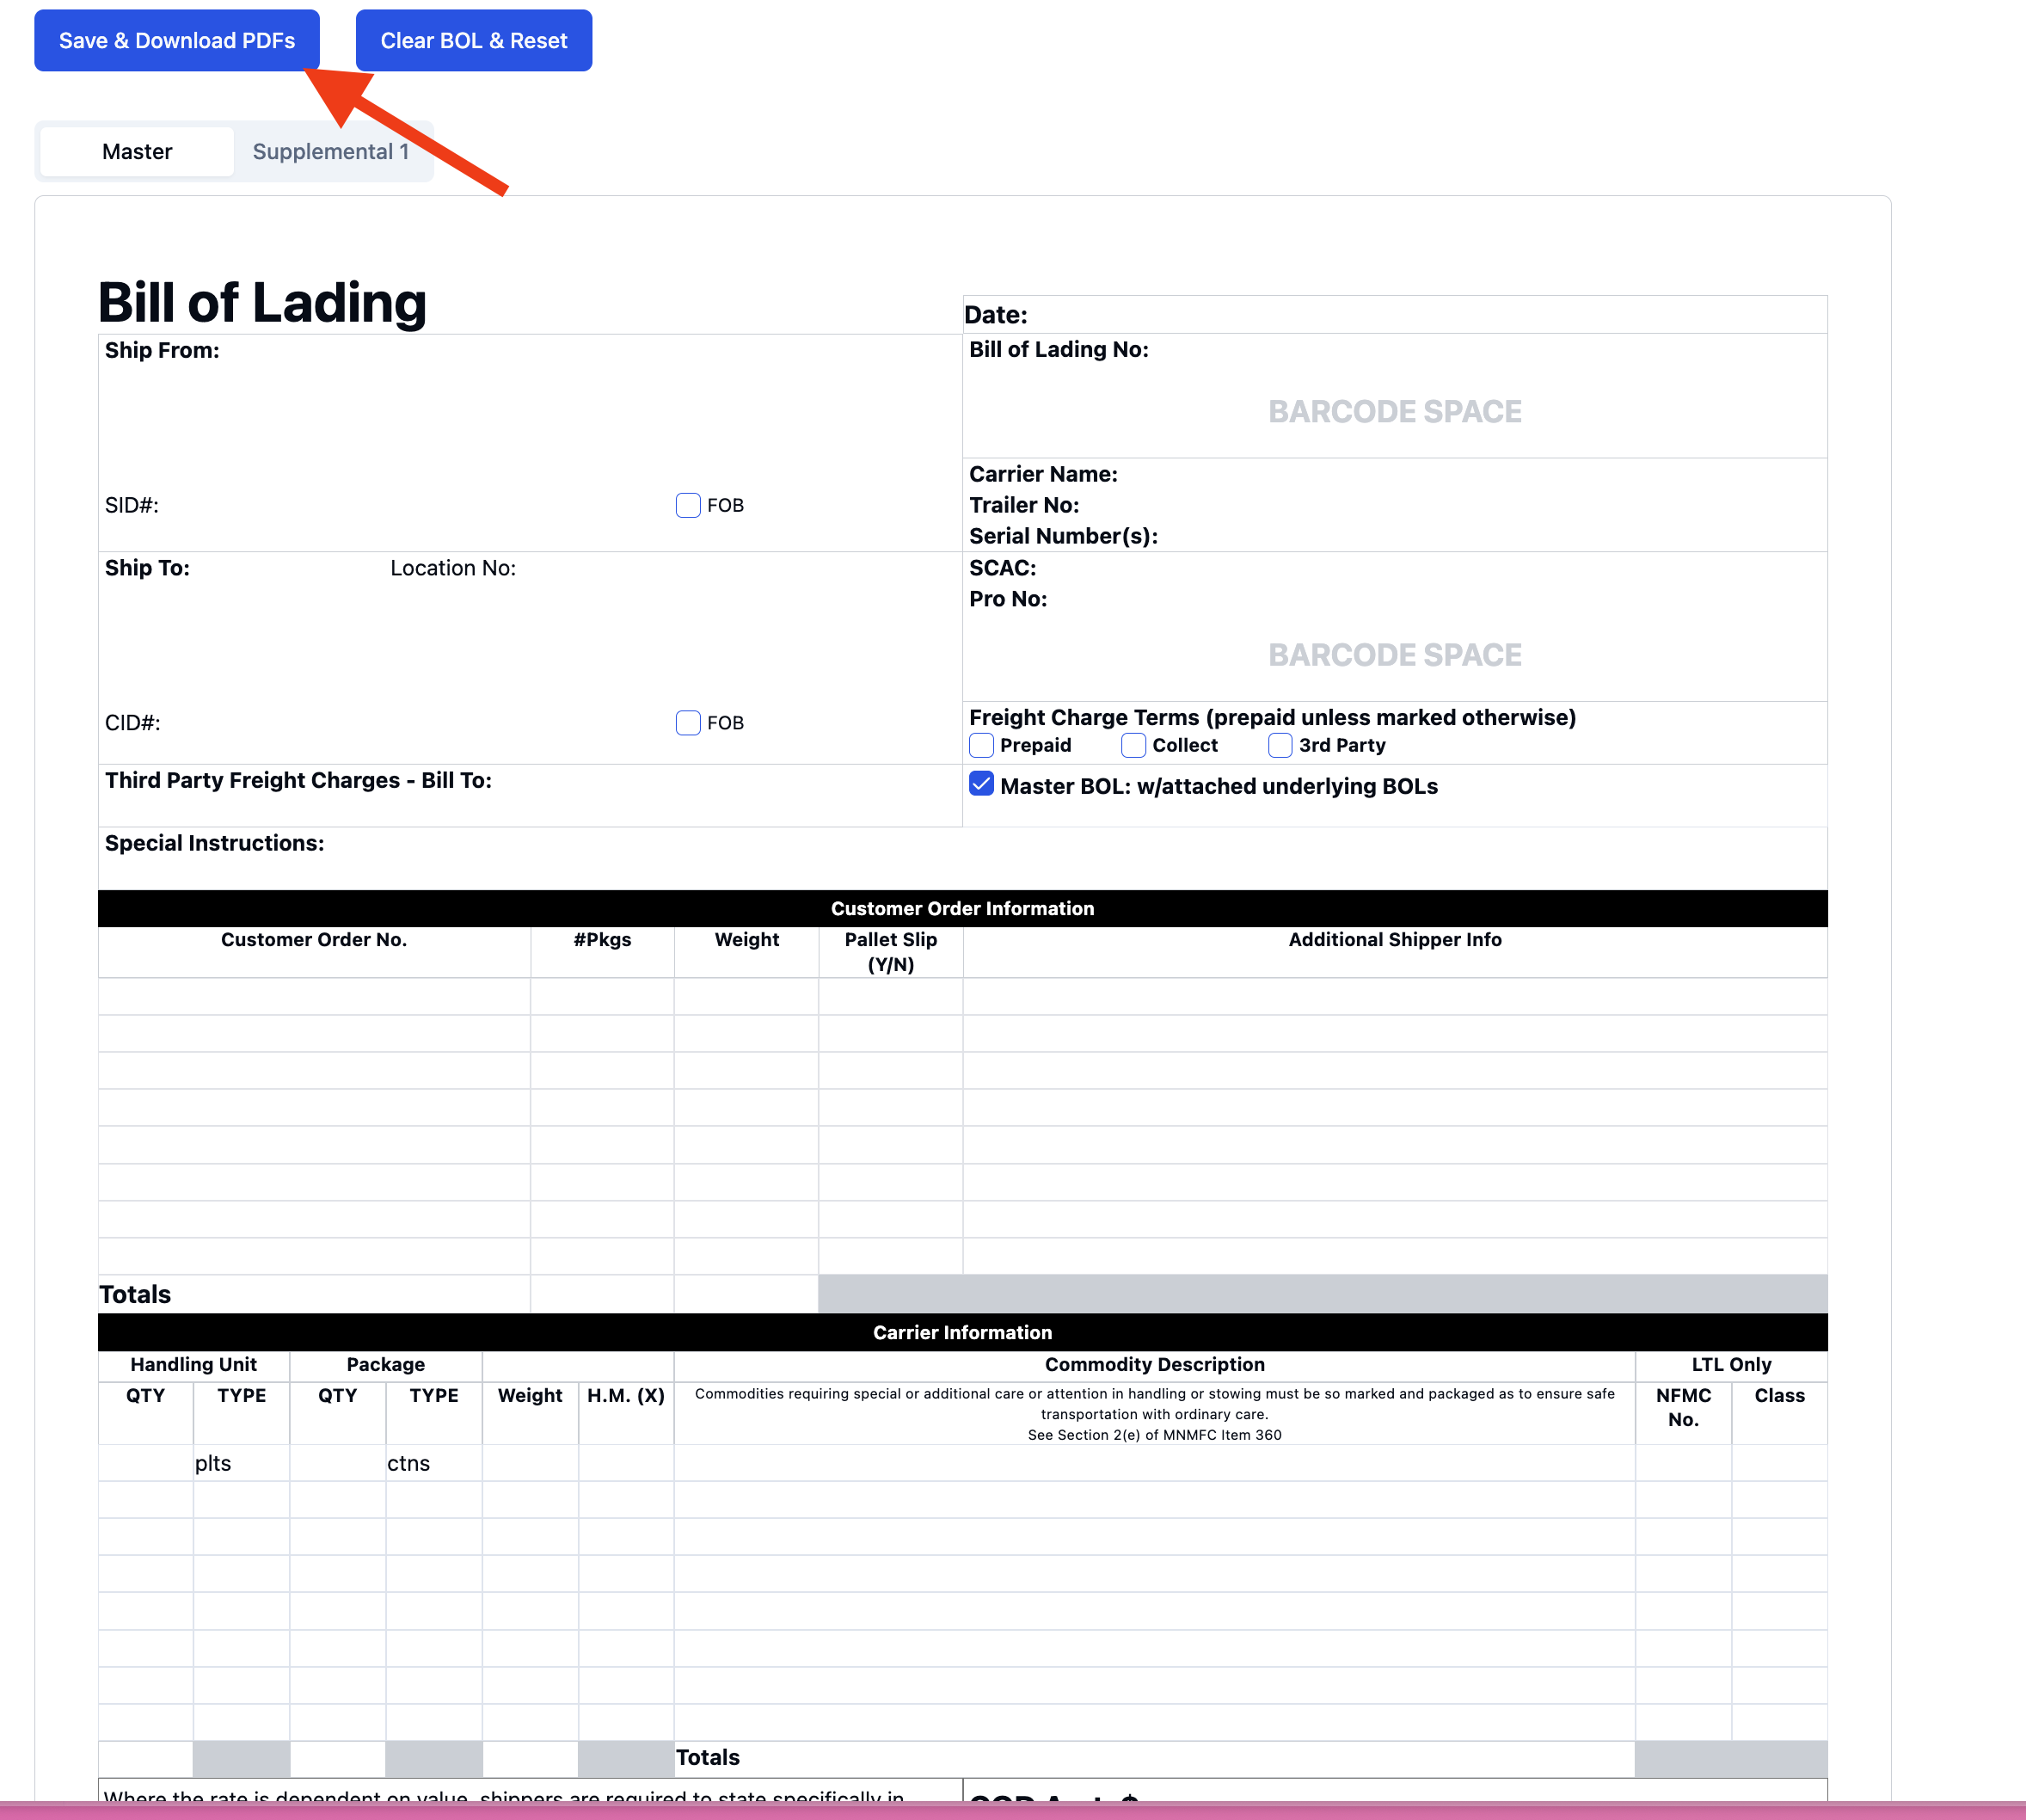
All fields on the BOL are editable — fill in or adjust any details as needed.
Click "Save and Download PDFs". The BOL will now appear in the Attachments section of your order.
From the left navigation panel, click 'Orders'. Find your freight order and click on it to open the order detail page.
Scroll to the Attachments section and expand it.
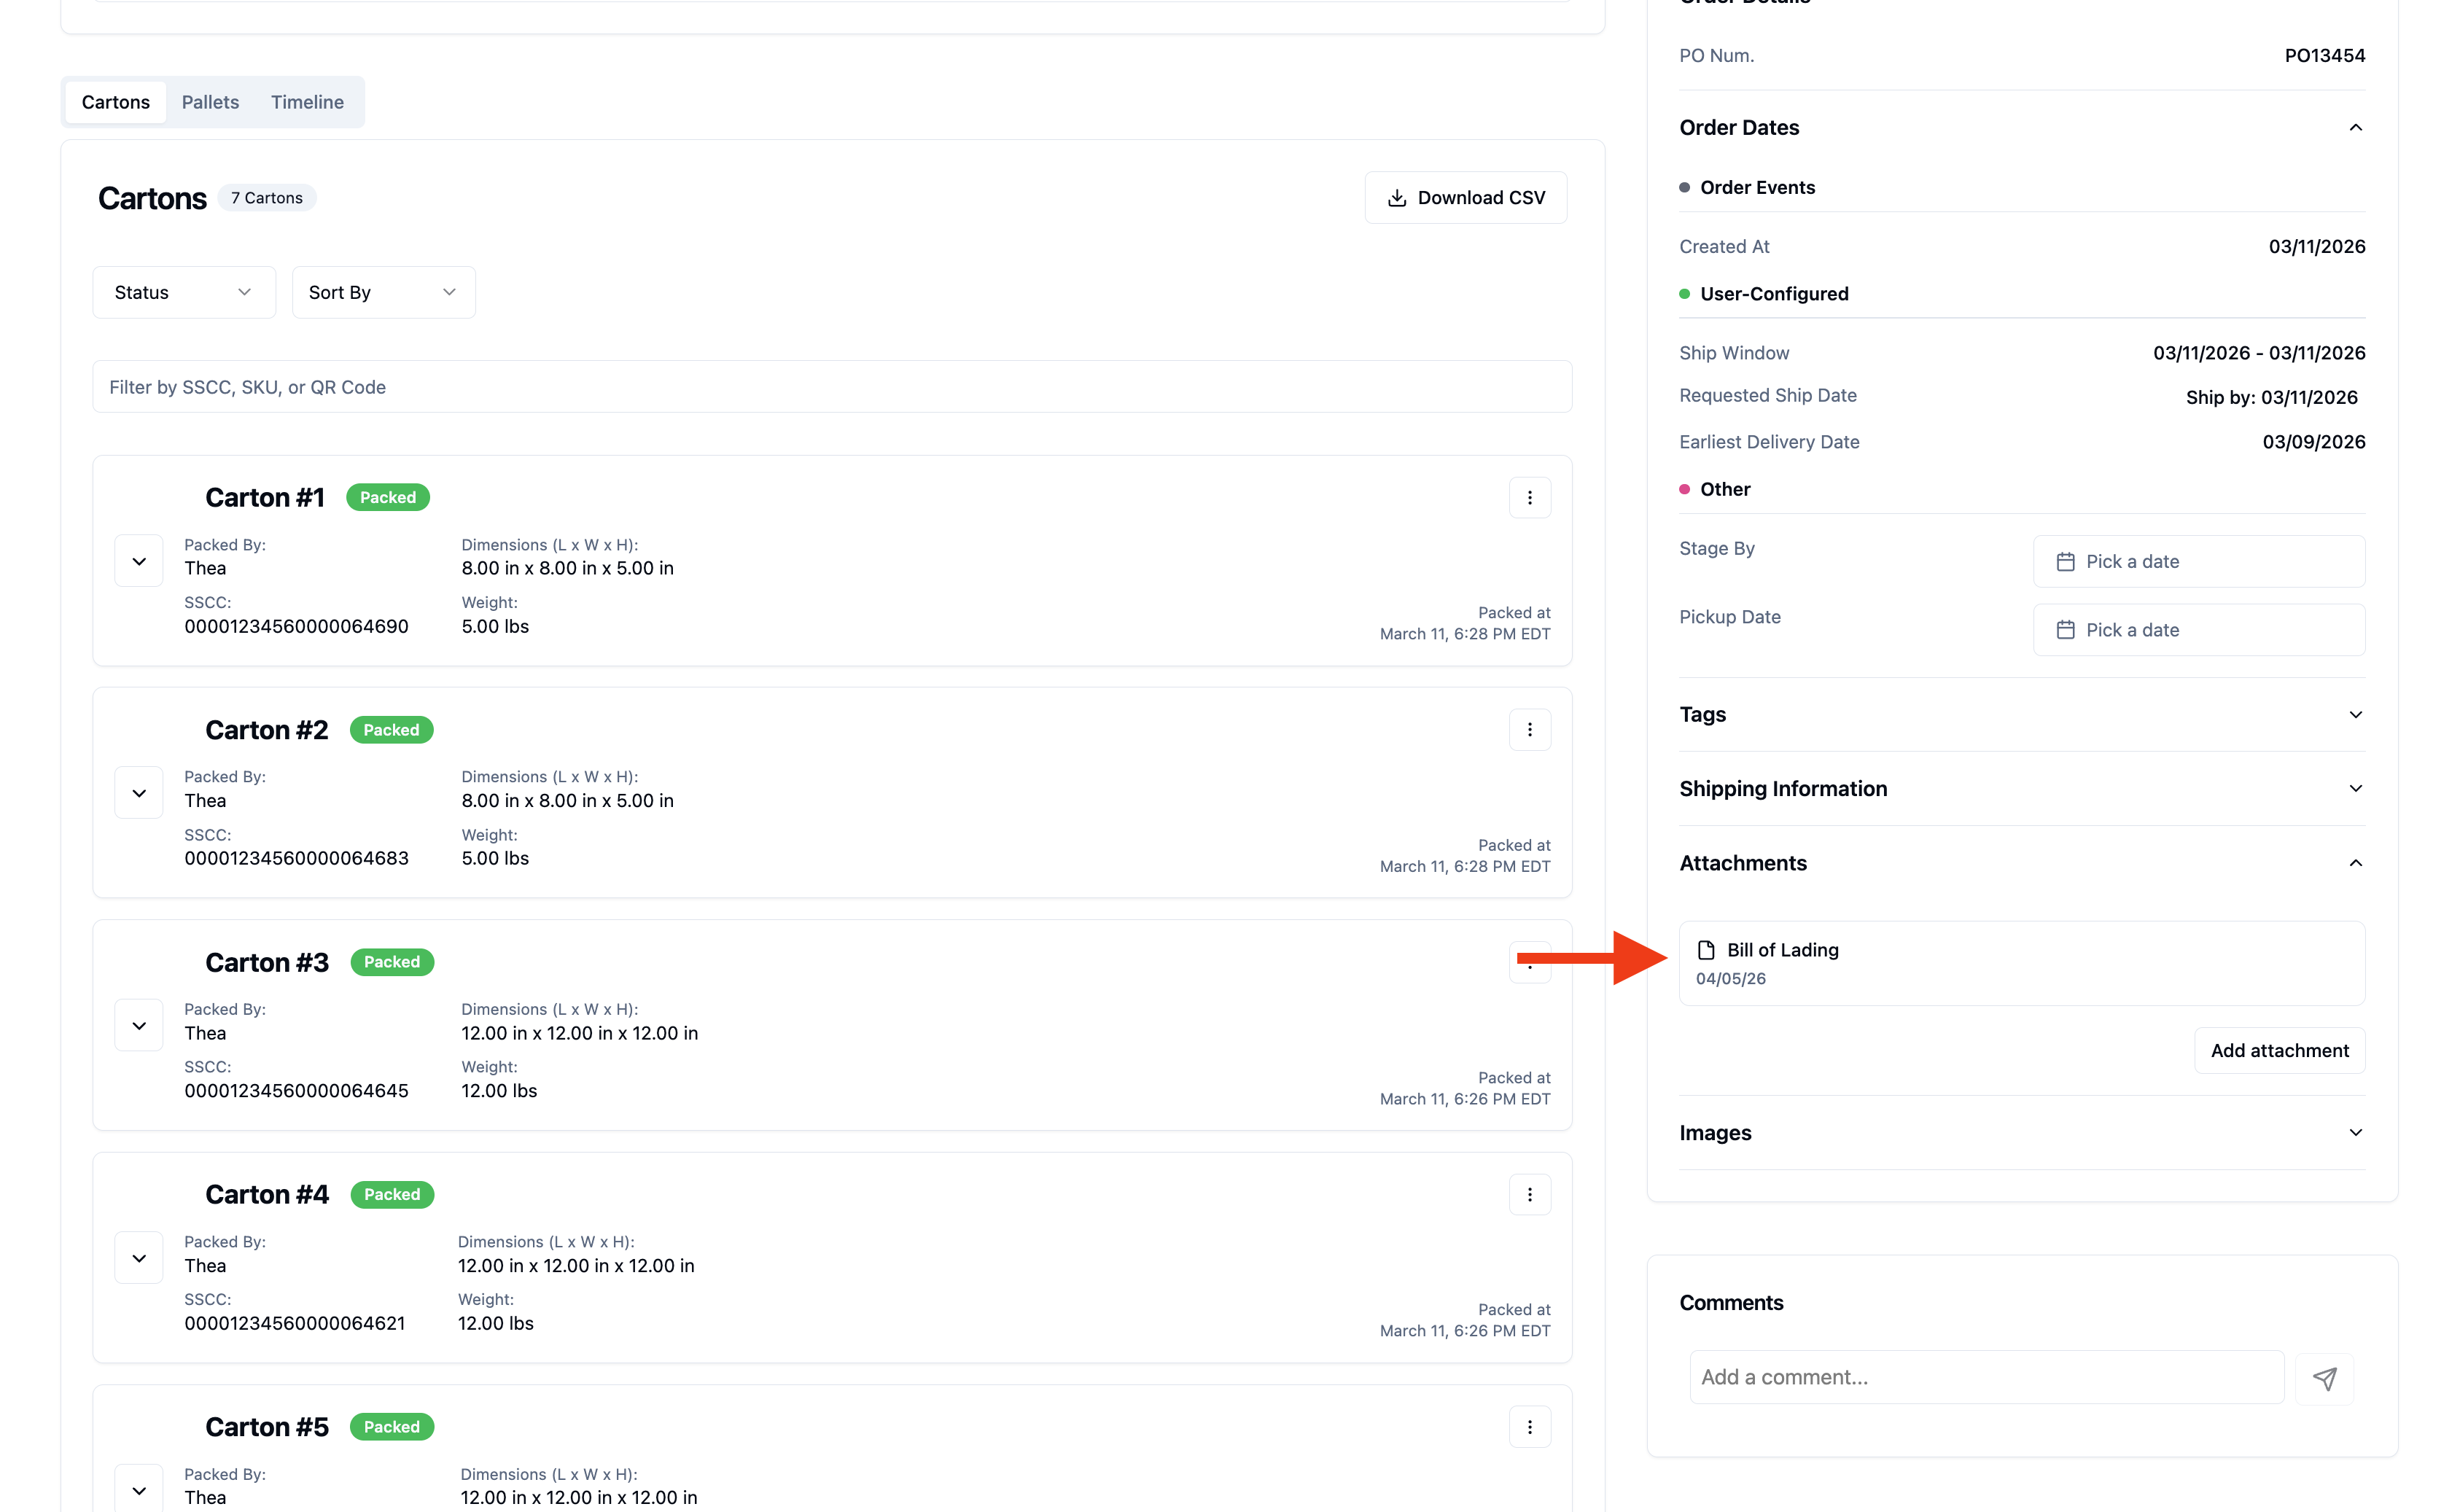
Download and print BOL
Option B: Carrier-provided BOL
Log into your carrier's portal and download the BOL from there, or locate the BOL in the email sent by your carrier.
Print the BOL.
On the app, take a photo of the signed BOL and tap 'Done'.
The RetailReady app will prompt you to upload the signed BOL on the Upload Documents screen. Tap the '+' in the Signed BOL field, take photo(s) of the signed document (ensure it is legible), then tap 'Done' to complete the order.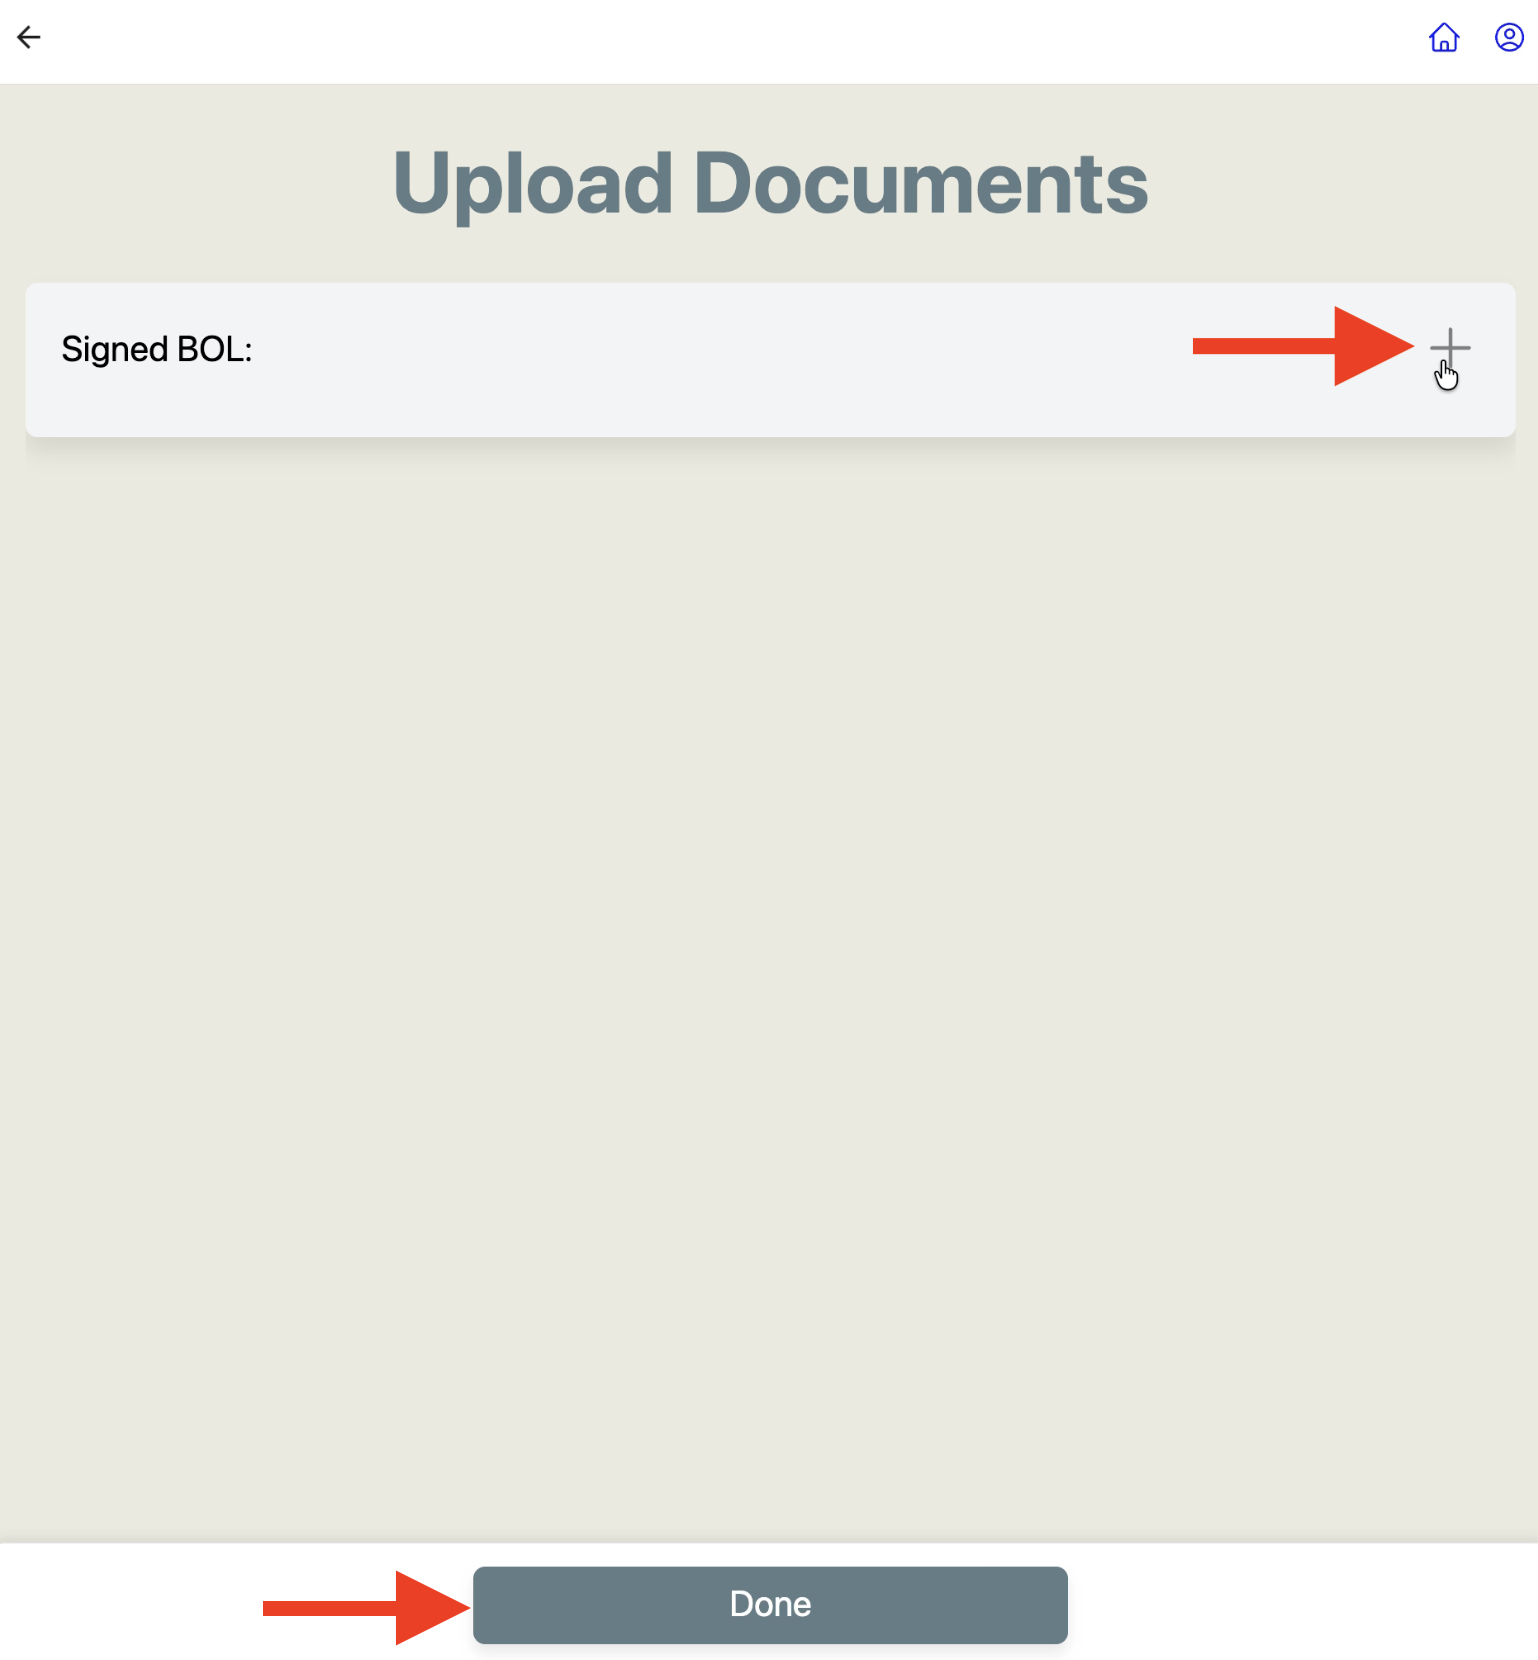
SUCCESS — Order complete
Once all pallets are scanned, loaded, and photos submitted, you will receive a SUCCESS screen, click 'Done'. The order is now complete.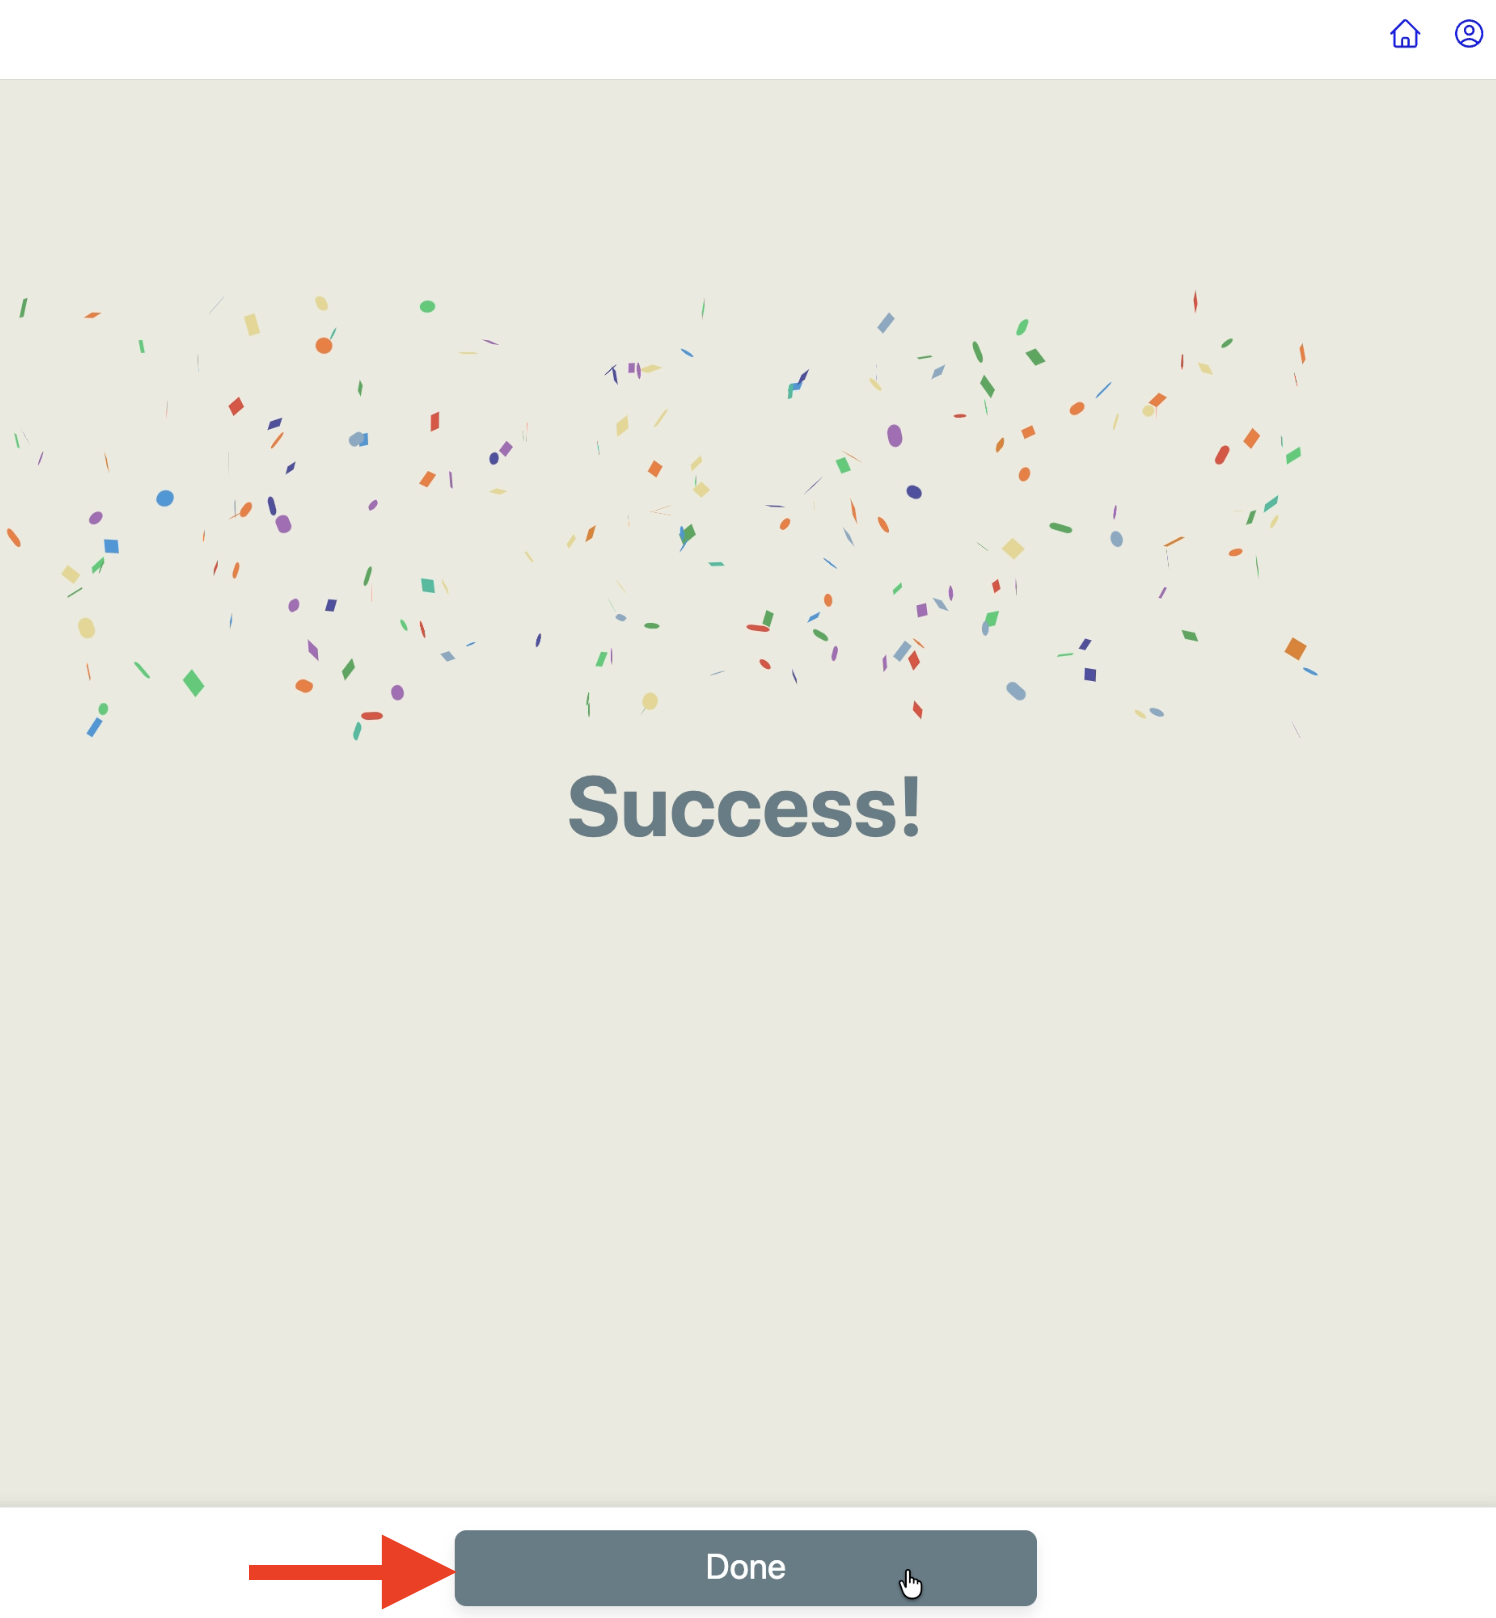
FAQ
What is the packing slip and where does it go on the pallet?
The packing slip is a document listing the order contents.
If using Tablet Mode on a desktop: On the Pallet Rules screen, tap "Print" next to "Add packing slip to pallet" to print it.
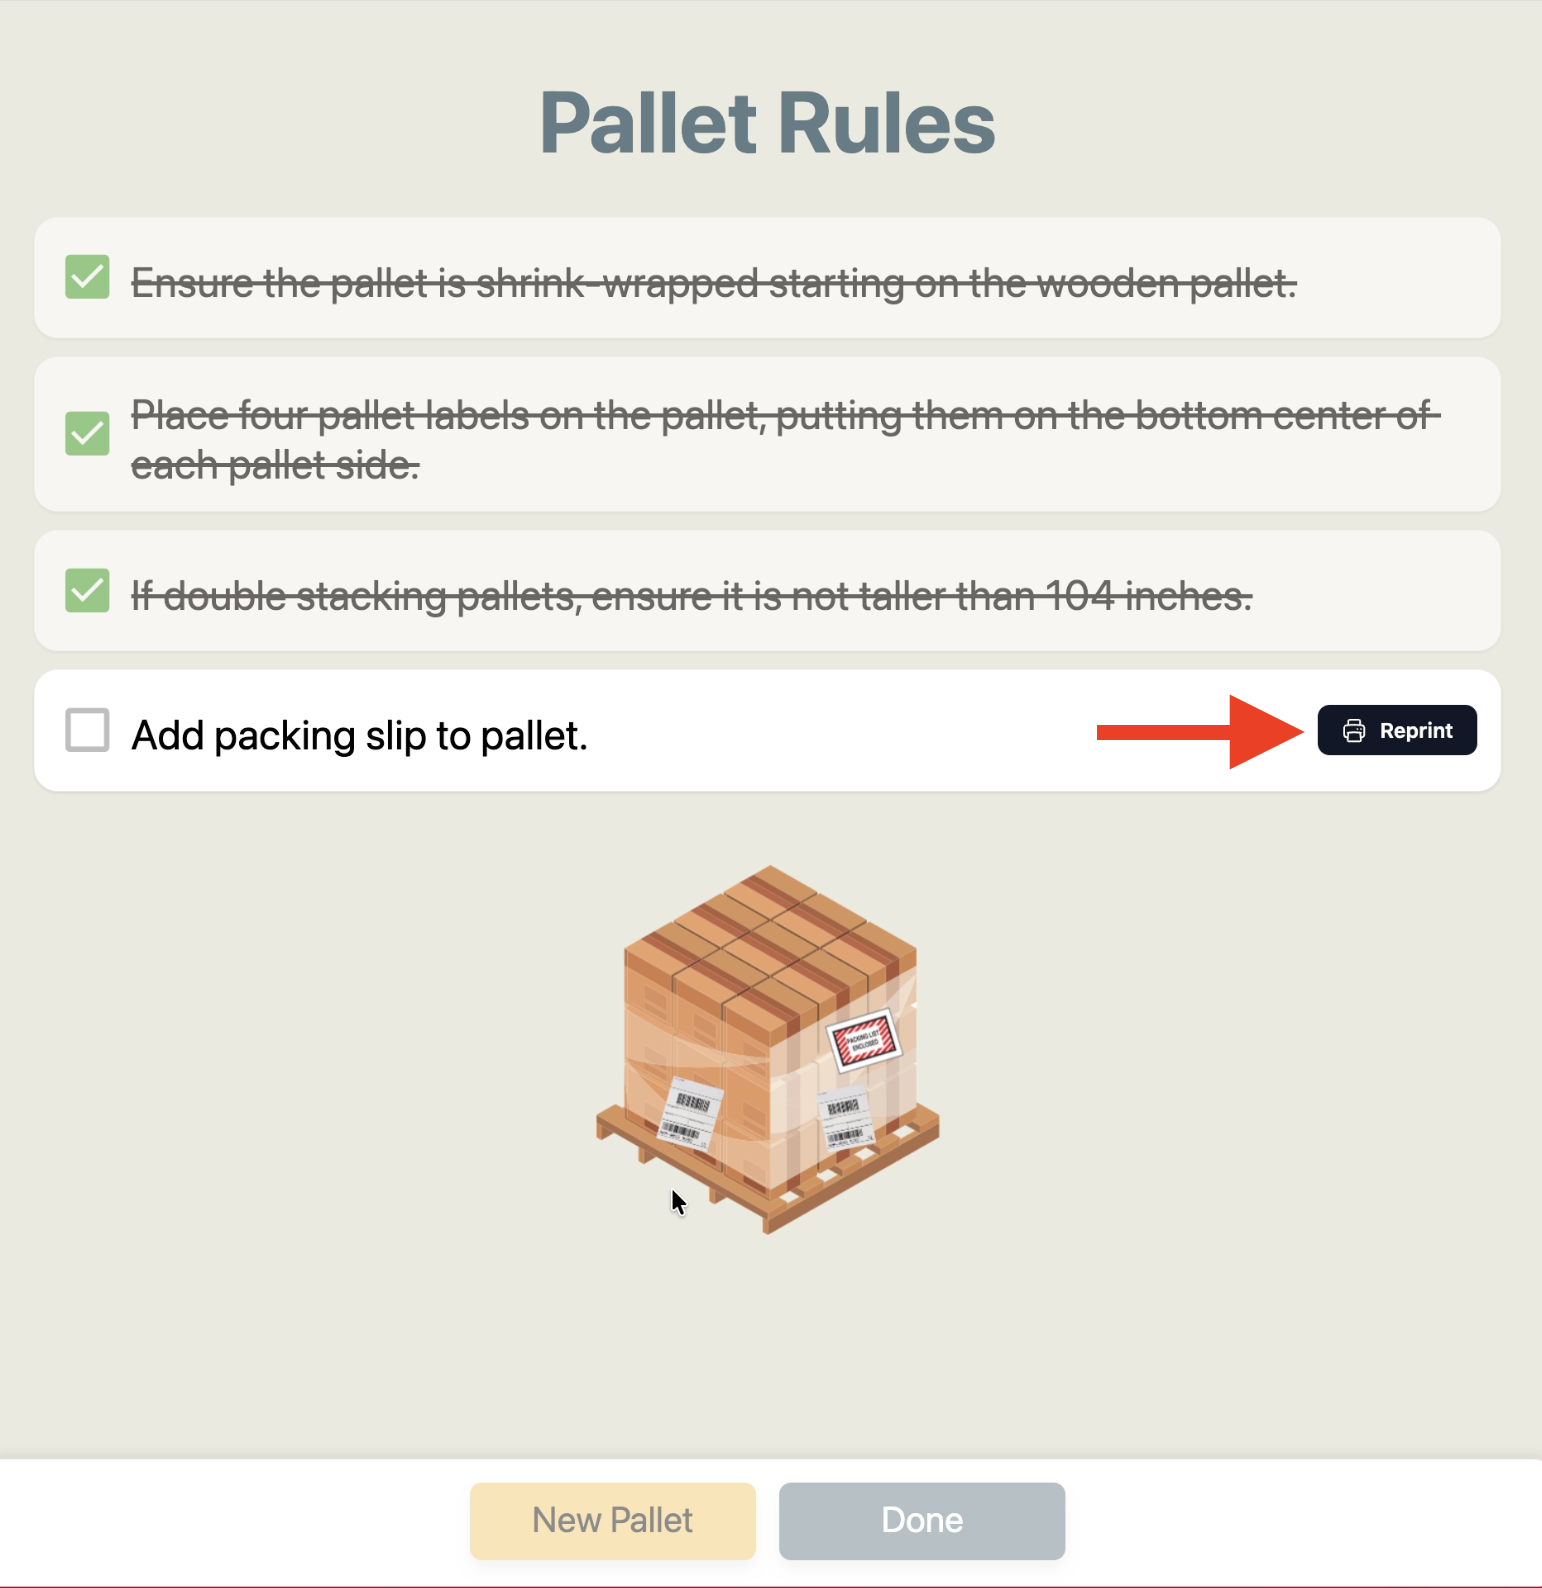
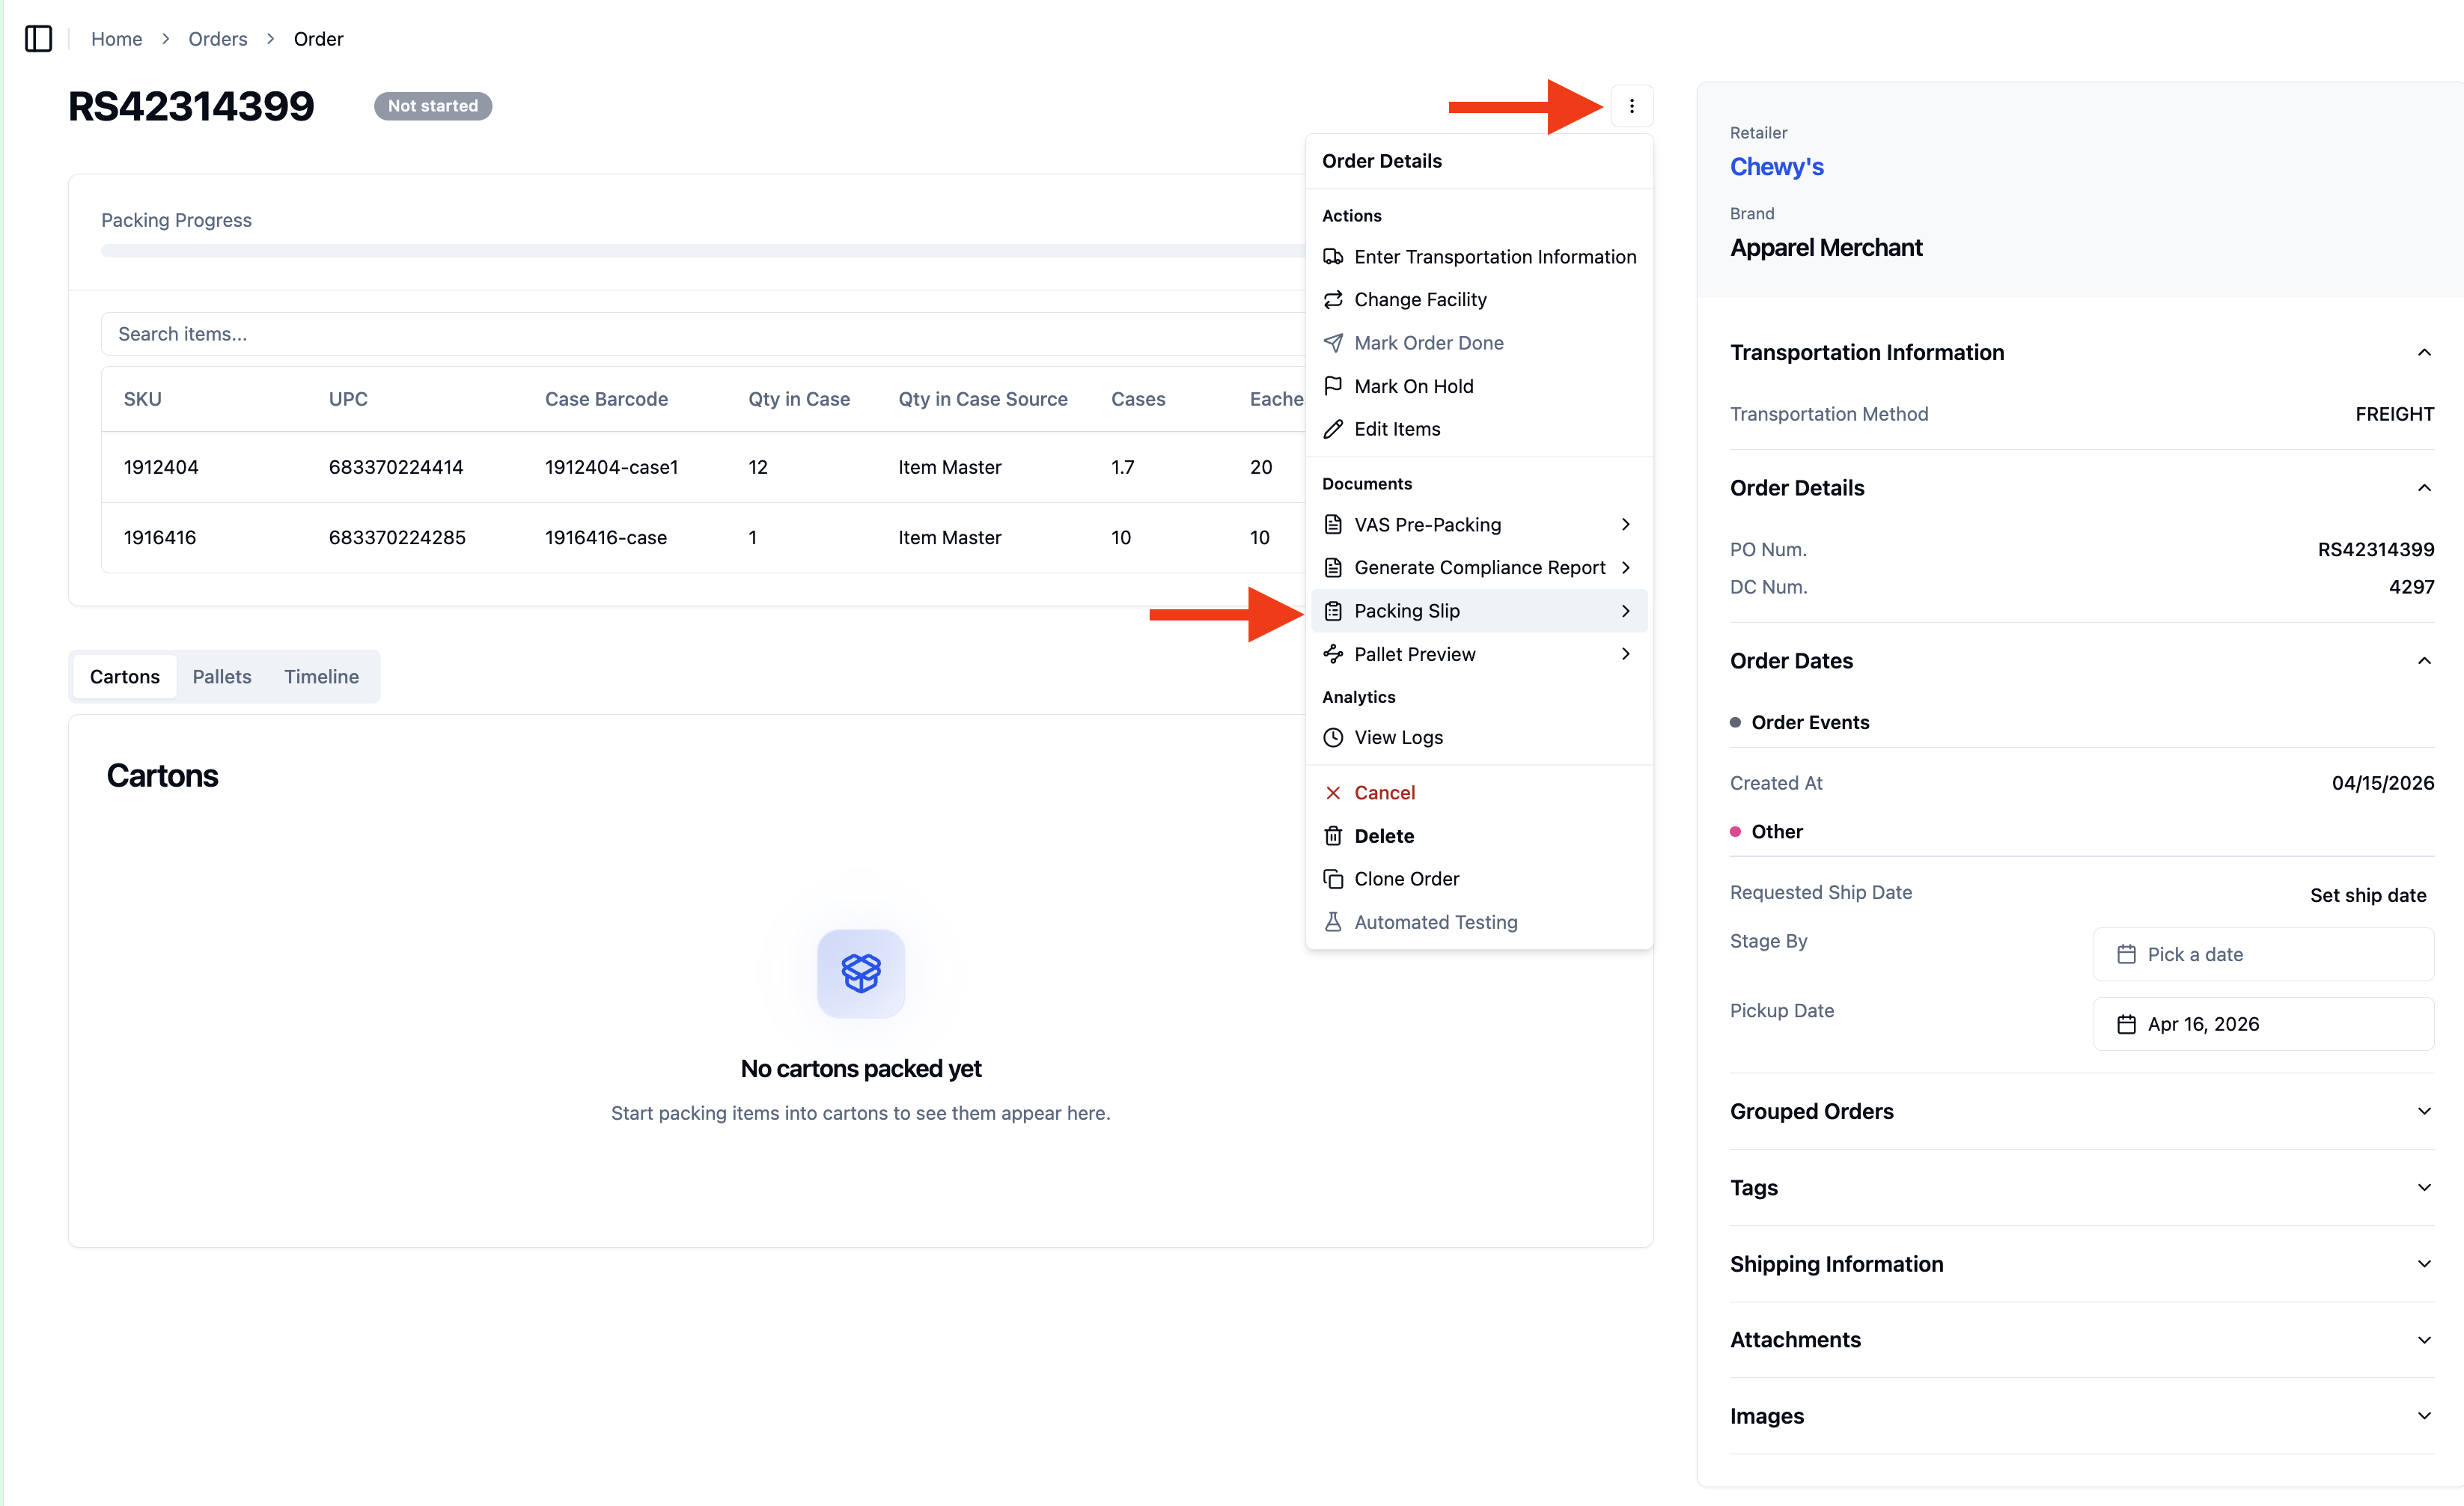
If using the iPad app: From the RetailReady dashboard, click 'Orders' and open your order. Click the three-dot menu and select 'Packing Slip to download and print it.
Who creates the load in the RetailReady dashboard and when?
The load is created in the RetailReady dashboard after all pallets are staged. This is typically done by the 3PL, anyone with Lead user access or higher can create a load. A Brand user can also create a load. The order cannot advance to the Ship Order step until the load is created.
Can I resume a partially packed pallet if I need to stop mid-order?
Yes. On the Prepare Pallet screen, tap 'Or scan existing pallet to resume' and scan the existing pallet's QR code. RetailReady will resume from where you left off on that pallet.